Rabbitmq - messaging service that just works
<slideshow style="nobleprog" headingmark="⌘" incmark="…" scaled="true" font="Trebuchet MS" >
- title
- Rabbitmq ….messaging service that just works!!
- author
- Deepak Gupta
</slideshow>
1.Introduction to RabbitMQ ⌘
Agenda:
- Setting up the required folders
- Downloading and installing RabbitMQ
What is RabbitMQ ⌘
RabbitMQ is a message-queueing software called a message broker or queue manager. Simply said; It is a software where queues can be defined, applications may connect to the queue and transfer a message onto it.

Features of RabbitMQ ⌘
- Robust yet easy to use messaging broker service for applications.
- Also referred as message-oriented middleware
- Rabbitmq implements Advanced Messaging Queue Protocol(AMQP).
- Rabbitmq server is written in Erlang programming language
- built on top of Open Telecom Platform framework for clustering and failover
- Client libraries to interface with the broker are available for all major programming languages
- Besides being open source, rabbitmq is also commercially supported
Firewall Settings(Listening ports): ⌘
amqp - 5672
clustering - 25672
management nodes - 15672
How do we install rabbitmq? ⌘
Prerequisites:
- Network connection between nodes must be reliable.
- All nodes must run the same version of Erlang and RabbitMQ.
- All TCP ports should be open between nodes, see the firewall section above.
RabbitMQ Directory Structure ⌘
|
|
Host entries across the nodes should be the same: ⌘
In the /etc/hosts file of your system, append the hostname corresponding to the IP address, and the same data should be present across all the machines in the cluster to maintain uniformity. e.g. we have 3 machines:
- a.b.c.d with hostname as rabbitmq1
- e.f.g.h with hostname as rabbitmq2
- i.j.k.l with hostname as rabbitmq3
then in the /etc/hosts on all the 3 machines, add the below lines:
- a.b.c.d rabbitmq1
- e.f.g.h rabbitmq2
- i.j.k.l rabbitmq3
and that should suffice to solve your issues with host entries. Rabbitmq is very sensitive towards hostnames, hence this step is of quiet importance. Once done, do verify if the nodes are ping-able from every node.
Installing rabbitmq-server ⌘
- sudo apt-get install -fy erlang-nox python-pip git-core python-setuptools git-core
- wget https://www.rabbitmq.com/releases/rabbitmq-server/v3.5.6/rabbitmq-server_3.5.6-1_all.deb
- sudo dpkg -i rabbitmq-server_3.5.6-1_all.deb
and there you go, your rabbitmq-server should be up and running. You can verify this by the below command: sudo service rabbitmq-server status
Installing RabbitMQ Client Library(Python) ⌘
sudo pip install pika
RabbitMQ Basic Architecture ⌘

RabbitMQ Basic Architecture - The Components ⌘
- Publisher
- Exchange
- Broker
- Consumer
- Queue
- Message
- Connection
- Channel
- Exchange
- Binding
- Routing Key
- AMQP
- User
- Vhost/Virtual Hosts
RabbitMQ Architecture/Components ⌘
👀 some important concepts before we dive into deeper concepts:
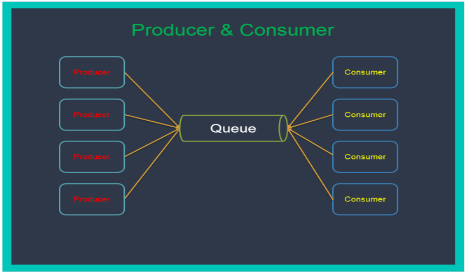
Producer: Application that sends the messages.
Consumer: Application that receives the messages.
Queue: Buffer that stores messages.
Message: Information that is sent from the producer to a consumer through RabbitMQ.
Connection: TCP connection between application and the RabbitMQ broker.
Channel: Virtual connection inside a connection, which allows publishing or consuming messages or subscribing to a queue.
Exchange: Receives messages from producers and pushes them to queues depending on rules defined by the exchange type. In order to receive messages, a queue needs to be bound to at least one exchange.
Binding: Link between a queue and an exchange.
Routing key: key that the exchange looks at to decide how to route the message to queues.
RabbitMQ Architecture/Components ⌘
AMQP: AMQP (Advanced Message Queuing Protocol) is the protocol used by RabbitMQ for messaging. Users: It is possible to connect to RabbitMQ with a given username and password. Every user can be assigned permissions such as rights to read, write and configure privileges within the instance. Users can also be assigned permissions to specific virtual hosts.
Vhost, virtual host: A Virtual host provides a way to segregate applications using the same RabbitMQ instance. Different users can have different access privileges to different vhosts and queues, and exchanges can be created so they only exists in one vhost.”
2. Understanding Messaging ⌘
Agenda:
- Role of a consumer
- Role of a producer
- Binding consumers and producers
- Messages and durability
- How to verify delivery
Role of a producer/consumer ⌘

Binding consumers and producers ⌘
Error creating thumbnail: File missing
Messages and durability ⌘
We'll look into how to use the various features of AMQP and RabbitMQ to achieve reliable delivery - to ensure that messages are always delivered, even encountering failure in any part of the existing system. What Can Fail?
- Network fail
- Firewalls can interrupt idle connections
- Hardware Failures
- Software Failures
- Logical Errors
Message Acknowledgements ⌘
1. Acknowledgements and Confirms - When a connection fails, messages may be in transit between client and server - they may be in the middle of being parsed or generated, in OS buffers, or on the wire. Messages in transit will be lost - they will need to be retransmitted. Acknowledgements let the server and clients know when to do this.
2. Acknowledgements can be used in both directions - to allow a consumer to indicate to the server that it has received / processed a message and to allow the server to indicate the same thing to the producer. RabbitMQ refers to the latter case as a "confirm". Even though the communication happens at TCP(Network Layer), which ensure messages are delivered, if not it will re-deliver. But this is good for network layer, where the acknowledgements and confirms indicate that messages have been received and have been acted upon and ensure the transfer of ownership.
3. Acknowledgements therefore have semantics - a consuming application should not acknowledge messages until it has done whatever it needs to do with them.
4. Use of acknowledgements guarantees at-least-once delivery. Without acknowledgements, message loss is possible during publish and consume operations and only at-most-once delivery is guaranteed.
How to verify delivery ⌘
Systems using messaging broker such as RabbitMQ are by definition distributed. Since protocol methods (messages) sent are not guaranteed to reach the peer or be successfully processed by it, both publishers and consumers need a mechanism for delivery and processing confirmation. Several messaging protocols supported by RabbitMQ provide such features.
Delivery processing acknowledgements from consumers to RabbitMQ are known as acknowledgements and the broker acknowledgements to publishers are a protocol extension called publisher confirms.
Sample Code Snippet ⌘
- !/usr/bin/env python
import pika
credentials = pika.PlainCredentials('admin', 'admin') connection = pika.BlockingConnection(pika.ConnectionParameters(
host="192.168.33.101", port=5672, credentials=credentials))
print "\n Trying connect \n" channel = connection.channel()
msg_props = pika.BasicProperties() msg_props.content_type = "text/plain" channel.queue_declare(queue='hello') if channel.basic_publish(exchange=,
                        routing_key='hello',
                        body='Hello World!',
                        properties=msg_props):
   print "Message Acknowledged"
else:
print "Message Lost"
print(" [x] Sent 'Hello World!'") connection.close()
Consumer Delivery Acknowledgements ⌘
When RabbitMQ delivers a message to a consumer, it needs to know when to consider the message successfully sent. What kind of logic is optimal depends on the system. It is therefore primarily an application decision. In AMQP 0-9-1 it is made when a consumer is registered using the basic.consume method or a message is fetched on demand with the basic.get method.
1. Delivery Identifiers: Delivery Tags - When a consumer (subscription) is registered, messages will be delivered (pushed) by RabbitMQ using the basic.deliver method. The method carries a delivery tag, which uniquely identifies the delivery on a channel. Delivery tags are therefore scoped per channel. Delivery tags are monotonically growing positive integers and are presented as such by client libraries. Client library methods that acknowledge deliveries take a delivery tag as an argument.
2. Acknowledgement Modes: Depending on the acknowledgement modes set, rabbitmq will consider a message to be successfully delivered. When in TCP then immediately after it sends a message or when an explicit client acknowledgement is used.
basic.ack is used for positive acknowledgements
basic.nack is used for negative acknowledgements (note: this is a RabbitMQ extension to AMQP 0-9-1)
basic.reject is used for negative acknowledgements but has one limitations compared to basic.nack
Consumer Delivery Acknowledgements ⌘
3. Multiple Acknowledgements at once: batched to reduce network traffic done by setting the multiple field of acknowledgement methods (see above) to true. When the multiple field is set to , RabbitMQ will acknowledge all outstanding delivery tags up to and including the tag specified in the acknowledgement. 4. Channel Prefetch Setting (QoS): Used to limit the number of unacknowledged messages. done by setting a "prefetch count" value using the basic.qos method. The value defines the max number of unacknowledged deliveries that are permitted on a channel. Once the number reaches the configured count, RabbitMQ will stop delivering more messages on the channel unless at least one of the outstanding ones is acknowledged. 5. Client Errors: Double Acking and Unknown Tags: Should a client acknowledge the same delivery tag more than once, RabbitMQ will result a channel error such as PRECONDITION_FAILED - unknown delivery tag 100. The same channel exception will be thrown if an unknown delivery tag is used.
Publisher Confirms: ⌘
only way to guarantee that a message isn't lost is by using transactions -- make the channel transactional, publish the message, commit. In this case, transactions are unnecessarily heavyweight and decrease throughput by a factor of 250. To remedy this, a confirmation mechanism was introduced. It mimics the consumer acknowledgements mechanism already present in the protocol.
To enable confirms, a client sends the confirm.select method. Depending on whether no-wait was set or not, the broker may respond with a confirm.select-ok. Once the confirm.select method is used on a channel, it is said to be in confirm mode. A transactional channel cannot be put into confirm mode and once a channel is in confirm mode, it cannot be made transactional.
Once a channel is in confirm mode, both the broker and the client count messages (counting starts at 1 on the first confirm.select). The broker then confirms messages as it handles them by sending a basic.ack on the same channel. The delivery-tag field contains the sequence number of the confirmed message. The broker may also set the multiple field in basic.ack to indicate that all messages up to and including the one with the sequence number have been handled.
1. Negative Acknowledgements: when the broker is unable to handle messages successfully, instead of a basic.ack, the broker will send a basic.nack. In this context, fields of the basic.nack have the same meaning as the corresponding ones in basic.ack and the requeue field should be ignored.
2.
3. Administering RabbitMQ ⌘
Agenda:
Starting and stopping nodes
RabbitMQ configuration files
How to manage privileges
Viewing statistics and analyzing logs
Sending alerts
How to set-up parallel processing
Rabbitmqctl commands: ⌘
rabbitmqctl stop
rabbitmqctl stop_app
rabbitmqctl start_app
rabbitmqctl reset
rabbitmqctl cluster_status
rabbitmqctl add_user tonyg changeit
rabbitmqctl delete_user tonyg
rabbitmqctl change_password tonyg newpass
rabbitmqctl clear_password tonyg
rabbitmqctl set_user_tags tonyg administrator
rabbitmqctl set_user_tags tonyg
rabbitmqctl list_users
rabbitmqctl add_vhost test
rabbitmqctl delete_vhost test
rabbitmqctl list_vhosts name tracing
rabbitmqctl set_permissions -p /myvhost tonyg "^tonyg-.*" ".*" ".*"
rabbitmqctl clear_permissions -p /myvhost tonyg
rabbitmqctl list_permissions -p /myvhost
rabbitmqctl list_user_permissions tonyg
Rabbitmq commands continued... ⌘
rabbitmqctl set_parameter federation local_username '"guest"'
rabbitmqctl clear_parameter federation local_username
rabbitmqctl list_parameters
rabbitmqctl set_policy federate-me "^amq." '{"federation-upstream-set":"all"}'
rabbitmqctl clear_policy federate-me
rabbitmqctl list_policies
rabbitmqctl list_queues -p /myvhost messages consumers
rabbitmqctl list_exchanges -p /myvhost name type
rabbitmqctl list_bindings -p /myvhost exchange_name queue_name
rabbitmqctl list_connections send_pend port
rabbitmqctl list_channels connection messages_unacknowledged
rabbitmqctl status
rabbitmqctl node_health_check -n rabbit@stringer
rabbitmqctl report > server_report.txt
rabbitmqctl eval 'node().'
Starting and stopping nodes ⌘
- To start a rabbitmq node - rabbitmqctl start
- To stop a rabbitmq node - rabbitmqctl stop
RabbitMQ configuration files ⌘
https://www.rabbitmq.com/configure.html RabbitMQ provides three general ways to customise the server:
- environment variables - define ports, file locations and names (taken from the shell, or set in the environment configuration file,rabbitmq-env.conf/rabbitmq-env-conf.bat)
- configuration file - defines server component settings for permissions, limits and clusters, and also plugin settings.
- runtime parameters and policies - defines cluster-wide settings which can change at run time
On Unix-based systems (including Linux, MacOSX) you can create/edit rabbitmq-env.conf to define environment variables. Its location is configurable using the RABBITMQ_CONF_ENV_FILE environment variable.
How to manage privileges ⌘
- sudo rabbitmqctl add_user <user id> <password>
- sudo rabbitmqctl set_user_tags <user id> administrator
- sudo rabbitmqctl set_permissions -p / <user id> ".*" ".*" ".*"
Viewing statistics ⌘
There are 2 ways to views the stats of your rabbitmq cluster, either via the rabbitmq plugin or via the http api provided by rabbitmq itself
https://pulse.mozilla.org/doc/stats.html -
http://192.168.33.101:15672/api/overview -
http://192.168.33.101:15672/api/nodes -
http://192.168.33.101:15672/api/nodes/rabbit@mqslave2 -
http://192.168.33.101:15672/api/connections -
http://192.168.33.101:15672/api/channels -
http://192.168.33.101:15672/api/channels/<name> -
http://192.168.33.101:15672/api/exchanges -
http://192.168.33.101:15672/api/exchanges/<name> -
/api/queues
/api/vhosts/
Analyzing logs ⌘
Check via the below command to verify whether a broker is running rabbitmqctl status
1. broker log file contains entries similar to Connection attempt from disallowed node… - make sure the erlang cookies are the same
2. =INFO REPORT==== 8-Nov-2016::15:03:26 === accepting AMQP connection <0.27270.101> (192.168.33.8:36503 -> 192.168.33.101:5672)
3. =INFO REPORT==== 8-Nov-2016::15:03:26 === closing AMQP connection <0.27270.101> (192.168.33.8:36503 -> 192.168.33.101:5672)
4. =WARNING REPORT==== 8-Nov-2016::16:54:56 === closing AMQP connection <0.27388.101> (192.168.33.1:64438 -> 192.168.33.101:5672): client unexpectedly closed TCP connection
5. =WARNING REPORT==== 10-Nov-2016::14:11:03 === HTTP access denied: user 'guest' - User can only log in via localhost
6. =ERROR REPORT==== 10-Nov-2016::14:11:03 === webmachine error: path="/api/vhosts" "Unauthorized"
7. =INFO REPORT==== 10-Nov-2016::16:04:49 === Adding vhost 'foo'
8. =WARNING REPORT==== 10-Nov-2016::16:06:07 === HTTP access denied: user 'admin' - User not authorised to access virtual host
9. =ERROR REPORT==== 10-Nov-2016::16:06:07 === webmachine error: path="/api/exchanges/foo" "Unauthorized"
Analyzing logs continued.. ⌘
10. =INFO REPORT==== 5-Nov-2016::19:53:13 === Mirrored queue 'hello' in vhost '/': Synchronising: all slaves already synced
11. =INFO REPORT==== 5-Nov-2016::19:53:13 === Mirrored queue 'hello' in vhost '/': Synchronising: 0 messages to synchronise
12. =INFO REPORT==== 5-Nov-2016::19:53:13 === Mirrored queue 'hello' in vhost '/': Synchronising: batch size: 4096
Sending alerts ⌘
Two circumstances under which RabbitMQ will stop reading from client network sockets, in order to prevent crashes. They are:
- Memory use goes above the configured limit.
- Disk space drops below the configured limit.
In either of the two above cases, the server will temporarily block connections and pause reading from the sockets of connected clients which publish messages. Connection heartbeat monitoring will be disabled as well.
memory and disk alarms are cluster-wide in a rabbitmq cluster. If one node goes over the limit then all nodes will block connections with the intent to stop producers but let consumers continue unaffected.
Configuring Memory Thresholds ⌘
Configuring the High Watermark parameter:
The memory threshold at which the flow control is triggered(high watermark) can be adjusted by editing the configuration file.
[{rabbit, [{vm_memory_high_watermark, 0.4}]}].
The default value of 0.4 stands for 40% of installed RAM or 40% of available virtual address space, whichever is smaller.
Alternatively, the memory threshold can be adjusted by setting an absolute limit of RAM used by the node.
[{rabbit, [{vm_memory_high_watermark, {absolute, 1073741824}}]}]. [{rabbit, [{vm_memory_high_watermark, {absolute, "1024MiB"}}]}].
The memory limit is appended to the RABBITMQ_NODENAME.log file when the RabbitMQ server starts:
-INFO REPORT---- 29-Oct-2009::15:43:27 --- Memory limit set to 2048MB.
The memory limit may also be queried using the “rabbitmqctl status command”
The threshold can be changed while the broker is running using the
rabbitmqctl set_vm_memory_high_watermark fraction command or
rabbitmqctl set_vm_memory_high_watermark absolute memory_limit command
Configuring Memory Thresholds continued... ⌘
Configuring the paging thresholds:
Before the broker hits the high watermark and blocks publishers, it attempts to free up memory by instructing queues to page their contents out to disc.
By default this starts to happen when the broker is 50% of the way to the high watermark (i.e. with a default high watermark of 0.4, this is when 20% of memory is used). To change this value, modify the
vm_memory_high_watermark_paging_ratio configuration from its default value of 0.5. using the below command
[{rabbit, [{vm_memory_high_watermark_paging_ratio, 0.75},{vm_memory_high_watermark, 0.4}]}].
Configuring Disk Thresholds ⌘
RabbitMQ blocks producers, and prevent memory-based messages from being paged to disk, when free disk space drops below 50MB.
Global flow control will be triggered if the amount of free disk space drops below a configured limit. The free space of the drive or partition that the broker database uses will be monitored at least every 10 seconds to determine whether the alarm should be raised or cleared.
The disk free space limit is configured with the disk_free_limit setting. By default 50MB is required to be free on the database partition. Use the below command to alter these settings.
[{rabbit, [{disk_free_limit, 1000000000}]}]. or
[{rabbit, [{disk_free_limit, “1GB”}]}].
How to set-up parallel processing ⌘
Refer: https://www.rabbitmq.com/tutorials/tutorial-two-python.html
Work Queue are used to distribute time-consuming tasks among multiple workers.
Idea behind Work Queues or Task Queues is to avoid doing a resource-intensive task immediately and having to wait for it to complete.
This is useful in web applications where it's impossible to handle a complex task during a short HTTP request window. If we are building up a backlog of work, we can just add more workers and that way, scale easily.
The basic advantage of the Work or Task queue is the Round Robin Dispatching, where the
Sample producer code snippet ⌘
- !/usr/bin/env python
import pika import sys
credentials = pika.PlainCredentials('admin', 'admin') # specifying the credentials connection = pika.BlockingConnection(pika.ConnectionParameters(
host="192.168.33.101", port=5672, credentials=credentials)) # Initialinzing the connection
channel = connection.channel() # Creating channel channel.queue_declare(queue='task_queue', durable=True) # Queue Declaration message = ' '.join(sys.argv[1:]) or "Hello World!" # Forming the message based on the user input channel.basic_publish(exchange=,
                     routing_key='task_queue',
                     body=message,
                     properties=pika.BasicProperties(
                        delivery_mode = 2, # make message persistent
                     )) # Publishing the message
print(" [x] Sent %r" % message) connection.close()
Code snippet for consumer ⌘
- !/usr/bin/env python
import pika import time
credentials = pika.PlainCredentials('admin', 'admin') # specifying the credentials connection = pika.BlockingConnection(pika.ConnectionParameters(
host="192.168.33.101", port=5672, credentials=credentials)) # Initialinzing the connection
channel = connection.channel() # Creating channel
channel.queue_declare(queue='task_queue', durable=True) # Queue Declaration print(' [*] Waiting for messages. To exit press CTRL+C')
def callback(ch, method, properties, body):
   print(" [x] Received %r" % body)
   time.sleep(body.count(b'.')) # sleeps for the number of dots entered by user
   print(" [x] Done")
   ch.basic_ack(delivery_tag=method.delivery_tag)
channel.basic_qos(prefetch_count=1) channel.basic_consume(callback,
queue='task_queue')
channel.start_consuming() # Start consuming
4. High availability with cluster ⌘
Agenda:
Architecture of a cluster
Queues in a cluster
Setting up a test cluster
Distributing the nodes to more machines
How to preserve message mirrored queues
Architecture of a cluster ⌘
Error creating thumbnail: File missing
Queues in a cluster ⌘
Messages published to the queue are replicated to all slaves.
Consumers are connected to the master regardless of which node they connect to, with slaves dropping messages that have been acknowledged at the master.
Queue mirroring therefore enhances availability, but does not distribute load across nodes (all participating nodes each do all the work). Queues have mirroring enabled via policy and policies can change at any time.
It is valid to create a non-mirrored queue, and then make it mirrored at some later point (and vice versa). There is a difference between a mirrored queue and a non-mirrored queue which does not have any slaves - the later lacks the extra mirroring infrastructure and will run faster.
Every queue in RabbitMQ has a home node. That node is called queue master. All queue operations go through the master first and then are replicated to mirrors. This is necessary to guarantee FIFO ordering of messages.
Queue Mirroring Policy: ⌘
| HA-mode | HA-policy | Description |
|---|---|---|
|
|
|
Setting up a test cluster ⌘
- sudo apt-get install -fy erlang-nox python-pip git-core python-setuptools git-core
- sudo pip install pika==0.10.0 or pip install pika==0.10.0(if using virtual-env)
- wget https://www.rabbitmq.com/releases/rabbitmq-server/v3.5.6/rabbitmq-server_3.5.6-1_all.deb
- sudo dpkg -i rabbitmq-server_3.5.6-1_all.deb
Synchronizing the erlang.cookie file across all the machines:
This is again a very important step for setting up rabbitmq cluster. The file itself is storing the value without a carriage return nor a line feed. This value needs to go into the slaves the same way as it is on the master. First stop the rabbitmq-server on all the slave machines using the below command:
- sudo service rabbitmq-server stop
- echo -n "<contents of .erlang.cookie form master server>" > /var/lib/rabbitmq/.erlang.cookie
eg: echo -n "DQRRLCTUGOBCRFNPIABC" > /var/lib/rabbitmq/.erlang.cookie
The file should be exactly the same as it is on the master server also ensuring that the permission level for all these file is "400" and the ownership of this file remains with rabbitmq user.
Rabbitmq uses mnesia db as it's default, make sure you delete mnesia before starting rabbitmqserver:
sudo rm -rf /var/lib/rabbitmq/mnesia
Distributing the nodes to more machines ⌘
RabbitMQ nodes and CLI tools (e.g. rabbitmqctl) use a cookie to determine whether they are allowed to communicate with each other.
For two nodes to be able to communicate they must have the same shared secret called the Erlang cookie. The cookie is just a string of alphanumeric characters.
It can be as long or short as you like.
Every cluster node must have the same cookie.
Erlang VM will automatically create a random cookie file when the RabbitMQ server starts up. The easiest way to proceed is to allow one node to create the file, and then copy it to all the other nodes in the cluster.
On Unix systems, the cookie will be typically located in /var/lib/rabbitmq/.erlang.cookie or$HOME/.erlang.cookie.
- sudo rabbitmqctl stop_app
- sudo rabbitmqctl reset
- sudo rabbitmqctl join_cluster rabbit@rabbitmq1 (assuming rabbitmq1 as master)
- sudo rabbitmqctl start_app
How to preserve messages: mirrored queues ⌘
Mirrored queue implementation and semantics:
For each mirrored queue there is one master and several slaves, each on a different node. The slaves apply the operations that occur to the master in exactly the same order as the master and thus maintain the same state. All actions other than publishes go only to the master, and the master then broadcasts the effect of the actions to the slaves. Thus clients consuming from a mirrored queue are in fact consuming from the master.
Should a slave fail, there is little to be done other than some bookkeeping: the master remains the master and no client need take any action or be informed of the failure.
If the master fails, then one of the slaves must be promoted. At this point, the following happens:
A slave is promoted to become the new master. The slave chosen for promotion is the eldest slave. As such, it has the best chance of being synchronised with the master. However, note that should there be no slave that is synchronised with the master, messages that only the master held will be lost.
The slave considers all previous consumers to have been abruptly disconnected. As such, it requeues all messages that have been delivered to clients but are pending acknowledgement. This can include messages for which a client has issued acknowledgements: either the acknowledgement was lost on the wire before reaching the master, or it was lost during broadcast from the master to the slaves. In either case, the new master has no choice but to requeue all messages it thinks have not been acknowledged.
How to preserve messages continued... ⌘
As a result of the requeuing, clients that re-consume from the queue must be aware that they are likely to subsequently receive messages that they have seen previously.
As the chosen slave becomes the master, no messages that are published to the mirrored queue during this time will be lost: messages published to a mirrored queue are always published directly to the master and all slaves. Thus should the master fail, the messages continue to be sent to the slaves and will be added to the queue once the promotion of a slave to the master completes.
Similarly, messages published by clients using publisher confirms will still be confirmed correctly even if the master (or any slaves) fail between the message being published and the message being able to be confirmed to the publisher. Thus from the point of view of the publisher, publishing to a mirrored queue is no different from publishing to any other sort of queue.
If you are consuming from a mirrored queue with noAck=true (i.e. the client is not sending message acknowledgements) then messages can be lost. This is no different from the norm of course: the broker considers a message acknowledged as soon as it has been sent to a noAck=true consumer, and should the client disconnect abruptly, the message may never be received. In the case of a mirrored queue, should the master die, messages that are in-flight on their way to noAck=true consumers may never be received by those clients, and will not be requeued by the new master. Because of the possibility that the consuming client is connected to a node that survives, the Consumer Cancellation Notification is useful in identifying when such events may have occurred. Of course, in practise, if you care about not losing messages then you are advised to consume with noAck=false.
How to preserve messages continued... ⌘
Publisher Confirms and Transactions Mirrored queues support both Publisher Confirms and Transactions. The semantics chosen are that in the case of both confirms and transactions, the action spans all mirrors of the queue. So in the case of a transaction, a tx.commit-ok will only be returned to a client when the transaction has been applied across all mirrors of the queue. Equally, in the case of publisher confirms, a message will only be confirmed to the publisher when it has been accepted by all of the mirrors. It is correct to think of the semantics as being the same as a message being routed to multiple normal queues, and of a transaction with publications within that similarly are routed to multiple queues.
Flow Control RabbitMQ uses a credit-based algorithm to limit the rate of message publication. Publishers are permitted to publish when they receive credit from all mirrors of a queue. Credit in this context means permission to publish. Slaves that fail to issue credit can cause publishers to stall. Publishers will remain stalled until all slaves issue credit or until the remaining nodes consider the slave to be disconnected from the cluster. Erlang detects such disconnections by periodically sending a tick to all nodes. The tick interval can be controlled with the net_ticktime configuration setting.
Consumer Cancellation Clients that are consuming from a mirrored queue may wish to know that the queue from which they have been consuming has failed over. When a mirrored queue fails over, knowledge of which messages have been sent to which consumer is lost, and therefore all unacknowledged messages are redelivered with the redelivered flag set. Consumers may wish to know this is going to happen.
If so, they can consume with the argument x-cancel-on-ha-failover set to true. Their consuming will then be cancelled on failover and a consumer cancellation notification sent. It is then the consumer's responsibility to reissue basic.consume to start consuming again.
5. A programmer perspective ⌘
Agenda:
Writing robust code
Installing and configuring HA proxy
Failing client between servers
Writing robust code ⌘
Best Practices:
1. Conversation between message broker and client is two-way. Both the client and the server can initiate ‘communication events and it may need to keep a connection open for its lifetime. This means that broker connections may last long periods; hours, days, or weeks. Maintaining these connections is expensive, both for the client and the server. In order to have many logical connections without the overhead of many physical TCP/IP connections, AMQP has the concept of ‘channel’. We can create multiple channels on a single connection and it’s relatively cheap to create and dispose of them. Channels are not thread safe and we should create and use a channel on a single thread.
2. An ACK should be invoked on the same channel on which the delivery was received - The delivery tag is scoped to the channel and an ACK sent to a different channel from which the delivery was received will cause a channel error. It seems neater to create a channel for each consumer. When we create a consumer, I also create a channel for it to consume from. When the consumer goes away, so does the channel and vice-versa.
3. Do not mix publishing and consuming on the same channel -
4. Limit the number of queues for each and every event, instead create a aggregated queue and send all notification to that queue.
6. It is best to have exchanges grouped by object type / exchange type combinations to avoid too much clutter.
7. If you need specific messages to go to specific consumers, you do this through the routing and bindings. Trying to filter once the message is in the queue, is an anti-pattern in RabbitMQ.
Installing and configuring HAProxy ⌘
1. sudo apt-get install haproxy 2. vim /etc/default/haproxy - set “ENABLE=1” 3. /etc/init.d/haproxy start
This will install HA Proxy on your machine and ensure it is up and running.
Failing clients between servers ⌘
queues within a RabbitMQ cluster are located on a single node (the node on which they were first declared)
This is in contrast to exchanges and bindings, which can always be considered to be on all nodes.
Queues can optionally be made mirrored across multiple nodes.
Each mirrored queue consists of one master and one or more slaves, with the oldest slave being promoted to the new master if the old master disappears for any reason.
Clustering and Network Partitions ⌘
RabbitMQ clusters do not tolerate network partitions well. If a distributed setup for rabbitmq is required, please use federation or the shovel instead.
However this does not guarantees a full proof solution and here we discuss some of the issues we may ends up and how to recover from them.
RabbitMQ stores information about queues, exchanges, bindings etc in Erlang's distributed database, Mnesia. Hence most of the issues around network partitions are related to Mnesia's behaviour.
1. Detecting network partitions: Mnesia typically determines that a node is down if another node is unable to contact it for a minute or so. If two nodes come back into contact, both having thought the other is down, Mnesia will determine that a partition has occurred. This will be written to the RabbitMQ log in a form like:
-ERROR REPORT---- 15-Oct-2012::18:02:30 --- Mnesia(rabbit@smacmullen): ** ERROR ** mnesia_event got
{inconsistent_database, running_partitioned_network, hare@smacmullen}
RabbitMQ nodes will record whether this event has ever occurred while the node is up, and expose this information through rabbitmqctl cluster_status and the management plugin.
rabbitmqctl cluster_status will normally show an empty list for partitions:
- rabbitmqctl cluster_status
Cluster status of node rabbit@smacmullen ... [{nodes,[{disc,[hare@smacmullen,rabbit@smacmullen]}]},
{running_nodes,[rabbit@smacmullen,hare@smacmullen]},
{partitions,[]}]
...done.
Clustering and Network Partitions ⌘
However, if a network partition has occurred then information about partitions will appear there:
- rabbitmqctl cluster_status
Cluster status of node rabbit@smacmullen ... [{nodes,[{disc,[hare@smacmullen,rabbit@smacmullen]}]},
{running_nodes,[rabbit@smacmullen,hare@smacmullen]},
{partitions,[{rabbit@smacmullen,[hare@smacmullen]},
             {hare@smacmullen,[rabbit@smacmullen]}]}]
...done.
The management plugin API will return partition information for each node under partitions in /api/nodes. The management plugin UI will show a large red warning on the overview page if a partition has occurred.
2. During a network partition: While a network partition is in place, the two sides of the cluster can evolve independently, with both sides thinking the other has crashed. Queues, bindings, exchanges can be created or deleted separately. Mirrored queues which are split across the partition will end up with one master on each side of the partition, again with both sides acting independently. Other undefined and weird behaviour may occur.
It is important to understand that when network connectivity is restored, this state of affairs persists. The cluster will continue to act in this way until we take action to fix it.
3. Partitions caused by suspend / resume
While we refer to "network" partitions, really a partition is any case in which the different nodes of a cluster can have communication interrupted without any node failing. In addition to network failures, suspending and resuming an entire OS can also cause partitions when used against running cluster nodes - as the suspended node will not consider itself to have failed, or even stopped, but the other nodes in the cluster will consider it to have done so.
Clustering and Network Partitions continued... ⌘
While you could suspend a cluster node by running it on a laptop and closing the lid, the most common reason for this to happen is for a virtual machine to have been suspended by the hypervisor. While it's fine to run RabbitMQ clusters in virtualized environments, you should make sure that VMs are not suspended while running. Note that some virtualisation features such as migration of a VM from one host to another will tend to involve the VM being suspended.
Partitions caused by suspend and resume will tend to be asymmetrical - the suspended node will not necessarily see the other nodes as having gone down, but will be seen as down by the rest of the cluster. This has particular implications for pause_minority mode.
4. Recovering from a network partition
- Choose one partition which you trust and this partition will become the authority for the state of Mnesia to be used, changes which have occurred on other partitions will be lost.
- Stop all nodes in the other partitions, then start them all up again. When they rejoin the cluster they will restore state from the trusted partition.
- Restart all the nodes in the trusted partition to clear the warning.
- It is simpler to stop the whole cluster and start it again, just ensure that the first node we start is from the trusted partition.
5. Automatically handling partitions
RabbitMQ also offers three ways to deal with network partitions automatically: 1. pause-minority mode 2. pause-if-all-down mode and 3. autoheal mode. (The default behaviour is referred to as ignore mode).
Clustering and Network Partitions continued... ⌘
- pause-minority mode - RabbitMQ will automatically pause cluster nodes which determine themselves to be in a minority (i.e. fewer or equal than half the total number of nodes) after seeing other nodes go down. It therefore chooses partition tolerance over availability from the CAP theorem. This ensures that in the event of a network partition, at most the nodes in a single partition will continue to run. The minority nodes will pause as soon as a partition starts, and will start again when the partition ends.
- pause-if-all-down mode - RabbitMQ will automatically pause cluster nodes which cannot reach any of the listed nodes. In other words, all the listed nodes must be down for RabbitMQ to pause a cluster node. This is close to the pause-minority mode, however, it allows an administrator to decide which nodes to prefer, instead of relying on the context. For instance, if the cluster is made of two nodes in rack A and two nodes in rack B, and the link between racks is lost, pause-minority mode will pause all nodes.
In pause-if-all-down mode, if the administrator listed the two nodes in rack A, only nodes in rack B will pause. Note that it is possible the listed nodes get split across both sides of a partition: in this situation, no node will pause. That is why there is an additional ignore/autoheal argument to indicate how to recover from the partition.
In autoheal mode RabbitMQ will automatically decide on a winning partition if a partition is deemed to have occurred, and will restart all nodes that are not in the winning partition. Unlike pause_minority mode it therefore takes effect when a partition ends, rather than when one starts. The winning partition is the one which has the most clients connected. If this produces a draw, one with the most nodes and if that still produces a draw then one of the partitions is chosen in an unspecified way.
We can enable either mode by setting the configuration parameter cluster_partition_handling for the rabbit application in your configuration file to:
  pause_minority
  {pause_if_all_down, [nodes], ignore | autoheal}
  autoheal
Clustering and Network Partitions continued... ⌘
Which mode should I pick? It's important to understand that allowing RabbitMQ to deal with network partitions automatically does not make them less of a problem. Network partitions will always cause problems for RabbitMQ clusters, we just get some degree of choice over what kind of problems we get.
If we want to connect RabbitMQ clusters over generally unreliable links, we should use federation or the shovel.
With that said, we might wish to pick a recovery mode as follows:
ignore - Our network really is reliable.
pause_minority - Your network is maybe less reliable. You have clustered across 3 AZs in EC2, and you assume that only one AZ will fail at once. In that scenario you want the remaining two AZs to continue working and the nodes from the failed AZ to rejoin automatically and without fuss when the AZ comes back.
autoheal - Your network may not be reliable. You are more concerned with continuity of service than with data integrity. You may have a two node cluster.
Also note that RabbitMQ will pause nodes which are not in a strict majority of the cluster - i.e. containing more than half of all nodes. It is therefore not a good idea to enable pause-minority mode on a cluster of two nodes since in the event of any network partition or node failure, both nodes will pause. However, pause_minority mode is likely to be safer than ignore mode for clusters of more than two nodes, especially if the most likely form of network partition is that a single minority of nodes drops off the network.
Finally, note that pause_minority mode will do nothing to defend against partitions caused by cluster nodes being suspended. This is because the suspended node will never see the rest of the cluster vanish, so will have no trigger to disconnect itself from the cluster.
6. Implementing failover and replication ⌘
Agenda:
Setting up a load balancer-based master/slave
Installing the Shovel plugin
Configuring and running Shovel
Setting up a load balancer-based master/slave ⌘
Error creating thumbnail: File missing
HA Proxy load balancing configuration ⌘
To set the HA proxy configuration, edit the haproxy.conf file as below:
vim /etc/haproxy/haproxy.conf - Add the below entries
listen rabbitmq 192.168.33.8:5672 mode tcp balance roundrobin server mqmaster 192.168.33.101:5672 check inter 5s rise 2 fall 3 server mqslave1 192.168.33.102:5672 check inter 5s rise 2 fall 3 server mqslave2 192.168.33.103:5672 check inter 5s rise 2 fall 3
HA Options for Rabbitmq ⌘
There are many forms of high availability, replication and resilience in the face of various different types of failure. RabbitMQ can be made to work in an active/passive setup, such that persistent messages that have been written to disk on the active node are able to be recovered by the passive node should the active node fail. Non-persistent messages will be lost, and the promotion of the passive node may take a little while as it reads the messages off disk.
Whilst RabbitMQ also supports clustering, clustering is intended to facilitate scalability, not availability. Thus in a cluster, if a node fails, queues which were on the failed node are lost. With the high availability setup described in this guide, when a node fails, the durable queues and the persistent messages within them can be recovered by a different node.
Distributed Rabbitmq broker ⌘
AMQP and the other messaging protocols supported by RabbitMQ via plug-ins are inherently distributed - it is quite common for applications from multiple machines to connect to a single broker, even across the internet, yet sometimes we need to make the RabbitMQ broker itself distributed. There are three ways in which to accomplish that:
1. Clustering connects multiple machines together to form a single logical broker. Communication is via Erlang message-passing, so all nodes in the cluster must have the same Erlang cookie. The network links between machines in a cluster must be reliable, and all machines in the cluster must run the same versions of RabbitMQ and Erlang. Virtual hosts, exchanges, users, and permissions are automatically mirrored across all nodes in a cluster. Queues may be located on a single node, or mirrored across multiple nodes.
2. Federation allows an exchange or queue on one broker to receive messages published to an exchange or queue on another (the brokers may be individual machines, or clusters). Communication is via AMQP, so for two exchanges or queues to federate they must be granted appropriate users and permissions. Federated exchanges are connected with one way point-to-point links. By default, messages will only be forwarded over a federation link once, but this can be increased to allow for more complex routing topologies. Federated queues are similarly connected with one way point-to-point links. Messages will be moved between federated queues an arbitrary number of times to follow the consumers. Typically you would use federation to link brokers across the internet for pub/sub messaging and work queueing.
3. Shovels Connecting brokers is conceptually similar to connecting them with federation. However, the shovel works at a lower level. Whereas federation aims to provide opinionated distribution of exchanges and queues, the shovel simply consumes messages from a queue on one broker, and forwards them to an exchange on another.
Cluster vs Federation vs Shovel ⌘
| Federation/Shovel | Cluster |
|---|---|
|
|
Federation Plugin ⌘
The high-level goal of the federation plugin is to transmit messages between brokers without requiring clustering. This is useful for various reasons:
1. Loose coupling: can transmit messages between brokers (or clusters) in different administrative domains which may have different users and virtual hosts and may run on different versions of RabbitMQ and Erlang.
2. WAN-friendly: The federation plugin uses AMQP 0-9-1 to communicate between brokers, and is designed to tolerate intermittent connectivity.
3. Specificity: A broker can contain federated and local-only components - we don't need to federate everything if you don't want to.
The federation plugin allows you to make exchanges and queues federated. A federated exchange or queue can receive messages from one or more upstreams (remote exchanges and queues on other brokers). A federated exchange can route messages published upstream to a local queue. A federated queue lets a local consumer receive messages from an upstream queue.
Federation links connect to upstreams using RabbitMQ Erlang client. Therefore they can connect to a specific vhost, use TLS, use multiple authentication mechanisms.
Enable the federation plugin via the command:
rabbitmq-plugins enable rabbitmq_federation && rabbitmq-plugins enable rabbitmq_federation_management
Federation Plugin continued... ⌘
All the nodes of the cluster should have the federation plugin enabled.
Information about federation upstreams is stored in the RabbitMQ database, along with users, permissions, queues, etc. There are three levels of configuration involved in federation:
Upstreams: each upstream defines how to connect to another broker.
      Upstream sets: each upstream set groups together a set of upstreams to use for federation.
      Policies: each policy selects a set of exchanges, queues or both, and applies a single upstream or an upstream set to those objects.
Parameters and policies can be set in three ways - either with an invocation of rabbitmqctl, a call to the management HTTP API, or through the web UI presented by rabbitmq_federation_management.
1. Navigate to Admin > Federation Upstreams > Add a new upstream. Enter "my-upstream" next to Name, "amqp://server-name" next to URI, and 36000000 next to Expiry. Click Add upstream.
2. Navigate to Admin > Policies > Add / update a policy. Enter "federate-me" next to "Name", "^amq\." next to "Pattern", choose "Exchanges" from the "Apply to" drop down list and enter "federation-upstream-set" = "all" in the first line next to "Policy". Click "Add" policy.
Federation Plugin continued... ⌘
We tell the policy to federate all exchanges whose names begin with "amq." (i.e. all the built in exchanges except for the default exchange) with (implicit) low priority, and to federate them using the implicitly created upstream set "all", which includes our newly-created upstream. Any other matching policy with a priority greater than 0 will take precedence over this policy. Keep in mind that federate-me is just a name we used for this example.
The built in exchanges should now be federated because they are matched by the policy. We can check that the policy has applied to the exchanges by checking the exchanges list in management or with the belwo command:
rabbitmqctl list_exchanges name policy | grep federate-me
Also we can check that federation links for each exchange have come up with Admin > Federation Status > Running Links or with: rabbitmqctl eval 'rabbit_federation_status:status().'
Shovel plugin - Features ⌘
Sometimes it is necessary to reliably and continually move messages from a queue (a source) in one broker to an exchange in another broker (a destination). The Shovel plugin allows you to configure a number of shovels, which do just that and start automatically when the broker starts.
Some cool features of the shovel plugin are as follows:
1. source queue and destination exchanges can be on the same broker (typically in different vhosts) or distinct brokers.
2. Shovels use RabbitMQ Erlang client under the hood.
3. Sort of a client application, it connects to its source and destination, reads and writes messages, and copes with connection failures
4. Sometimes it is necessary to reliably and continually move messages from a queue (a source) in one broker to an exchange in another broker (a destination). The Shovel plugin allows you to configure a number of shovels, which do just that and start automatically when the broker starts.
Shovel Advantages ⌘
The primary advantages of a shovel are: Loose coupling - A shovel can move messages between brokers (or clusters) in different administrative domains:
- they may have different users and virtual hosts;
- they may run on different versions of RabbitMQ and Erlang.
2. WAN-friendly - Shovel plugin uses AMQP 0-9-1 to communicate between brokers, and is designed to tolerate intermittent connectivity without message loss.
3. Highly tailorable - When a shovel connects it can be configured to perform any number of explicit methods. For example, the source queue need not exist initially, and can be declared on connect.
Configuring and running Shovel ⌘
rabbitmq-plugins enable rabbitmq_shovel
Monitoring shovels:
There are two ways of discovering the status of shovels.
Use shovel management:
Shovel status can be reported on the Management plugin user interface by enabling the rabbitmq_shovel_management plugin wherever you have the management plugin enabled.
Information about configured shovels will automatically appear in the management API and UI.
Direct query:
Shovel status can be obtained by direct query of the Shovel plugin app. Issue the following rabbitmqctl command:
$ rabbitmqctl eval 'rabbit_shovel_status:status().'
This calls the status method in a module of the rabbitmq_shovel plugin, which will return an Erlang list, with one element for each configured shovel.
Configuring and running shovel ⌘
Each element of the list is a tuple with four fields: {Name, Type, Status, Timestamp}.
Name is the shovel name, Type is either static or dynamic, Status is the current shovel state, and Timestamp is the time when the shovel entered this state. Timestamp is a local calendar time of the form {{YYYY, MM, DD}, {HH, MM, SS}}.
Status takes one of three forms:
The shovel is starting up, connecting and creating resources:
'starting'
The shovel is running normally:
 { 'running', {'source', Source},
              {'destination', Destination}}:
where Source and Destination terms give the respective connection parameter
The shovel has terminated:
{'terminated', Reason}
where Reason is an Erlang term that indicates the reason for the termination.
7. Web tools to administer RabbitMQ ⌘
Agenda:
The RabbitMQ Management plugin
Managing RabbitMQ from the web console
Administering users from the web console
Managing queue from the web console
Using the command line interface
Web tools to administer RabbitMQ ⌘
Using RabbitMQ you can use message queue mechanism to transfer messages from one application to another. RabbitMQ has drivers for several programming languages. You can pretty much write code in any of your favourite language to manipulate the messages in the RabbitMQ message queue. Sometimes managing the message queue from command line, or writing several lines of custom code might be cumbersome.
This is where the rabbitmq-management plugin comes to the rescue. The rabbitmq plugin provides an HTTP-based API for management and monitoring of your RabbitMQ server, along with a browser-based UI and a command line tool.
Some of the feature of the rabbitmq management plugins are:
- Declare, list and delete exchanges, queues, bindings, users, virtual hosts and permissions.
- Monitor queue length, message rates globally and per channel, data rates per connection, etc.
- Send and receive messages.
- Monitor Erlang processes, file descriptors, memory use.
- Export / import object definitions to JSON.
- Force close connections, purge queues.
The RabbitMQ Management plugin ⌘
RabbitMQ Management is a plugin that can be enabled for RabbitMQ. It gives a single static HTML page that makes background queries to the HTTP API for RabbitMQ. Information from the management interface can be useful when you are debugging your applications or when you need an overview of the whole system. If you see that the number of unacked messages starts to get high, it could mean that your consumers are getting slow. If you need to check if an exchange is working, you can try to send a text message.”

Managing RabbitMQ from the web console ⌘
Rabbitmq management plugin in included in the standard rabbitmq distribution.
To enable the plugin simply use the below command:
rabbitmq-plugins enable rabbitmq_management
Now you can access the console on the following address: "http://<rabbitmq machine ip with plugin enabled>:15672"
It will ask for user id and password. you need to provide the user id and password for authentication.
In-case you have not yet created any user, the you can do so by the below commands:
sudo rabbitmqctl add_user <user id> <password>
sudo rabbitmqctl set_user_tags <user id> administrator
sudo rabbitmqctl set_permissions -p / <user id> ".*" ".*" ".*"
Administering users from the web console ⌘
To use this feature of administrating users form the management web console, follow the below steps:
1. Login to the management plugin console
2. Go to the Admin tab(ensure the user has administrative privileges)
3. From the GUI, you can simply add new users, set their passwords, allot tags to them, set permissions on vhosts, update the passwords for existing users, delete users etc.

Managing queue from the web console ⌘
To use this feature of administrating users form the management web console, follow the below steps:
1. Login to the management plugin console 2. Go to the Queue tab
3. From the GUI, you can simply add new queues, delete queues, check existing bindings etc.
Error creating thumbnail: File missing
Using the command line Interface ⌘
Alternatively we can also use the command line interface provided by the rabbitmq server to administer the server.
If you are contemplating invoking rabbitmqadmin from your own program you may want to consider using the HTTP API directly. With the management plugin installed, browse to http://server-name:15672/cli/ to download.
Get the rabbitmqadmin.py file from First copy rabbitmqadmin to /usr/local/bin and make it an executable file.
Rabbitmqadmin supports tab completion in bash. To print a bash completion script, invokerabbitmqadmin --bash-completion. This should be redirected to a file and sourced.
To get the list of available commands user use:
rabbitmqadmin --help
Using the command line Interface continued…. ⌘
A few examples for using rabbitmqadmin are:
Listing out list exchanges:
rabbitmqadmin -V test list exchanges
Declaring exchanges:
rabbitmqadmin declare exchange name=my-new-exchange type=fanout
Publishing a message:
rabbitmqadmin publish exchange=amq.default routing_key=test payload="hello, world"
For more commands please refer :
https://www.rabbitmq.com/management-cli.html - Rabbitmq management CLI
8. RabbitMQ and the REST API ⌘
Agenda:
Rest API features
Accessing Statistics
Vhost and user provisioning
REST API features ⌘
The first thing to understand about the API is that it is fully RESTful, so the name of the item you’re manipulating is always included in the URL.
It should be read in conjunction with the manual page for rabbitmqctl. Any field which can be returned by a command of the form rabbitmqctl list_something will also be returned in the equivalent part of the HTTP API and also a lot of extra fields which are not available in rabbitmqctl.
For example, if you wanted to see the statistics for the queue named branches in the oak virtual host, you’d construct the following URL and send it as an HTTP GET request to the server:
http://localhost:55672/api/queues/oak/branches
The RabbitMQ API interprets GET as meaning “show me all the details/settings about the item located at/api/queues/oak/ branches.”
Besides GET, we can also use POST, PUT, or DELETE when talking to the API.
POST and PUT create items, whereas DELETE does what it says—it deletes things.
POST and PUT aren’t interchangeable, and some API calls require POST to create the item referenced in the URL whereas others use PUT.
URIs will serve only resources of type application/json and require HTTP basic authentication
URIs require the name of a virtual host as part of the path, since names only uniquely identify objects within a virtual host As the default virtual host is called "/", this will need to be encoded as "%2f"
Accessing statistics ⌘
There are times when we need to see how many messages are sitting in a particular queue. Sometimes it’s to debug a new app we’re writing or to monitor in production the ratio between messages waiting to be consumed and those that have been delivered to a consumer and are still unacknowledged. We could use rabbitmqctl to list the total message count in our queues, but this has two major disadvantages: 1 We can only run rabbitmqctl from computers that have Erlang installed and the same Erlang cookie as the RabbitMQ server.
2 rabbitmqctl will only show us the total number of messages in the queue. It won’t differentiate between delivered messages waiting for acknowledgement and messages waiting to be consumed in the first place.
This is where Rabbitmq management API comes to the rescue. Since we want to be able to run our query statistics script from the command line, you need to start by parsing the command line arguments, as in the following listing.
curl -i -u admin:admin http://192.168.33.101:15672/api/vhosts
curl -i -u admin:admin -H "content-type:application/json" -XPUT http://192.168.33.101:15672/api/vhosts/foo
curl -i -u admin:admin -H "content-type:application/json" -XPUT -d'{"type":"direct","durable":true}' http://192.168.33.101:15672/api/exchanges/%2f/my-new-exchange
curl -i -u admin:admin -H "content-type:application/json" -XDELETE http://192.168.33.101:15672/api/exchanges/%2f/my-new-exchange To get a more detailed list of HTTP API’s please refer http://<server>:15672/api/
vhost and user provisioning ⌘
Before the management API came along, one of the biggest hassles in deploying RabbitMQ was automating the creation of the virtual hosts and users that apps need. Frequently, when deploying our apps with automated deployment tools like Chef or Puppet, the recipe to deploy your app is run on a server that’s different from the RabbitMQ server the app needs to communicate with. When all we have is rabbitmqctl to create users and virtual hosts, that’s a problem, because it means Erlang and rabbitmqctl must be installed on every app server for the sole purpose of creating users and vhosts on the central RabbitMQ server.
This is where the rabbitmq-management plugin comes into the rescue. The HTTP API’s provided by the rabbitmq management allows us to create, delete, show and list user/vhosts from any remote machine with basic http authentication.
curl -i -u guest:guest -H "content-type:application/json" \
-XPUT http://localhost:15672/api/vhosts/foo
curl -i -u guest:guest -H "content-type:application/json" \
   -XPUT -d'{"type":"direct","durable":true}' \
   http://localhost:15672/api/exchanges/%2f/my-new-exchange
/api/queues - A list of all queues. /api/queues/vhost - A list of all queues in a given virtual host. /api/queues/vhost/name - An individual queue. To PUT a queue, you will need a body looking something like this: {"auto_delete":false,"durable":true,"arguments":{},"node":"rabbit@smacmullen"} All keys are optional. When DELETEing a queue you can add the query string parameters if-empty=true and / or if-unused=true. These prevent the delete from succeeding if the queue contains messages, or has consumers, respectively.
Vhost and user provisioning continued... ⌘
/api/vhosts -A list of all vhosts.
/api/vhosts/name/permissions - A list of all permissions for a given virtual host.
/api/users -A list of all users.
/api/users/name - A list of all users.
/api/users/permission - An individual user. To PUT a user, you will need a body looking something like this:
{"password":"secret","tags":"administrator"}
9. Monitoring and securing RabbitMQ ⌘
Agenda:
Message durability and message acknowledgement
Memory usage and process limit
Setting up SSL
Message durability and Message acknowledgement ⌘
Message durability
When discussing software performance, everything has to be taken with a grain of salt or even two. Why? Because whatever decision you make has to take into account the context in which it’s applied. For every decision you make there are pros and cons. For example, you can speed up message delivery for system logs which you might not even need to persist to disk, but when it comes to order processing for shopping carts you’d better make sure nothing is lost in the process. So although you could send logs as non- persistent messages and consume them without acknowledgment, you can’t afford such luxury when customer money is in play. So whenever you deal with these kinds of performance tweaks, you have to think of the trade-offs you’re making.
When you publish messages, you have to decide whether it’s okay to lose any of them. If it’s okay that a couple of messages out of thousands can be lost (for whatever reason), then you may publish them with the property delivery-mode set to 1, which means nonpersistent. Usually you’d deliver messages as persistent by setting the deliv- ery-mode to 2, but at the cost of forcing the broker to write them to disk. For example, on a Mac, RabbitMQ can easily deliver up to 12,000 messages per second. If you turn on message persistence, then that number drops to around 4,000 message deliveries per second. The number of messages is still high but has dropped considerably.
How do you manage this setting? You have to specify it as part of the message prop- erties for every message that you publish to the server. The following code snippet is an example of how to create a nonpersistent message with the PHP library:
Message Acknowledgements ⌘
Message acknowledgment
We looked at the settings that involve message publication, let’s see how we can configure during message consumption. One setting that will speed up message delivery is the no-ack flag that we can specify during queue subscription time.
If set to true, the server will automatically dequeue the message after it’s sent to the client. If for some reason the connection is lost or your client application dies, the message will be lost forever.
The speed advantage of subscribing to a queue with no-ack set to true comes from the fact that you don’t need to send an acknowledgment back to the server after you process the message, which will speed up your consumers. On the server side, things will be simplified since RabbitMQ can forget about your message after it’s delivered. Here’s a Python snippet showing how to consume from a queue with no-ack set to true:
      channel.basic_consume( critical_notify,
                             queue="critical",
                             no_ack=True,
                             consumer_tag="critical")
You’ll consume from the critical queue using critical as the consumer tag as well. For every message that you receive, the callback critical_notify will be called. Now it’s time to see what happens during message routing. In the next section we’ll look at each of the main routing algorithms used by RabbitMQ.
Memory usage and process limits ⌘
RabbitMQ can report on its own memory use, to let you see where your system is using memory. The memory report is powered by the underlying erlang virtual machine.
The memory usage can be accessed by either of the below 2 methods:
1. rabbitmqctl status
2. From the node details page in the management UI.
The memory usage comprises of the following non overlapping components:
1. Connections - Memory consumed by incoming/outgoing connections/channels and memory used by SSL systems and Erlang clients.
2. Queues - Memory consumed by individual queue processes.
3. Plugins - Memory consumed by plugins
4. Other process memory - Memory consumed by processes, ERlang VM, garbage collected memory etc. are shown here.
Mnesia:
Mnesia is the local database used by rabbitmq and it helps keep an in-memory copy of all its data (even on disc nodes).
Message store index:
The default message store implementation keeps an in-memory index of all messages, including those paged out to disc.
Management database:
The management database (if the management plugin is loaded). In a cluster, this will only be present on one node.
Other ETS tables
Other in-memory tables besides the three sets above. Note that due to a bug in current versions of the Erlang runtime, some memory will be counted under this heading for all tables, including the three sets above.
Memory Usage and Process Limits comtinued... ⌘
Binaries:
Memory used by shared binary data in the Erlang VM. In-memory message bodies show up here.
Code: Memory used by code. Should be fairly constant.
Atoms: Memory used by atoms. Should be fairly constant.
Other system memory: Other memory used by Erlang. One contributor to this value is the number of available file descriptors.
Process Limits: Upon startup of the machine, RabbitMQ server detects the total amount of RAM installed in the computer. and when rabbitmqctl set_vm_memory_high_watermark fraction is executed.
The default threshold for rabbitmq is around 40% of the memory available. Rabbitmq will stop receiving messages(throttle the publisher) and raise an alarm.
32-bit architectures tend to impose a per process memory limit of 2GB. Common implementations of 64-bit architectures (i.e. AMD64 and Intel EM64T) permit only a paltry 256TB per process. 64-bit Windows further limits this to 8TB. However, note that even under 64-bit OSes, a 32-bit process frequently only has a maximum address space of 2GB.
Memory usage and process limits continued... ⌘
The memory threshold at which the flow control is triggered can be adjusted by editing the configuration file
[{rabbit, [{vm_memory_high_watermark, 0.4}]}].
The 0.4 signifies 40% of the available RAM or 40% of the available virtual space, either of which is lower.
E.g. on a 32-bit platform, if you have 4GB of RAM installed, 40% of 4GB is 1.6GB, but 32-bit Windows normally limits processes to 2GB, so the threshold is actually to 40% of 2GB (which is 820MB)
the memory threshold can be adjusted by setting an absolute limit of RAM used by the node
[{rabbit, [{vm_memory_high_watermark, {absolute, 1073741824}}]}].
one more example: [{rabbit, [{vm_memory_high_watermark, {absolute, "1024MiB"}}]}].
Edge Case:
If the absolute limit is larger than the installed RAM or available virtual address space, the threshold is set to whichever limit is smaller.
The memory can be queried upon by the following command: rabbitmqctl status
The threshold can be changed while the broker is running using the below commands:
rabbitmqctl set_vm_memory_high_watermark fraction command or rabbitmqctl set_vm_memory_high_watermark absolute memory_limit command.
References ⌘
Rabbitmq documentation Rabbitmq in Action by Alvaro Videla