Nodejs
- title
- Node.js
- author
- Lukasz Sokolowski (NobleProg)
Nodejs
Node.js Training Materials
Copyright Notice
Copyright © 2004-2026 by NobleProg Limited All rights reserved.
This publication is protected by copyright, and permission must be obtained from the publisher prior to any prohibited reproduction, storage in a retrieval system, or transmission in any form or by any means, electronic, mechanical, photocopying, recording, or likewise.
Nodejs Intro - Design and architecture
- Introduction
- Installation and requirements
- Node.js Philosophy
- Asynchronous and Evented
- DIRTy Applications
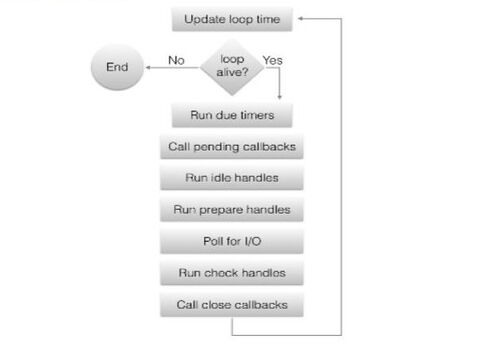
- Reactor Pattern (The event Loop)
Introduction
Definition
- A platform built on Chrome’s JavaScript runtime for easily building fast, scalable network applications
- Node.js uses an event-driven, non-blocking I/O model that makes it
- Lightweight and efficient
- Perfect for data-intensive real-time applications that run across distributed devices
Intro Con't
- Started in 2009
- Very popular project on GitHub
- Good Following in Google group
- Above 2.7 millions community modules published in npm (package manager)
Installation
- Official packages for all the major platforms
- Package managers (apt, rpm, brew, etc)
- nvm - allows to keep different versions
- Linux - https://github.com/nvm-sh/nvm
- Windows - https://github.com/coreybutler/nvm-windows
Update (Linux)
npm cache clean -f
npm install -g n
n stable # Install the latest stable version
n latest # Install the latest release
# n [version.number]  - Install a specific version
Requirements
"Nice to know" JavaScript concepts
- Lexical Structure, Expressions
- Types, Variables, Functions
- this, Arrow Functions
- Loops, Scopes, Arrays
- Template Literals, Semicolons
- Strict Mode, ECMAScript 6, 2016, 2017
Requirements Con't
Asynchronous programming as a fundamental part of Node.js
- Asynchronous programming and callbacks
- Timers
- Promises, Async and Await
- Closures, The Event Loop
Node.js Philosophy
- Small Core
- Small modules
- Small Surface Area
- Simplicity
Small Core
- Small set of functionality leaves the rest to the so-called userland
- Userspace or the ecosystem of modules living outside the core
- Gives freedom to the community for a broader set of solutions
- Created by the userland opposed to one slowly evolving solution
- Keeping the core to the bare minimum is convenient for maintainability
- Positive cultural impact that it brings on the evolution of the entire ecosystem
Small Modules
- One of the most evangelized principles is to design small modules
- In terms of code size, and scope (principle has its roots in the Unix philosophy)
- A module as a fundamental mean to structure the code of a program
- Brick or package for creating applications and reusable libraries
- With npm (Official package manager) Node.js helps solving dependencies
- Each package will have its own separate set of dependencies (avoid conflicts)
- Involves extreme levels of reusability
- Applications are composed of a high number of small, well-focused dependencies
Small Surface Area
Node.js modules usually expose a minimal set of functionality
- Increased usability of the API (intra and inter projects)
- In Node.js a common pattern for defining modules
- To expose only one piece of functionality
- More advanced aspects or secondary features
- become properties of the exported function or constructor
- Node.js modules are created to be used rather than extended
Simplicity
Simplicity and pragmatism
- A simple, as opposed to a perfect, feature-full software, is a good practice
- "Simplicity is the ultimate sophistication" – Leonardo da Vinci
Asynchronous and Evented
- Browser side
- Server side
Browser Side
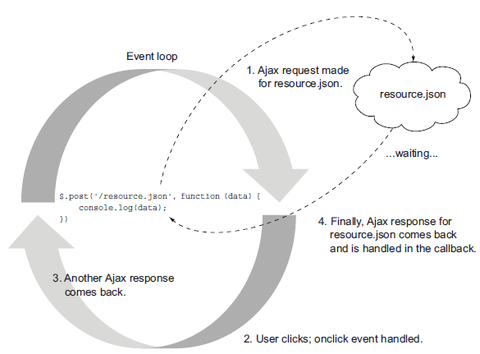
- I/O that happens in the browser is outside of the event loop (outside the main script execution)
- An "event" is emitted when the I/O finishes
- Event is handled by a function (the "callback" function)
Server Side
Server side
$result = mysql_query('SELECT * FROM myTable');- Code does some I/O, and the process is blocked from continuing until all the data has come back
- The process does nothing until the I/O is completed
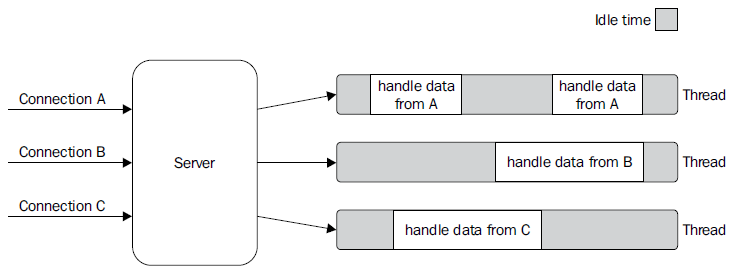
- More requests to handle => Multi-threaded approach
- One thread per connection and set up a thread pool
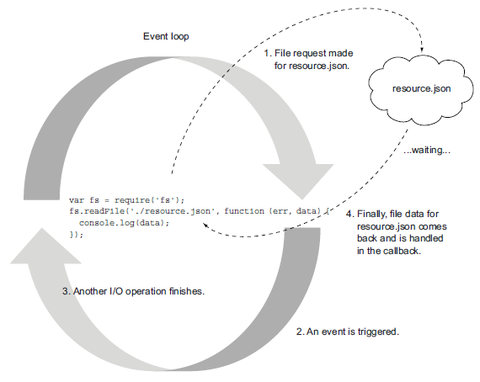
- In Node to read the resource.json file from the file disk >>
var fs = require('fs');
fs.readFile('./resource.json', function (err, data) {
  console.log(data);
})
Server Side Con't
- An anonymous function is called (the “callback”)
- Containing eventually any error occurred, and data (file data)
DIRTy Applications
Designed for Data Intensive Real Time (DIRT) applications
- Very lightweight on I/O
- Good at shuffling or proxying data from one pipe to another
- Allows a server to hold a number of connections open while handling many requests and keeping a small memory footprint
- Designed to be responsive (like the browser)
Reactor Pattern (The event Loop)
The reactor pattern is the heart of the Node.js asynchronous nature
- Main concepts
- Single-threaded architecture
- Non-blocking I/O
Reactor Pattern Con't
I/O is slow - Not expensive in terms of CPU, but it adds a delay
- I/O is the slowest among the fundamental operations
- Accessing RAM is in the order of nanoseconds
- Accessing disk data is in the order of milliseconds (10e-3 seconds)
- For the bandwidth
- RAM has a transfer rate in the order of GB/s
- Disk and network varies from MB/s to, optimistically, GB/s
Blocking I/O
- Web Servers that implement blocking I/O will handle concurrency
- by creating a thread or a process (Taken from a pool) for each concurrent connection that needs to be handled
Non Blocking I/O
Non Blocking I/O Con't
Another mechanism to access resources (non-blocking I/O)
- In this operating mode the system call returns immediately
- without waiting for the data to be read or written
- Most basic pattern for non-blocking I/O
- to actively poll the resource (a loop), this is called busy-waiting
resources = [socketA, socketB, pipeA];
while(!resources.isEmpty()) {
  for(i = 0; i < resources.length; i++) {
    resource = resources[i];
    var data = resource.read(); //try to read
    if(data === NO_DATA_AVAILABLE) //there is no data to read at the moment
      continue;
    if(data === RESOURCE_CLOSED) //the resource was closed, remove it from the list
      resources.remove(i);
    else //some data was received, process it
      consumeData(data);
  }
}
Event Demultiplexing
- Busy-waiting is not an ideal technique
- « Synchronous event demultiplexer » or « event notification interface » technique
- Component collects and queues I/O events that come from a set of watched resources
- and block until new events are available to process
Event Demultiplexing Con't
An algorithm that uses a generic synchronous event demultiplexer
- Reads from two different resources
//// Pseudocode, just to simplify the explanation
socketA, pipeB;
watchedList.add(socketA, FOR_READ);    // [1]
watchedList.add(pipeB, FOR_READ);

while(events = demultiplexer.watch(watchedList)) {    // [2]
  for(event in events) {    // [3]
    data = event.resource.read();
    if(data === RESOURCE_CLOSED)
      //the resource was closed, remove it from the watched list
      demultiplexer.unwatch(event.resource);
    else
      //some actual data was received, process it
      consumeData(data);
  }
}
Event Demultiplexing Expl
- Resources are added to a data structure
- Associating each with a specific operation (read)
- The event notifier is set up with the group of resources to be watched
- Synchronous call, blocks until any of the watched resources is ready for a read
- Event demultiplexer returns from the call and a new set of events is available to be processed
- Each event returned by the event demultiplexer is processed
- When all the events are processed, the flow will block again on the event demultiplexer
- until new events are again available to be processed
- This is called the event loop
- When all the events are processed, the flow will block again on the event demultiplexer
Reactor Pattern Expl
Reactor Pattern
- A specialization of the previous algorithm
- We have a handler (in Node.js a callback function) associated with each I/O operation
- It will be invoked as soon as an event is produced and processed by the event loop
Reactor Pattern Flow
Reactor Pattern Flow Expl
At the heart of Node.js that pattern:
Handles I/O by blocking until new events are available from a set of
observed resources, and then reacts by dispatching each event to an
associated handler.
Reactor Pattern Flow Expl Con't
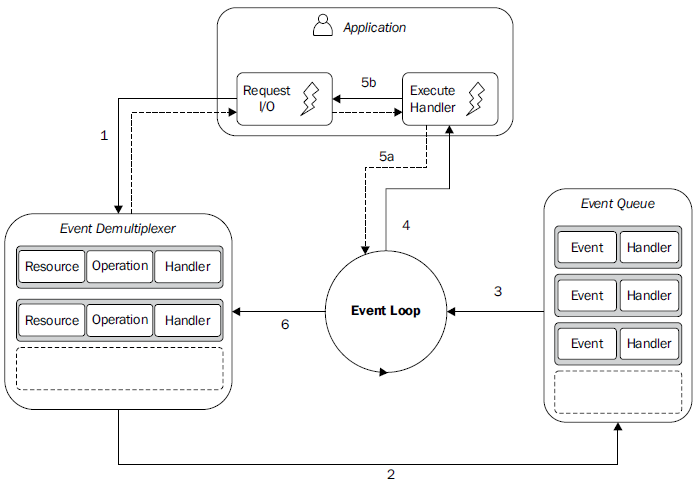
AP = Application, ED = Event Demultiplexer, EQ = Event Queue, EL = Event Loop
- The AP submits a request (new I/O operation) to the ED
- Specifies also a handler, which will be invoked when the operation completes
- A non-blocking call submits a new request to the ED
- And it immediately returns the control back to the AP
- When a set of I/O operations completes, the ED pushes the new events into the EQ
- At this point, the EL iterates over the items of the EQ
- For each event, the associated handler is invoked
- The handler, AP code, when complete (5a), will give back the control to the EL
- New async operations might be requested during the execution of the handler (5b)
- causing new operations to be inserted in the ED (1)
- before the control is given back to the EL
- New async operations might be requested during the execution of the handler (5b)
- When all the items in the EQ are processed
- the loop will block again on the ED which will then trigger another cycle
Libuv - I/O engine of Nodejs
- Running Node.js across and within the different operating systems requires an abstraction level for the Event Demultiplexer
- The Node.js core team created the "libuv" library (C library) with the objectives
- To make Node.js compatible with all the major platforms
- Normalize the non-blocking behavior of the different types of resource;
- libuv represents the low-level I/O engine of Node.js
- http://nikhilm.github.io/uvbook/
Libuv - the event loop
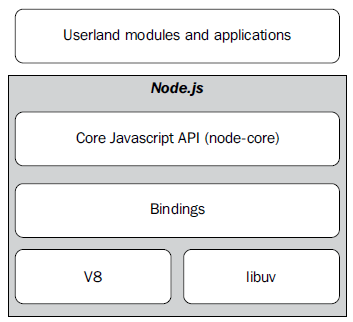
Nodejs - the whole platform
To build the platform we still need:
- A set of bindings responsible for wrapping and exposing libuv and other low-level
functionality to JavaScript.
- V8, the JavaScript engine originally developed by Google for the Chrome browser.
This is one of the reasons why Node.js is fast and efficient.
- A core JavaScript library (called node-core) that implements the high-level Node.js API
Nodejs Platform Con't
The Callback Pattern
- Handlers of the Reactor Pattern
- Synchronous CPS
- Asynchronous CPS
- Unpredictable functions
- Callback Conventions
Handlers of the Reactor Pattern
- Callbacks are the handlers of the reactor pattern
- They are part of what give Node.js its distinctive programming style
- When dealing with asynchronous operations what we need are functions that are invoked to propagate the result of these operations
- This way of propagating the result (standard callback) is called continuation-passing style (CPS)
- With closures we consve the context in which a function was created no matter when or where its callback is invoked
Synchronous CPS
- The add() function is a synchronous CPS function it returns a value only when the callback completes its execution
console.log('before');
add(1, 2, function(result) {
  console.log('Result: ' + result);
});
console.log('after');
The previous code will trivially print the following:
before
Result: 3
after
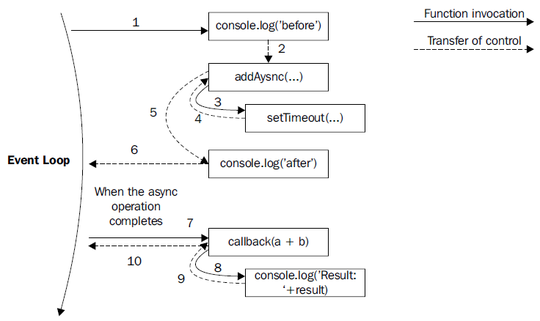
Asynchronous CPS
- The use of setTimeout() simulates an asynchronous invocation of the callback
function addAsync(a, b, callback) {
  setTimeout(function() {
    callback(a + b);
  }, 100);
}
console.log('before');
addAsync(1, 2, function(result) {
  console.log('Result: ' + result);
});
console.log('after');
- The preceding code will print the following:
before
after
Result: 3
Asynchronous CPS and event loop
Asynchronous CPS Con't
- When the asynchronous operation completes, the execution is then resumed starting from the callback
- The execution will start from the Event Loop, so it will have a fresh stack
- This behavior is crucial in Node.js
- It allows the stack to unwind, and the control to be given back to the event loop as soon as an asynchronous request is sent
- A new event from the queue can be processed
Unpredictable Functions, async read
Example
var fs = require('fs');
var cache = {};
function inconsistentRead(filename, callback) {
  if(cache[filename]) {
    //invoked synchronously
    callback(cache[filename]);
  } else {
    //asynchronous function
    fs.readFile(filename, 'utf8', function(err, data) {
      cache[filename] = data;
      callback(data);
    });
  }
}
Unpredictable Functions, wrapper
Example
function createFileReader(filename) {
  var listeners = [];
  inconsistentRead(filename, function(value) {
    listeners.forEach(function(listener) {
      listener(value);
    });
  });
  return {
    onDataReady: function(listener) {
      listeners.push(listener);
    }
  };
}
- The callback function launches listeners (methods) on the file data
- All the listeners will be invoked at once when the read operation completes and the data is available
Unpredictable Functions, main
Example
var reader1 = createFileReader('data.txt');
reader1.onDataReady(function(data) {
  console.log('First call data: ' + data);
});
//...sometime later we try to read again from
//the same file
var reader2 = createFileReader('data.txt');
reader2.onDataReady(function(data) {
  console.log('Second call data: ' + data);
});
Result?? >> First call data: some data
Unpredictable Functions, Expl
Explanation - behavior
- Reader2 is created in a cycle of the event loop in which the cache for the requested file already exists.
- The inner call to inconsistentRead() will be synchronous.
- Its callback will be invoked immediately
- All the listeners of reader2 will be invoked synchronously
- We register the listeners after the creation of reader2 => They will never be invoked.
Unpredictable Functions, Concl
Conclusions
- >> It is imperative for an API to clearly define its nature, either synchronous or Asynchronous
- >> The callback behavior of our inconsistentRead() function is really unpredictable, it depends on many factors
- >> Bugs can be extremely complicated to identify and reproduce in a real application
Unpredictable Functions, Sync Sol
Solution - Synchronous API >> Entire function converted to direct style
- Make our inconsistentRead() function totally synchronous
- Node.js provides a set of synchronous direct style APIs for most of the basic I/O operations
var fs = require('fs');
var cache = {};
function consistentReadSync(filename) {
  if(cache[filename]) {
    return cache[filename];
  } else {
    cache[filename] = fs.readFileSync(filename, 'utf8');
    return cache[filename];
  }
}
Unpredictable Functions, Sync Sol Con't
Solution - Synchronous API
- Changing an API from CPS to direct style, or from asynchronous to synchronous, or vice versa might also require a change to the style of all the code using it
- Using a synchronous API instead of an asynchronous one has some caveats:
- A synchronous API might not be always available for the needed functionality.
- A synchronouAPI will block the event loop and put the concurrent requests on hold >> breaks the Node.js concurrency, slowing down the whole application
- In this case the risk of blocking the event loop is partially mitigated
- The synchronous I/O API is invoked only once per each filename
- This solution is strongly discouraged if we have to read many files only once
Unpredictable Functions, Deferred Sol
Solution - Deferred Execution
- Instead of running it immediately in the same event loop cycle we schedule the synchronous callback invocation to be executed at the next pass of the event loop:
var fs = require('fs');
var cache = {};
function consistentReadAsync(filename, callback) {
  if(cache[filename]) {
    process.nextTick(function() {
    callback(cache[filename]);
  });
  } else {
    //asynchronous function
    fs.readFile(filename, 'utf8', function(err, data) {
      cache[filename] = data;
      callback(data);
    });
  }
}
Callback Conventions
- In Node.js CPS APIs and callbacks follow a set of specific conventions they apply to the Node.js core API and are followed by every userland module
- Callbacks come last
- If a function accepts in input a callback, the callback has to be passed as the last argument even in the presence of optional arguments
fs.readFile(filename, [options], callback)
- Errors come first
- In CPS, errors are propagated as any other type of result, which means using the callback
- Any error produced by a CPS function is passed as the first argument of the callback (any actual result is passed starting from the second argument)
- If the operation succeeds without errors the first argument will be null or undefined
- The error must always be of type Error (simple strings or numbers should not be passed as error objects)
fs.readFile('foo.txt', 'utf8', function(err, data) {
  if(err) // Always check for the presence of an error
    handleError(err);
  else
    processData(data);
});
Callback Conventions - Propagating Errors
- Propagating errors in synchronous, direct style functions is done with the well-known throw command (The error to jump up in the call stack until it's caught
- In asynchronous CPS error propagation is done by passing the error to the next callback in the CPS chain
var fs = require('fs');
function readJSON(filename, callback) {
  fs.readFile(filename, 'utf8', function(err, data) {
    var parsed;
    //propagate the error and exit the current function
    if(err) return callback(err);
    try {
      parsed = JSON.parse(data);  //parse the file contents
    } catch(err) {
      return callback(err);  //catch parsing errors
    }
    callback(null, parsed);  //no errors, propagate just the data
  });
};
Callback Conventions - Uncaught Exceptions
- In order to avoid any exception to be thrown into the fs.readFile() callback, we put a try-catch block around JSON.parse()
- Throwing inside an asynchronous callback will cause the exception to jump up to the event loop and never be propagated to the next callback
- In Node.js, this is an unrecoverable state and the application will simply shut down printing the error to the stderr interface.
Uncaught Exceptions - Behavior
- In the case of an uncaught exception:
var fs = require('fs');
function readJSONThrows(filename, callback) {
  fs.readFile(filename, 'utf8', function(err, data) {
    if(err) return callback(err);
    //no errors, propagate just the data
    callback(null, JSON.parse(data)); // eventual exception uncaught
  });
};
- The parsing of an invalid JSON file with the following code …
readJSONThrows('nonJSON.txt', function(err) {
  console.log(err);
});
Uncaught Exceptions - Behavior Con't
- … Would result with the following message printed in the console
SyntaxError: Unexpected token d
at Object.parse (native)
at [...]/06_uncaught_exceptions/uncaught.js:7:25
at fs.js:266:14
at Object.oncomplete (fs.js:107:15)
- The exception traveled from our callback into the stack that we saw and then straight into the event loop, where it's finally caught and thrown in the console
- The application is aborted the moment an exception reaches the event loop!!
Behavior - Node Anti-pattern
- Wrapping the invocation of readJSONThrows() with a try-catch block will not work
- The stack in which the block operates is different from the one in which our callback is invoked
- Node Anti-patern:
try {
  readJSONThrows('nonJSON.txt', function(err, result) {
    [...]
  });
} catch(err) {
  console.log('This will not catch the JSON parsing exception');
}
Uncaught Exceptions – "Last chance"
- Node.js emits a special event called uncaughtException just before exiting the process
process.on('uncaughtException', function(err){
  console.error('This will catch at last the ' +
    'JSON parsing exception: ' + err.message);
  //without this, the application would continue
  process.exit(1);
});
- An uncaught exception leaves the application in a state that is not guaranteed to be consistent >>> can lead to unforeseeable problems.
- There might still have incomplete I/O requests running
- Closures might have become inconsistent
- It is always advised, especially in production, to exit anyway from the application after an uncaught exception is received.
Callback & Flow Control
Node.js & the callback discipline – Asynchronous Flow control patterns
- Introduction
- The Callback Hell
- Callback Discipline
- Sequential Execution
- Parallel Execution
Intro
- Writing asynchronous code can be a different experience, especially when it comes to control flow
- To avoid ending up writing inefficient and unreadable code require the developer to take new approaches and techniques
- Sacrificing qualities such as modularity, reusability, and maintainability leads to the uncontrolled proliferation of callback nesting, the growth in the size of functions, and will lead to poor code organization
The Callback Hell
Simple Web Spider
- Code for a simple web spider: a command-line application that takes in a web URL as input and downloads its contents locally into a file.
- We are going to use npm dependencies:
- request: A library to streamline HTTP calls
- mkdirp: A small utility to create directories recursively
- In the spider() function we defined the algorithm is simple but the code has several levels of indentation and is hard to read
- In fact what we have is one of the most well recognized and severe anti-patterns in Node.js and JavaScript
The Callback Hell Con't
Simple Web Spider
- The anti-pattern
asyncFoo(function(err) {
  asyncBar(function(err) {
    asyncFooBar(function(err) {
      [...]
    });
  });
});
- Code written in this way assumes the shape of a pyramid due to the deep nesting
- Poor readability
- Overlapping variable names used in each scope (Similar names to describe the content of a variable >> err, error, err1, err2… )
The Callback Discipline
Basic principles - to keep the nesting level low and improve the organization of our code in general:
- Exit as soon as possible. Use return, continue, or break, depending on the context, to immediately exit the current statement
- Create named functions for callbacks
- Keep them out of closures and passing intermediate results as arguments
- Naming functions will also make them look better in stack traces
- Modularize the code >> Split the code into smaller, reusable functions whenever it's possible.
The Callback Discipline Con't
Basic principles
- Use
if(err) {
  return callback(err);
}
//code to execute when there are no errors
- Rather than
if(err) {
  callback(err);
} else {
  //code to execute when there are no errors
}
The Callback Discipline Example
Basic principles
- The functionality that wris a given string to a file can be easily factored out into a separate function as follows
function saveFile(filename, contents, callback) {
  mkdirp(path.dirname(filename), function(err) {
    if(err) {
      return callback(err);
    }
    fs.writeFile(filename, contents, callback);
  });
}
- Same changes for
function download(url, filename, callback) { …
Sequential Execution
The Need
- Executing a set of tasks in sequence is running them one at a time one after the other. The order of execution matters and must be preserved
- There are different variations of this flow:
- Executing a set of known tasks in sequence, without chaining or propagating results
- Using the output of a task as the input for the next (also known as chain, pipeline, or waterfall)
- Iterating over a collection while running an asynchronous task on each element, one after the other
Sequential Execution Con't
Pattern
function task1(callback) {
  asyncOperation(function() {
    task2(callback);
  });
}
function task2(callback) {
  asyncOperation(function(result) {
    task3(callback);
  });
}
function task3(callback) {
  asyncOperation(function() {
    callback();
  });
}
task1(function() {
  //task1, task2, task3 completed
});
Sequential Execution Example
Web Spider Version 2
- Download all the links contained in a web page recursively
- Extract all the links from the page and then trigger our web spider on each one of them recursively and in sequence
- The spider() function will use a function spiderLinks() for a recursive download of all the links of a page
Sequential Execution Pattern
The Pattern
function iterate(index) {
  if(index === tasks.length) {
    return finish();
  }
  var task = tasks[index];
  task(function() {
    iterate(index + 1);
  });
}
function finish() {
  //iteration completed
}
iterate(0);
Parallel Execution
The Need
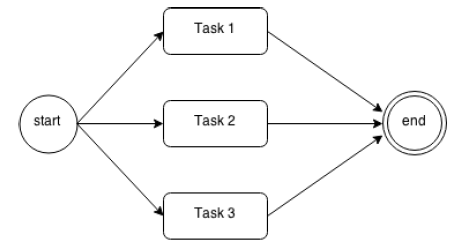
- The order of the execution of a set of asynchronous tasks is not important and all we want is just to be notified when all those running tasks are completed
- We achieve concurrency withe nonblocking nature of Node.js (The tasks do not run simultaneously, the execution is carried out by a nonblocking API and interleaved by the event loop)
Parallel Execution Con't
Web Spider Version 3
Parallel Execution Example
Web Spider Version 3
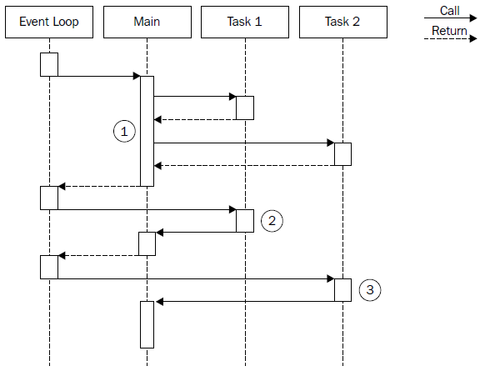
- The Main function triggers the execution of Task 1 and Task 2. As these trigger an asynchronous operation, they immediately return the control back to the Main function, which then returns it to the event loop.
- When the asynchronous operation of Task 1 is completed, the event loop gives control to it. When Task 1 completes its internal synchronous processing as well, it notifies the Main function.
- When the asynchronous operation triggered by Task 2 is completed, the event loop invokes its callback, giving the control back to Task 2. At the end of Task 2, the Main function is again notified. At this point, the Main function knows that both Task 1 and Task 2 are complete, so it can continue its execution or return the results of the operations to another callback …
Parallel Execution Example Con't
Web Spider Version 3
- Improve the performance of the web spider by downloading all the linked pages in parllel
- Launch all the spider() tasks at once, and then invoke the final callback when all of them have completed
- To make our application wait for all the tasks to complete is to provide the spider() function with a special callback, which we call done().
- The done() function increases a counter when a spider task completes
- When number of completed downloads reaches the size of the links array, the final callback is invoked
Parallel Execution Pattern
The Pattern
var tasks = [...];
var completed = 0;
tasks.forEach(function(task) {
  task(function() {
    if(++completed === tasks.length) {
      finish();
    }
  });
});
function finish() {
  //all the tasks completed
}
Module System, Patterns
- Module Intro
- Homemade Module Loader
- Defining Modules & Globals
- exports & require
- Resolving Algorithm
- Module Cache
- Cycles
- Module Definition Patterns
- Modules worth to know
Nodejs Modules
- Resolve one of the major problems with JavaScript >> the absence of namespacing
- Are the bricks for structuring non-trivial applications
- Are the main mechanism to enforce information hiding (keeping private all the functions and variables that are not explicitly marked to be exported)
Modules Con't
They are based on the revealing module pattern
- A self-invoking function to create a private scope, exporting only the parts that are meant to be public
var module = (function() {
  var privateFoo = function() { //... };
  var privateVar = [];
  var export = {
    publicFoo: function() { //... },
    publicBar: function() { //... }
  }
  return export;
})();
- This pattern is used as a base for the Node.js module system
Modules Con't
Node.js Modules
- CommonJS is a group with the aim to standardize the JavaScript ecosystem
- One of their most popular proposals is called CommonJS modules.
- Node.js built its module system on top of this specification, with the addition of some custom extensions:
- Each module runs in a private scope
- Every variable that is defined locally does not pollute the global namespace
Homemade Module Loader
The behavior of loadModule
- The code that follows creates a function that mimics a subset of the functionality of the original require() function of Node.js
function loadModule(filename, module, require) {
  var wrappedSrc =
    '( function(module, exports, require) { fs.readFileSync(filename, "utf8") } )(module, module.exports, require);';
  eval(wrappedSrc);
}
- The source code of a module is wrapped into a function (revealing module pattern)
- We pass/inject a list of variables to the module, in particular: module , exports , and require .
Module Loader Con't
The behavior of require
var require = function(moduleName) {
  console.log('Require invoked for module: ' + moduleName);
  var id = require.resolve(moduleName); //[1]
  if(require.cache[id]) { //[2]
    return require.cache[id].exports;
  }
  //module metadata
  var module = { //[3]
    exports: {},
    id: id
  };
  //Update the cache
  require.cache[id] = module; //[4]
  //load the module
  loadModule(id, module, require); //[5]
  //return exported variables
  return module.exports; //[6]
};
require.cache = {};
require.resolve = function(moduleName) {
  /* resolve a full module id from the moduleName */
}
Behavior of require
The require() function of Node.js loads modules
- With the module name we resolve the full path of the module
- Task is delegated to require.resolve() (implements a resolving algorithm)
- If the module was already loaded in the past we just return it immediately (from the cache)
- Otherwise create a module object that contains an exports property initialized with an empty object literal.
- This property will be used by the module to export public API
- The module object is cached.
- The module source is read from its file and the code is evaluated
- We provide to the module, the module object that we just created, and a reference to the require() function.
- The module exports its public API by manipulating or replacing the module.exports object.
- The content of module.exports (the public API of the module) is returned to the caller
Defining Modules & Globals
Defining a Module
- You need not worry about wrapping your code in a module
//load another dependency
var dependency = require('./anotherModule');
//a private function
function log() {
  console.log('Well done ' + dependency.username);
}
//the API to be exported for public use
module.exports.run = function() {
  log();
};
- Everything inside a module is private unless it's assigned to the module.exports variable
- The contents of this variable are then cached and returned when the module is loaded using require()
Modules & Globals Con't
Defining Globals
- All the variables and functions that are declared in a module are defined in its local scope
- It is still possible to define a global variable
- The module system exposes a special variable called global that can be used for this purpose.
exports & require
exports & module.exports - the variable exports is just a reference to the initial value of module.exports (simple object literal created before the module is loaded). This means:
- We can only attach new properties to the object referenced by the exports variable, as shown in the following code:
exports.hello = function() {console.log('Hello');}
- Reassigning the exports variable doesn't have any effect (doesn't change the contents of module.exports). The following code is wrong:
exports = function() {console.log('Hello');}
- If we want to export something other than an object literal, as for example a function, an instance, or even a string, we have to reassign module.exports as follows:
module.exports = function() { console.log('Hello');}
exports & require con't
require is synchronous
- That our homemade require function is synchronous. It returns the module contents using a simple direct style
- As a consequence, any assignment to module.export must be synchronous as well. For example, the following code is incorrect:
setTimeout(function() {
  module.exports = function() {...};
}, 100);
- >>> We are limited to using synchronous code during the definition of a module
- One of the reasons why the core Node.js libraries offer synchronous APIs as an alternative to most of the asynchronous ones
- We can always define and export an uninitialized module that is initialized asynchronously at a later time.
- Loading such a module using require does not guarantee that it's ready to be used
- In its early days, Node had an asynchronous version of require() , it was removed (making over complicated a functionality that was meant to be used only at initialization time)
Resolving Algorithm
Dependency hell
- A situation whereby the dependencies of a software, in turn depend on a shared dependency, but require different incompatible versions
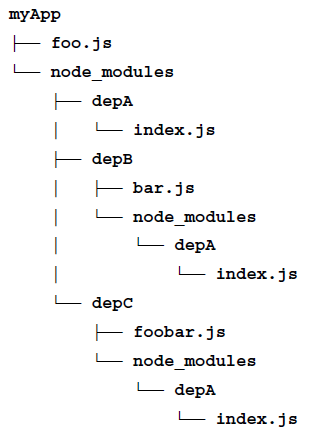
- Node.js solves this problem by loading a different version of a module depending on where the module is loaded from.
- The merits of this feature go to npm (package manager) and also to the
resolving algorithm used in the require function
- Reminder: the resolve() function
- Takes a module name as input & returns the full path of the module
- The path is used to load its code and also to identify the module uniquely
Resolving Algorithm - Branches
The resolving algorithm can be divided into the following three major branches:
- File modules: If moduleName starts with "/" it's considered already an absolute path to the module and it's returned as it is. If it starts with "./", then moduleName is considered a relative path, which is calculated starting from the requiring module.
- Core modules: If moduleName is not prefixed with "/" or "./", the algorithm will first try to search within the core Node.js modules.
- Package modules: If no core module is found matching moduleName , then the search continues by looking for a matching module into the first node_modules directory that is found navigating up in the directory structure starting from the requiring module. The algorithm continues to search for a match by looking into the next node_modules directory up in the directory tree, until it reaches the root of the filesystem.
Resolving Algorithm, matching
- For file and package modules, both the individual files and directories can match moduleName . In particular, the algorithm will try to match the following:
- < moduleName >.js
- < moduleName >/index.js
- The directory/file specified in the main property of < moduleName >/package.json
Resolving Algorithm, dependency
Module Cache
- Each module is loaded and evaluated only the first time it is required
- Any subsequent call of require() will simply return the cached version (… homemade require function)
- Caching is crucial for performances, but it also has some important functional implications:
- It makes it possible to have cycles within module dependencies
- It guarantees, to some extent, that always the same instance is returned when requiring the same module from within a given package
- The module cache is exposed in the require.cache variable. It ispossible to directly access it if needed (a common use case is to invalidate any cached module … useful during testing)
Cycles
- Circular module dependencies can happen in a real project, so it's useful for us to know how this works in Node.js
- Module a.js
console.log('a starting');
exports.done = false;
var b = require('./b.js');
console.log('in a, b.done = %j', b.done);
exports.done = true;
console.log('a done');
- Module b.js
console.log('b starting');
exports.done = false;
var a = require('./a.js');
console.log('in b, a.done = %j', a.done);
exports.done = true;
console.log('b done');
Cycles Con't
- If we load these from another module, main.js, as follows:
console.log('main starting');
var a = require('./a.js');
var b = require('./b.js');
console.log('in main, a.done=%j, b.done=%j', a.done, b.done);
- The preceding code will print the following output:
main starting
a starting
b starting
in b, a.done = false
b done
in a, b.done = true
a done
in main, a.done=true, b.done=true
- main.js loads a.js, then a.js in turn loads b.js.
- At that point, b.js tries to load a.js. In order to prevent an infinite loop an unfinished copy of the a.js exports object is returned to the b.js module.
- b.js then finishes loading, and its exports object is provided to the a.js module.
Module Definition Patterns
- Module System & APIs
- Patterns – Named Exports
- Exporting a Function ( substack pattern )
- Exporting a Constructor
- Exporting an instance
- Monkey patching
Module System & APIs
- The module system, besides being a mechanism for loading dependencies, is also a tool for defining APIs
- The main factor to consider is the balance between private and public functionality
- The aim is to maximize information hiding and API usability, while balancing these with other software qualities like extensibility and code reuse.
Patterns – Named Exports
The most basic method for exposing a public API is using named exports
- Consists in assigning all the values we want to make public to properties of the object referenced by exports (or module.exports )
- The resulting exported object becomes a container or namespace for a set of related functionality (Most of the Node.js core modules use this pattern)
//file logger.js
exports.info = function(message) {
console.log('info: ' + message);
};
exports.verbose = function(message) {
console.log('verbose: ' + message);
};
- The exported functions are then available as properties of the loaded module
Patterns – Named Exports Con't
//file main.js
var logger = require('./logger');
logger.info('This is an informational message');
logger.verbose('This is a verbose message');
- The CommonJS specification only allows the use of the exports variable to expose public members
- Therefore, the named exports pattern is the only one that is really compatible with the CommonJS specification
- The use of module.exports is an extension provided by Node.js to support a broader range of module definition patterns …
Patterns – Exporting a Function ( substack pattern )
- One of the most popular module definition patterns consists in reassigning the whole module.exports variable to a function.
- Its main strength it's the fact that it exposes only a single functionality, which provides a clear entry point for the module, and makes it simple to understand and use
- It also honors the principle of small surface area very well.
//file logger.js
module.exports = function(message) {
console.log('info: ' + message);
};
Substack pattern
- A possible extension of this pattern is using the exported function as namespace for other public APIs.
- This is a very powerful combination, because it still gives the module the clarity of a single entry point (the main exported function)
- It also allows us to expose other functionalities that have secondary or more advanced use cases
module.exports.verbose = function(message) {
console.log('verbose: ' + message);
};
Substack pattern con't
//file main.js
var logger = require('./logger');
logger('This is an informational message');
logger.verbose('This is a verbose message');
Patterns – Exporting a Constructor
- Specialization of a module that exports a function. The difference is that with this new pattern low the user to create new instances using the constructor
- We also give them the ability to extend its prototype and forge new classes
//file logger.js
function Logger(name) {
this.name = name;
};
Logger.prototype.log = function(message) {
console.log('[' + this.name + '] ' + message);
};
Logger.prototype.info = function(message) {
this.log('info: ' + message);
};
Logger.prototype.verbose = function(message) {
this.log('verbose: ' + message);
};
module.exports = Logger;
Exporting a Constructor
- We can use the preceding module as follows
//file logger.js
var Logger = require('./logger');
var dbLogger = new Logger('DB');
dbLogger.info('This is an informational message');
var accessLogger = new Logger('ACCESS');
accessLogger.verbose('This is a verbose message');
- Exporting a constructor still provides a single entry point for the module; Compared to the substack pattern: exposes a lot more of the module internals
- It allows much more power when it comes to extending its functionality
Exporting a Constructor Con't
- A variation of this pattern consists in applying a guard against invocations that don't use the new instruction.
function Logger(name) {
if(!(this instanceof Logger)) {
return new Logger(name);
}
this.name = name;
};
Patterns – Exporting an Instance
- We can leverage the caching mechanism of require() to easily define stateful Instances:
- Objects with a state created from a constructor or a factory, which can be shared across different modules
//file logger.js
function Logger(name) {
this.count = 0;
this.name = name;
};
Logger.prototype.log = function(message) {
this.count++;
console.log('[' + this.name + '] ' + message);
};
module.exports = new Logger('DEFAULT');
Exporting an Instance
- This newly defined module can then be used as follows:
//file main.js
var logger = require('./logger');
logger.log('This is an informational message');
- Since the module is cached, every module that requires the logger module will actually always retrieve the same instance of the object, thus sharing its state
- This pattern is very much like creating a Singleton, however, it does not guarantee the uniqueness of the instance across the entire application
- In the resolving algorithm, we have seen that that a module might be installed multiple times inside the dependency tree of an application.
Exporting an Instance Con't
- An extension to the pattern we just described consists in exposing the constructor used to create the instance, in addition to the instance itself, we can then
- Create new instances of the same object
- Extend it if necessary
module.exports.Logger = Logger;
- We can then use the exported constructor to create other instances of the class, as follows:
var customLogger = new logger.Logger('CUSTOM');
customLogger.log('This is an informational message');
Patterns - Modifying modules or the global scope (monkey patching)
- A module can export nothing and modify the global scope and any object in it, including other modules in the cache
- Considered bad practice but can be useful and safe under some circumstances (testing) and is sometimes used in the wild
- monkey patching >> Practice of modifying the existing objects at runtime to change or extend their behavior or to apply temporary fixes
//file patcher.js
// ./logger is another module
require('./logger').customMessage = function() {
console.log('This is a new functionality');
};
Monkey patching Con't
- Using our new patcher module would be as easy as writing the following code:
//file main.js
require('./patcher');
var logger = require('./logger');
logger.customMessage();
- In the preceding code, patcher must be required before using the logger module for the first time in order to allow the patch to be applied.
- Be careful you can affect the state of entities outside their scope
npm modules worth to know
- Frameworks and Tools
- Via popularity
Event Emitters - The Observer Pattern
- The Pattern – The EventEmitter
- Create and use EventEmitters
- Propagating errors
- Make an Object Observable
- Synchronous & Asynchronous Events
- EventEmitter vs Callbacks
- Combine Callbacks & EventEmitters
- Patterns
The Pattern – The EventEmitter
- The Observer Pattern
- Fundamental pattern used in Node.js. (one of the pillars of the platform)
- A prerequisite for using many node-core and userland modules
- The Solution for modeling the reactive nature of Node.js, cooperates with callbacks
- Definition
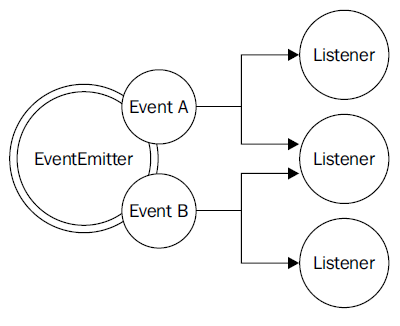
- Defines an object (called subject), which can notify a set of observers (or listeners), when a change in its state happens.
The Pattern – The EventEmitter Con't
- Requires: interfaces, concrete classes, hierarchy
- In Node.j it's already built into the core and is available through the EventEmitter class
- that class allows to register one or more functions as listeners, which will be invoked when a particular event type is fired
The Pattern – The EventEmitter as prototype
- The EventEmitter is a prototype, and it is exported from the events core module.
- The following code shows how we can obtain a reference to it:
import { EventEmitter } from 'events'
const emitter = new EventEmitter()
The Pattern – The EventEmitter methods
on(event, listener): allows to register a new listener (a function) for the given event type (a string)once(event, listener): registers a new listener, removed after the event is emitted for the first timeemit(event, [arg1], […]): produces a new event and provides additional arguments for the listenersremoveListener(event, listener): removes a listener for the specified event type
The Pattern – The EventEmitter methods con't
- All the preceding methods will return the EventEmitter instance to allow chaining.
- The listener function has the signature, function([arg1], […]) , it accepts the arguments provided the moment the event is emitted
- Inside the listener, this refers to the instance of the EventEmitter that produced the event.
Create and use EventEmitters
- Use an EventEmitter to notify its subscribers in real time when a particular pattern is found in a list of files:
import { EventEmitter } from 'events'
import { readFile } from 'fs'
function findRegex (files, regex) {
  const emitter = new EventEmitter()
  for (const file of files) {
    readFile(file, 'utf8', (err, content) => {
      if (err) {
        return emitter.emit('error', err)
      }
      emitter.emit('fileread', file)
      const match = content.match(regex)
      if (match) {
        match.forEach(elem => emitter.emit('found', file, elem))
      }
    })
  }
  return emitter
}
Create and use EventEmitters Con't
- The EventEmitter created by the preceding function will produce the following three events:
- fileread: This event occurs when a file is read
- found: match has been found
- error: This event occurs when an error has occurred during the reading of the file
- The findRegex() function can be used as follows
findRegex(
  ['fileA.txt', 'fileB.json'],
  /hello \w+/g
)
  .on('fileread', file => console.log(`${file} was read`))
  .on('found', (file, match) => console.log(`Matched "${match}" in ${file}`))
  .on('error', err => console.error(`Error emitted ${err.message}`))
Propagating Errors
- The EventEmitter - as it happens for callbacks - cannot just throw exceptions when an error condition occurs
- They would be lost in the event loop if the event is emitted asynchronously !
- Instead, the convention is to emit an error event and to pass an Error object as an argument (good practice)
- If no associated listener is found Node.js will automatically throw an exception and exit from the program
Make an Object Observable
- It is more common (rather than always use a dedicated object to manage events) to use a generic object observable
- This is done by extending the EventEmitter class.
- Implementation
import { EventEmitter } from 'events'
import { readFile } from 'fs'
class FindRegex extends EventEmitter {
  constructor (regex) {
    super()
    this.regex = regex
    this.files = []
  }
  addFile (file) {
    this.files.push(file)
    return this
  }
  find () {
    for (const file of this.files) {
      readFile(file, 'utf8', (err, content) => {
        if (err) {
          return this.emit('error', err)
        }
        this.emit('fileread', file)
        const match = content.match(this.regex)
        if (match) {
          match.forEach(elem => this.emit('found', file, elem))
        }
      })
    }
    return this
  }
}
Make an Object Observable - usage
const findRegexInstance = new FindRegex(/hello \w+/)
findRegexInstance
  .addFile('fileA.txt')
  .addFile('fileB.json')
  .find()
  .on('found', (file, match) => console.log(`Matched "${match}" in file ${file}`))
  .on('error', err => console.error(`Error emitted ${err.message}`))
Make an Object Observable - more
More
- The Server object of the core http module defines methods such as listen(), close(), setTimeout()
- Internally it inherits from the EventEmitter allowing it to produce events
- request when a new request is received
- connection when a new connection is established
- closed when the server is closed
- Other notable examples of objects extending the EventEmitter are streams.
Synchronous & Asynchronous Events
Events & The event loop
- The EventListener calls all listeners synchronously in the order in which they were registered.
- Like callbacks, events can be emitted synchronously or asynchronously
- listener functions can switch to an asynchronous mode of operation using the setImmediate() or process.nextTick() methods
- It is crucial that we never mix the two approaches in the same EventEmitter
- Avoid to produce unpredictable behavior when emitting the same event type
- The main difference between emitting synchronous or asynchronous events is in the way listeners can be registered
Synchronous & Asynchronous Events Con't
- Asynchronous Events
- The user has all the time to register new listeners even after the EventEmitter is initialized (why?)
- Because the events are guaranteed not to be fired until the next cycle of the event loop.
- That's exactly what is happening in the findRegex() function.
- Synchronous Events
- Requires for all the listeners to be registered before the EventEmitter function starts to emit any event
- The event is produced synchronously and the listener is registered after the event was already sent, so the result is that the listener is never invoked; the code will print nothing to the console
EventEmitters vs Callbacks
Reusability
import { EventEmitter } from 'events'
function helloEvents () {
  const eventEmitter = new EventEmitter()
  setTimeout(() => eventEmitter.emit('complete', 'hello world'), 100)
  return eventEmitter
}
function helloCallback (cb) {
  setTimeout(() => cb(null, 'hello world'), 100)
}
helloEvents().on('complete', message => console.log(message))
helloCallback((err, message) => console.log(message))
EventEmitters vs Callbacks Con't
- Two functions equivalent; one communicates the completion of the timeout using an event, the other uses a callback
- Callbacks have some limitations when it comes to supporting different types of events
- (we can still differentiate between multiple events by passing the type as an argument of the callback but it is not an elegant API)
- A callback is expected to be invoked exactly once whether the operation is successful or not.
- The EventEmitter might be preferable when the same event can occur multiple times, or not occur at all.
- Callbacks have some limitations when it comes to supporting different types of events
- An API using callbacks can notify only that particular callback
- Using an EventEmitter function it's possible for multiple listeners to receive the same notification (loose coupling)
Combine Callbacks & EventEmitters
- The Pattern
- Useful pattern for small surface area done by :
- Exporta traditional asynchronous function as the main functionality
- Providing richer features, and more control by returning an EventEmitter
- Useful pattern for small surface area done by :
- Implementation (the “glob” module, glob-style file searches)
- The main entry point of the module is the function it exports - glob(pattern, [options], callback)
- The function takes a pattern, a set of options, and a callback function (invoked with the list of all the files matching the provided pattern)
- At the same time, the function returns an EventEmitter that provides a more fine-grained report over the state of the process
Combine Callbacks & EventEmitters Con't
- Exposing a simple, clean, and minimal entry point
- while still providing more advanced or less important features with secondary means
- It is possible to
- Be notified in real-time when a match occurs by listening to the match event
- Obtain the list of all the matched files with the end event
- Know whether the process was manually aborted by listening to the abort event
import glob from 'glob'
glob('data/*.txt',
  (err, files) => {
    if (err) {
      return console.error(err)
    }
    console.log(`All files found: ${JSON.stringify(files)}`)
  })
  .on('match', match => console.log(`Match found: ${match}`))
Buffers & Data Serialization
- Introduction
- Changing Encodings
Introduction
- The need for Buffers
- The ability to serialize data is fundamental to cross-application and cross-network communication.
- JavaScript has historically had subpar binary support. Parsing binary data would involve various tricks with strings to extract the data you want.
- The Node API extends JavaScript with a Buffer class, exposing an API for raw binary data access and tools for dealing more easily with binary data
- Buffers are raw allocations of the heap, exposed to JavaScript in an array-like manner
- Buffers are exposed globally and therefore don’t need to be required, and can be thought of as just another JavaScript type (like String or Number)
Changing Encodings
Buffers to Plain Text
- If no encoding is given, file operations and many network operations will return data as a Buffer:
import fs from 'fs';
fs.readFile('./names.txt', (er, buf) => {
  console.log( Buffer.isBuffer(buf) ); // true (isBuffer returns true if it is a Buffer)
});
- By default, Node’s core APIs returns a buffer unless an encoding is specified, but buffers easily convert to other formats
Changing Encodings Con't
Buffers to Plain Text
- File names.txt that contains:
Janet
Wookie
Alex
Marc
- If we were to load the file using a method from the file system (fs) API, we’d get a Buffer (buf) by default
import fs from 'fs';
fs.readFile('./names.txt', (er, buf) => {
  console.log(buf);
});
- which, when logged out, is shown as a list of octets (using hex notation):
<Buffer 4a 61 6e 65 74 0a 57 6f 6f 6b 69 65 0a 41 6c 65 78 0a 4d 61 72 63 0a>
Changing Encodings - types
Buffers to Plain Text
- The Buffer class provides a method called toString to convert our data into a UTF-8 encoded string:
import fs from 'fs';
fs.readFile('./names.txt', (er, buf) => {
  console.log(buf.toString()); // by default returns UTF-8 encoded string
});
- To change the encoding to ASCII rather than UTF-8 we provide the type of encoding as the first argument for toString():
import fs from 'fs';
fs.readFile('./names.txt', (er, buf) => {
  console.log(buf.toString('ascii'));
});
- The Buffer API provides other encodings such as utf16le , base64 , and hex
Changing Encodings - auth header
Changing String Encodings - Authentication header
- The Node Buffer API provides a mechanism to change encodings.
- For request that uses Basic authentication, you’d need to send the username and password encoded using Base64
Authorization: Basic am9obm55OmMtYmFk
- Basic authentication credentials combine the username and password, separating the two using a colon
const user = 'johnny';
const pass = 'c-bad';
const authstring = user + ':' + pass;
Changing Encodings - auth header con't
Changing String Encodings - Authentication header
- Convert it into a Buffer in order to change it into another encoding.
- Baffers can be allocated by bytes simply passing in a number ( for example, Buffer.alloc(255) ).
- Buffers can be allocated by passing in string data
const buf = Buffer.from(authstring); // Converted to a Buffer
const encoded = buf.toString('base64'); // Result am9obm55OmMtYmFk
- Process can be compacted as well:
const encodedc = Buffer.from(user + ':' + pass).toString('base64');
Changing Encodings - data URI
- Data URIs allow a resource to be embedded inline on a web page using the following scheme:
data:[MIME-type][;charset=<encoding>[;base64],<data>
- PNG image represented as a data URI:
data:image/png;base64,iVBORw0KGgoAAAANSUhEUgAAACsAAAAoCAYAAABny...
- Create a data URI using the Buffer API
const mime = 'image/jpg';
const encoding = 'base64';
const data = fs.readFileSync('./monkey.jpg').toString(encoding);
const uri = 'data:' + mime + ';' + encoding + ',' + data;
// console.log(uri);
fs.writeFileSync('./dataUri.txt', uri);
Changing Encodings - data URI con't
- The other way around:
import fs from 'fs';
// const uriBack = 'data:image/png;base64,iVBORw0KGgoAAAANSUhEUgAAACsAAAAo...';
const uriBack = fs.readFileSync('./dataUri.txt').toString();
const dataBack = uriBack.split(',')[1];
const bufBack = Buffer.from(dataBack, 'base64');
fs.writeFileSync('./secondmonkey.jpg', bufBack);
Streams - Types, Usage & Implementation, Flow Control
- Importance of Streams
- Anatomy of a Stream
- Readable Streams
- Writable Streams
- Duplex Streams
- Transform Streams
- Connecting Streams & Pipes
- Flow Control With Streams
Importance of Streams
Introduction
- Streams are one of the most important components and patterns of Node.js
- The usage of streams is elegance and fits perfectly into the Node.js philosophy
- In an event-based platform such as Node.js, the most efficient way to handle I/O is in real time
- Consuming the input as soon as it is available
- Sending the output as soon as it is produced by the application
Importance of Streams Con't
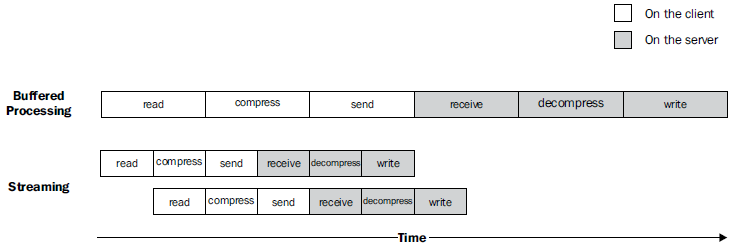
Buffers vs Streams
- All the asynchronous APIs that we've seen so far work using the buffer mode.
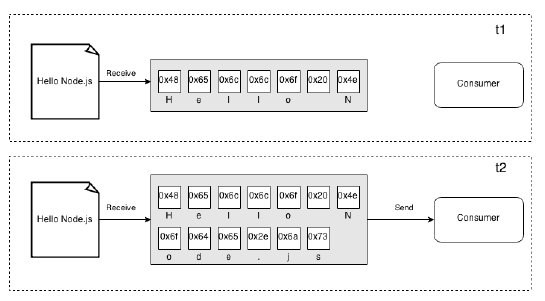
- For an input operation, the buffer mode causes all the data coming from a resource to be collected into a buffer
- It is then passed to a callback as soon as the entire resource is read\
Buffers vs Streams Con't
- On the other side, streams allow you to process the data as soon as it arrives from the resource
- Each new chunk of data is received from the resource and is immediately provided to the consumer, (can process it straightaway)
- Differences between the two approaches
- Spatial efficiency (for example with huge files)
- Time efficiency
- Node.js streams have another important advantage: Composability
Buffers vs Streams – Time Efficiency
Buffers vs Streams – Composability
- The code we have seen so far has already given us an overview of how streams can be composed, thanks to pipes
- This is possible because streams have a uniform interface
- The only prerequisitis that the next stream in the pipeline has to support the data type produced by the previous stream (binary, text, or even objects)
Streams and Node.js core
- Streams are powerful and are everywhere in Node.js, starting from its core modules.
- The fs module has createReadStream() and createWriteStream()
- The http request and response objects are essentially streams
- The zlib module allows us to compress and decompress data using a
streaming interface.
Anatomy of a Stream
- Every stream in Node.js is an implementation of one of the four base abstract classes available in the stream core module:
- stream.Readable
- stream.Writable
- stream.Duplex
- stream.Transform
- Each stream class is also an instance of EventEmitter
- Can produce events
- end when a Readable stream has finished reading
- error when something goes wrong
- Can produce events
- Streams support two operating modes:
- Binary mode: Where data is streamed in the form of chunks, such as buffers or strings
- Object mode: Where the streaming data is treated as a sequence of discreet objects (allowing to use almost any JavaScript value)
Readable Streams
- Implementation
- Represents a source of data
- Implemented using the Readable abstract class that is available in the stream module
- Reading from a Stream
- Two ways (modes) to receive the data from a Readable stream
- Non-flowing
- Flowing
- Two ways (modes) to receive the data from a Readable stream
Non-Flowing mode
- Default pattern for reading from a Readable stream
- Consists of attaching a listener for the readable event that signals the availability of new data to read.
- Then, in a loop, we read all the data until the internal buffer is emptied
- This can be done using the read() method
- read() synchronously reads from the internal buffer and returns a Buffer or String object representing the chunk of data
readable.read([size])
- Using this approach, the data is explicitly pulled from the stream on demand
- The data is read exclusively from within the readable listener, which is invoked as soon as new data is available
Non-Flowing mode Con't
- When a stream is working in binary mode, we can specify the size we are interested in reading a specific amount of data by passing a size value to the read() method
- This is particularly useful when implementing network protocols or when parsing specific data formats
- Streaming paradigm is a universal interface, which enables our programs to communicate, regardless of the language they are written in.
Flowing mode
- Another way to read from a stream is by attaching a listener to the data event
- This will switch the stream into using the flowing mode where the data is not pulled using read() , but instead it's pushed to the data listener as soon as it arrives
- This mode offers less flexibility to control the flow of data.
- To enable it attach a listener to the data event or explicitly invoke the resume() method.
- To temporarily stop the stream from emitting data events, we can then invoke the pause() method, causing any incoming data to be cached in the internal buffer.
Readable Stream implementation
- Now that we know how to read from a stream, the next step is to learn how to implement a new Readable stream.
- Create a new class by inheriting the prototype of stream.Readable
- The concrete stream must provide an implementation of the _read() method, which has the following signature:
readable._read(size)
- The internals of the Readable class will call the _read() method, which in
turn will start to fill the internal buffer using push() :
readable.push(chunk)
- read() is a method called by the stream consumers, while _read() is a method to be implemented by a stream subclass and should never be called directly (underscore indicates method is not public)
Readable Stream implementation Con't
stream.Readable.call(this, options);
- Call the constructor of the parent class to initialize its internal state, and forward the options argument received as input.
- The possible parameters passed through the options object include:
- The encoding argument that is used to convert Buffers to Strings (defaults to null)
- A flag to enable the object mode (objectMode defaults to false)
- The upper limit of the data stored in the internal buffer after which no more reading from the source should be done (highWaterMark defaults to 16 KB)
- The possible parameters passed through the options object include:
Writable Streams
Write in a Stream
- A writable stream represents a data destination
- It's implemented using the Writable abstract class, which is available in the stream module.
- To Push data down a writable stream
- The encoding argument is optional and can be specified if chunk is String (defaults to utf8, ignored if chunk is Buffer)
- The callback function instead is called when the chunk is flushed into the underlying resource and is optional as well.
writable.write(chunk, [encoding], [callback])
Write in a Stream Con't
- To signal that no more data will be written to the stream, we have to use the end() method
writable.end([chunk], [encoding], [callback])
- The callback function is equivalent to registering a listener to the finish event
- Fired when all the data written in the stream has been flushed into the underlying resource.
Writable Stream Implementation
- To Implement a new Writable stream
- Inherit the prototype of stream.Writable
- providing an implementation for the _write() method.
- Build a Writable stream that receives objects in the following format:
- Save the content part into a file created at the given path.
- The input of our stream are objects, and not strings or buffers >> stream
has to work in object mode
{
  path: <path to a file>
  content: <string or buffer>
}
Writable Stream Implementation Con't
_write(chunk,encoding,callback)
- The method accepts
- data chunk,
- An encoding (Makes sense only if we are in the binary mode and the stream option decodeStrings is set to false)
- A callback function which needs to be invoked when the operation completes
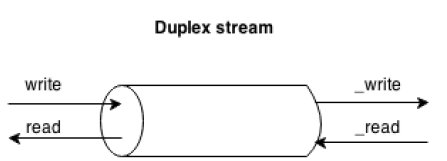
Duplex Streams
Usage
- Stream that is both Readable and Writable for an entity that is both a data source and a data destination (network sockets is an example)
- Duplex streams inherit the methods of both stream.Readable and stream.Writable, so this is nothing new to us
- We can
- read() or write() data
- listen for both the readable and drain events
- A Duplex stream has no immediate relationship between the data read from the stream and the data written into it
- A TCP socket is not aware of any relationship between the input and the output
Duplex Streams Usage Con't
Duplex Stream Implementation
- Provide an implementation for both _read() and _write()
- The options object passed to the Duplex() constructor is internally forwarded to both the Readable and Writable constructors
- Option are the same as the previous ones with an additional parameter
- allowHalfOpen : (defaults to true) If set to false will cause both the parts (Readable and Writable) of the stream to end if only one of them does
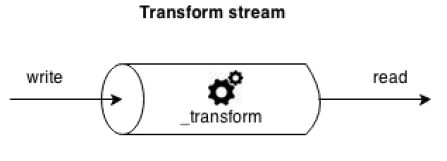
Transform Streams
Usage
- A special kind of Duplex stream designed to handle data transformations.
- Transform streams apply some kind of transformation to each chunk of data that they receive from their Writable side and then make the transformed data available on their Readable side
Transform Stream Implementation
- The interface of a Transform stream is exactly like that of a Duplex stream
- To implement a Transform stream we have to
- Provide the _transform() and _flush() methods
- For example a transform stream that replaces all the occurrences of a given string
- The _transform() method instead of writing data into an underlying resource pushes it into the internal buffer using this.push()
- The flush() method is invoked just before the stream is ended
- It takes a callback that we have to invoke when all the operations are complete causing the stream to be terminated
Connecting Streams & Pipes
Usage
- Node.js streams can be connected together using the pipe() method of the Readable stream
readable.pipe(writable, [options])
- The pipe() pumps the data emitted from the readable stream into the provided writable stream
- The writable stream is ended automatically when the readable stream emits an end event (unless specified {end: false} as options)
- The pipe() method returns the writable stream passed as an argument
- allows to create chained invocations if the writable stream is also readable (Duplex or Transform stream).
- When Streams are Piped and the data to flow automatically
- There is no need to call read() or write()
- There is no need to control the back-pressure anymore
Connecting Streams & Pipes - Errors
- The error events are not propagated automatically through the pipeline.
stream1.pipe(stream2).on('error', function() {});
- We will catch only the errors coming from stream2, which is the stream that we attached the listener to
- If we want to catch any error generated from stream1, we have to attach another error listener directly to it
Flow Control With Streams
Streams are an elegant programming pattern to turn asynchronous control flow into flow control
Sequential Execution
- Streams will handle data in a sequence
- _transform() function of a Transform stream will never be invoked again with the next chunk of data, until the previous invocation completes by executing callback()
- We can use streams to execute asynchronous tasks in a sequence
Flow Control With Streams Con't
Unordered Parallel Execution
- Processing in sequence can be a bottleneck as we would not make the most of the Node.js concurrency
- If we have to execute a asynchronous operation for every data chunk, it can be advantageous to parallelize the execution
- Execute asynchronous tasks in a sequence
Introduction to Express.js
- Introduction
- Installation
- The Application Skeleton
- Middleware Functions
- Dynamic Rooting
- Error Handling Middleware
- Built-in Middleware
- Third-party Middleware
Introduction
Express
- The Express web framework is built on top of Connect, providing tools and structure that make writing web applications easier and faster
- Express offers
- A unified view system that lets you use nearly any template engine you want
- Utilities for responding with various data formats, transferring files, routing URLs, and more
Installation
- Install Express
- Express works both as a Node module and as a command-line executable
- Install Express globally in order to run the subsequently installed express executable from any directory
sudo npm i -g express
- Install Express Generator
- The express-generator module (part of the Express project) provides an easy way to generate a project skeleton using its command-line tool (express).
sudo npm i -g express-generator
The Application Skeleton
- Usage
express --help
- Generate Project Files
- To generate all of our project files under a new directory called photo :
- In the directory project 'photo' >> express –e photo
- -e : add 'ejs' engine support (defaults to 'jade')
- A fully functional application will be created
- Import Dependencies
- In the 'photo' directory >> npm install
- Start the server
- npm start
- go to your navigator and check if the application responses
The Application Skeleton Con't
Exploring the Application
- package.json
- The script object has a start property that points to the file './bin/www'
- The www file initializes the app, listening (by default) on port 3000
- The script object has a start property that points to the file './bin/www'
- app.js
- Contain the boilerplate for the web app
- The 'routes' folder
- Holds the 'users.js' and 'index.js' files and both are required by app.js
- To define our routes, we push them onto Node's exports object
- The views folder
- Holds template files
The app.js file
- The app.js file can be divided into five sections
- Dependencies
- App configuration
- Route setting
- Error handling
- export
Middleware Functions
- Middleware functions are functions that have access to threquest object ( req ), the response object ( res ), and the next middleware function in the application’s request-response cycle
- The next middleware function is commonly denoted by a variable named next
- Middleware functions can perform the following tasks:
- Execute any code
- Make changes to the request and the response objects
- End the request-response cycle
- Call the next middleware in the stack
- If the current middleware function does not end the request-response cycle, it must call next() to pass control to the next middleware function. Otherwise, the request will be left hanging.
Middleware Functions Con't
Middleware Functions - logger
- Function that prints "LOGGED" when a request to the app passes through it.
var myLogger = function (req, res, next) {
  console.log('LOGGED');
  next();
};
- next() invokes the next middleware function in the app
- The next() function is not a part of the Node.js or Express API, but is the third argument that is passed to the middleware function
- The next() function could be named anything, but by convention it is always named “next”
Middleware Functions - logger con't
- To load the middleware function, call app.use()
var express = require('express');
var app = express();

var myLogger = function (req, res, next) {
  console.log('LOGGED');
  next();
};
app.use(myLogger);
app.get('/', function (req, res) {
  res.send('Hello World!');
});
app.listen(3000);
Middleware Functions - flow
- Every time the app receives a request, it prints the message "LOGGED" to the terminal
- The order of middleware loading is important: middleware functions that are loaded first are also executed first.
- If myLogger is loaded after the route to the root path, the request never reaches it and the app doesn't print "LOGGED", because the route handler of the root path terminates the request-response cycle.
- The middleware function myLogger simply prints a message, then passes on the request to the next middleware function in the stack by calling the next() function.
Dynamic Routing
- Routing refers to the definition of application end points (URIs) and how they respond to client requests. For an introduction to routing, see
var express = require('express');
var app = express();

// respond with "hello world" when a GET request is made to
the homepage
app.get('/', function(req, res) {
  res.send('hello world');
});
Dynamic Routing Con't
Routing Methods
- A route method is derived from one of the HTTP methods, and is attached to an instance of the express class.
- Express supports a list of routing methods (corresponding each to a HTTP methods)
- get, post, put, head, delete, options, trace, copy, lock, mkcol, move, purge, propfind, proppatch…
// POST method route
app.post('/', function (req, res) {
res.send('POST request to the homepage');
});
Dynamic Routing methods con't
Routing Methods
- Additional routing method, app.all() , not derived from any HTTP method.
- Used for loading middleware functions at a path for all request methods
app.all('/secret', function (req, res, next) {
  console.log('Accessing the secret section ...');
  next(); // pass control to the next handler
});
Dynamic Routing - routing Paths
- In combination with a request method, a routing path defines the endpoints at which requests can be made
- Route paths can be strings, string patterns, or regular expressions.
- Root path that matches requests to the root route "/"
app.get('/', function (req, res) {
  res.send('root');
});
- Route path that matches requests to "/about"
app.get('/about', function (req, res) {
  res.send('about');
});
Dynamic Routing - Routing Paths Con't
- This route path will match acd and abcd.
app.get('/ab?cd', function(req, res) {
  res.send('ab?cd');
});
- This route path will match abcd, abbcd, abbbcd, and so on.
app.get('/ab+cd', function(req, res) {
  res.send('ab+cd');
});
Dynamic Routing Routing Paths - matchers
- This route path will match anything with an "a" in the route name.
app.get(/a/, function(req, res) {
  res.send('/a/');
});
- This route path will match "butterfly" and "dragonfly", but not "butterflyman”", "dragonfly man"
app.get(/.*fly$/, function(req, res) {
  res.send('/.*fly$/');
});
Dynamic Routing - Routing Handlers
- Route handlers can be in the form of a function, an array of functions, or combinations of both
- You can provide multiple callback functions to handle a request
- These callbacks might invoke next('route') to bypass the remaining route callbacks
- A single callback function can handle a route. For example:
app.get('/example/a', function (req, res) {
  res.send('Hello from A!');
});
Dynamic Routing - Routing Handlers Con't
- More than one callback function can handle a route (make sure you specify the next object). For example:
app.get('/example/b', function (req, res, next) {
  console.log('the response will be sent by the next function ...');
  next();
}, function (req, res) {
  res.send('Hello from B!');
});
Dynamic Routing - Routing Handlers callbacks
- An array of callback functions can handle a route. For example:
var cb0 = function (req, res, next) {
  console.log('CB0');
  next();
}
var cb1 = function (req, res, next) {
  console.log('CB1');
  next();
}
var cb2 = function (req, res) {
  res.send('Hello from C!');
}

app.get('/example/c', [cb0, cb1, cb2]);
Dynamic Routing - Routing Handlers combo
- A combination of independent functions and arrays of functions can handle a route. For example:
var cb0 = function (req, res, next) {
  console.log('CB0');
  next();
}
var cb1 = function (req, res, next) {
  console.log('CB1');
  next();
}
app.get('/example/d', [cb0, cb1], function (req, res, next) {
  console.log('the response will be sent by the next function ...');
  next();
}, function (req, res) {
  res.send('Hello from D!');
});
Dynamic Routing - Response Methods
- res.download() Prompt a file to be downloaded.
- res.end() End the response process.
- res.json() Send a JSON response.
- res.jsonp() Send a JSON response with JSONP support.
- res.redirect() Redirect a request.
- res.render() Render a view template.
- res.send() Send a response of various types.
- res.sendFile() Send a file as an octet stream.
- res.sendStatus() Set the response status code and send its string representation as the response body.
Dynamic Routing - Express Router
- Use the express.Router class to create modular, mountable route handlers.
- A Router instance is a complete middleware and routing system (referred to as a "mini-app")
- The following example creates a router as a module, loads a middleware function in it, defines some routes, and mounts the router module on a path in the main app
Dynamic Routing - Express Router Con't
var express = require('express');
var router = express.Router();

// middleware that is specific to this router
// When a middleware is injected using .use() it will be invoked for any
// request
router.use(function timeLog(req, res, next) {
  console.log('Time: ', Date.now());
  next();
});

// define the home page route
router.get('/', function(req, res) {
  res.send('Birds home page');
});
// define the about route
router.get('/about', function(req, res) {
  res.send('About birds');
});

module.exports = router;
Dynamic Routing - Express router module
- Load the router module in the app:
var birds = require('./birds');
...
app.use('/birds', birds);
- The app will now be able to handle requests to "/birds" and "/birds/about", as well as call the timeLog middleware function that is specific to the route.
Dynamic Rooting - chainable
- You can create chainable route handlers for a route path by using app.route()
app.route('/book')
  .get(function(req, res) {
    res.send('Get a random book');
  })
  .post(function(req, res) {
    res.send('Add a book');
  })
  .put(function(req, res) {
    res.send('Update the book');
  });
Dynamic Rooting - Skip to the next route handler
- Callback functions you can use the "route" parameter to skip to the next route handler. For example:
app.get('/a_route_behind_paywall',
  function checkIfPaidSubscriber(req, res, next) {
    if(!req.user.hasPaid) {
      // continue handling this request
     next('route');
    }
  }, function getPaidContent(req, res, next) {
    PaidContent.find(function(err, doc) {
     if(err) return next(err);
     res.json(doc);
   });
  });
Error Handling Middleware
Usage
- Error-handling middleware always takes four arguments.
- You must provide four arguments to identify it as an error-handling middleware function.
- Even if you don’t need to use the next object, you must specify it to maintain the signature.
- Define error-handling middleware functions in the same way as other middleware functions, except with four arguments
app.use(function (err, req, res, next) {
  console.error(err.stack);
  next(err);
});

app.use(function(err, req, res, next) {
  console.error(err.stack);
  res.status(500).send('Something broke!');
});
Error Handling Middleware con't
Usage
- You define error-handling middleware last, after other app.use() and routes calls; for example:
var bodyParser = require('body-parser');
var methodOverride = require('method-override');

app.use(bodyParser());
app.use(methodOverride());
app.use(function(err, req, res, next) {
  // logic
});
- The "catch-all" errorHandler function might be implemented as follows:
function errorHandler(err, req, res, next) {
  res.status(500);
  res.render('error', { error: err });
}
Built-in Middleware
express.static
- Built-in middleware function in Express
- This function is responsible for serving static assets such as HTML files, images, and so on. Signature is:
express.static(root, [options])
- The root argument specifies the root directory from which to serve static assets
var options = {
dotfiles: 'ignore',
etag: false,
extensions: ['htm', 'html'],
index: false,
maxAge: '1d',
redirect: false,
setHeaders: function (res, path, stat) {
res.set('x-timestamp', Date.now());
}}
app.use(express.static('public', options));
- You can have more than one static directory per app
Third-party Middleware
- Third-party middleware to add functionality to Express apps
- Load it in your app at the application level or at the router level
var express = require('express');
var app = express();
var cookieParser = require('cookie-parser');

// load the cookie-parsing middleware
app.use(cookieParser());
- Partial list of third-party middleware functions that are commonly used with Express
Real-time communication, integration
- Messaging system
- Socket.io
- Redis
- ZeroMQ
- RabbitMQ
Fundamentals of a messaging system
Things to consider
- The direction of the communication
- one-way vs request/reply exchange
- The purpose of the message, also determines its content
- The timing of the message
- can be sent and received in-context (synchronously) or out-of-context (asynchronously)
- The delivery of the message, can happen directly or via a broker
Example with ws module
Socket.io
- Enables real-time, bidirectional and event-based communication
- Works on every platform, browser or device
- Focusing equally on reliability and speed
- Server - https://github.com/socketio/socket.io
- Client - https://github.com/socketio/socket.io-client
Socket.io - use cases
- Real-time analytics
- Push data to clients that gets represented as real-time counters, charts or logs
- Binary streaming
- Possible to send any blob back and forth: image, audio, video
- Instant messaging and chat
- Chat app in just a few lines of code
- Document collaboration
- Allow users to concurrently edit a document and see each other's changes
Redis
- In-memory data structure store (BSD licensed)
- Use cases: database, cache, message broker
- It supports strings, hashes, lists, sets, sorted sets with range queries, bitmaps, hyperloglogs, geospatial indexes with radius queries and streams
- Has built-in replication, Lua scripting, LRU eviction, transactions and different levels of on-disk persistence
- It's Redis Sentinel provides high availability
- Redis Cluster does automatic partitioning
ZeroMQ
- Embeddable networking library - acts like a concurrency framework
- Has sockets that carry atomic messages via in-process, inter-process, TCP, and multicast
- Supports patterns - fan-out, pub-sub, task distribution, request-reply
- Fabric for clustered products
- Has asynchronous I/O model - scalable multicore applications, built as asynchronous message-processing tasks
- Has a score of language APIs and runs on most operating systems
RabbitMQ
- Open source message broker - one of the most popular brokers (used by T-Mobile, Runtastic, etc)
- Lightweight and easy to deploy on premises and in the cloud
- Supports multiple messaging protocols
- Can be deployed in distributed and federated configurations (high-scale, high-availability)
- Runs on many operating systems and cloud environments
- Provides a wide range of developer tools for most popular languages
Connecting to Databases
- MongoDB
- Official driver
- version '>3.6' - https://docs.mongodb.com/drivers/node/
- older '<3.6' - https://github.com/mongodb/node-mongodb-native
- Not-the-duck way - https://mongoosejs.com/
- Official driver
- MySQL
- Pure driver - https://github.com/mysqljs/mysql#readme
- MariaDB
- Official connector - https://mariadb.com/kb/en/nodejs-connector/
- Oracle
- SQL Server
- Tedious driver - https://github.com/tediousjs/tedious
MongoDB driver
0. Global setup check
  mongo
  sudo systemctl start mongod
  sudo systemctl status mongod
  sudo chown mongodb:mongodb /tmp/mongodb-27017.sock
  mongo
1. Initial setup
mkdir mongodb_; cd mongodb_; npm init -y; npm i mongodb
2. Database connection
// Example of connection to MongoDB via mongodb driver

const { MongoClient } = require("mongodb");

// Connection URI
const uri =
  "mongodb://localhost:27017/?poolSize=20&w=majority";

// Create a new MongoClient
const client = new MongoClient(uri);

async function run() {
  try {
    // Connect the client to the server
    await client.connect();

    // Establish and verify connection
    await client.db("admin").command({ ping: 1 });
    console.log("Connected successfully to server");
  } finally {
    // Ensures that the client will close when you finish/error
    await client.close();
  }
}
run().catch(console.dir);
3. Add documents
const { MongoClient } = require("mongodb");

const uri =
  "mongodb://localhost:27017/?poolSize=20&w=majority";

const client = new MongoClient(uri);

async function run() {
  try {
    await client.connect();

    const database = client.db("food");
    const collection = database.collection("food");

    // create an array of documents to insert
    const docs = [
      {amount:"3", name:"Mars", type:"sweet"},
      {amount:"6", name:"Cat's Eye", type:"meat"},
      {amount:"9", name: "Crab", type:"fish"}
    ];
    // this option prevents additional documents from being inserted if one fails
    const options = { ordered: true };

    const result = await collection.insertMany(docs, options);
    console.log(`${result.insertedCount} documents were inserted`);
  } finally {
    await client.close();
  }
}
run().catch(console.dir);
4. Exercises
From nodejs script:
- Update existing document - change Crab type from fish to meat
- use collection.updateOne()
- Delete existing document - Mars
- use collection.deleteOne()
V8 engine internals
- Performance
- V8 as a compiler
- Memory schemes
- Garbage collection
- Memory leaks
Performance
- With DevTools Tab
- With Runtime Call Stats (RCS), through chrome://tracing
Garbage collection
- The C++ object graph around the DOM is heavily tangled with Javascript objects
- Chromium team uses garbage collector called Oilpan
- Oilpan is written in C++ for managing C++ memory
- That can be connected to V8 using cross-component tracing
- That treats the tangled C++/JavaScript object graph as one heap
- More here: https://v8.dev/blog/high-performance-cpp-gc
- Oilpan implementation is moving from Blink to this V8 library (currently still under construction, so unstable)
Garbage collection Con't
- Oilpan supports:
- Multiple inheritance through mixins and references to such mixins (interior pointers).
- Triggering garbage collection during executing constructors.
- Keeping objects alive from non-managed memory through Persistent smart pointers which are treated as roots.
- Collections covering sequential (e.g. vector) and associative (e.g. set and map) containers with compaction of collection backings.
- Weak references, weak callbacks, and ephemerons
- Finalizer callbacks that are executed before reclaiming individual objects.
Memory leaks
- Example
//
// You can run it with this command:
// node --allow-natives-syntax --track-retaining-path --expose-gc test.js
//
// More available 'd8' options can be checked like this
// node --v8-options
//
function foo() {
  const x = { bar: 'bar' };
  %DebugTrackRetainingPath(x);
  return () => { return x; }
}
const closure = foo();
gc();
- Source - https://v8.dev/docs/memory-leaks
Monitoring
- Sematex (free/commercial)
- Live Demo - https://apps.sematext.com/demo
- Dynatrace, aka ruxit (free/commercial)
- PM2 (free)
- Other good alternatives
- Prometheus (free, but needs a lot of config) - https://prometheus.io/
- Datadog (free/commercial) - https://www.datadoghq.com/
PM2
- Examples
npm install pm2@latest -g

pm2 start main.js   # restart | reload | stop | delete

pm2 [list|ls|status]

pm2 logs   # --lines 100

pm2 monit

pm2 start app.js -i max   # cluster mode (automatic load balancer)

pm2 ecosystem   # configuration file for all the apps
pm2 [start|restart|stop|delete] ecosystem.config.js

pm2 startup   # and later with 'pm2 save' to save current process list
pm2 resurrect
pm2 unstartup

pm2 start main.js --watch --ignore-watch="node_modules"   # to restart application on changes

npm install pm2@latest -g   # updating pm2
pm2 update
PM2 Con't
Exercises, Examples
FOLDER nodejs_examples(m0 to m6) - "we're Livin' On The Edge!"
(~/Documents/nodejsMats/node_express/nodejs_examples/)
0. First we rely on our parents
  'm0' - dependencies
0.1. One day we move to our first flat
  'm1' - package file (minimum config)
0.2. Sooner or later we're gonna need something bigger
  'm2' - package file (improvements)
  (see also /home/nobleprog/Documents/nodejsMats/other_/react-examples/package.json)
0.3. Oh well, when "IT"(child) become finally the real threat
  'm3' - handling files
0.4. Here come the siblings cohort.. yup.. I know.. more fun means more and more expenses..
  'm4' - simple event, external scripts
0.5. Now we're talking! Nice, suddenly the middle age crisis came, so go on and you name it, what's your poison, huh?
Lamborgini, Porsche, 32 years old whiskey, 19 years old gender-something-little-handsome-creature.. ? (-;
  'm5' - simple static file serving, simple api
0.6. Oh, yeah.. oh boy.. oh girl.. Let's shout together: "Mr Grunt is in da house!"
  'm6' - simple grunt config


COMMAND LINE - toys, not only for boys (-;
1. Node Package Manager (command line)
1.1. Search for all packages related to 'openssl'
1.2. Copy 'm2' into 'm2_[your_name]'
- remove 'node_modules' folder from it (if any exists)
- look at openssl wrapper details
- install openssl wrapper
- find out who is the owner of openssl wrapper
- uninstall openssl wrapper
1.3. Make 'm2_[your_name]' module available as a local package
- use default template to create/update file 'package.json'
- add 'README.md' file and put some howto/faq about your module in it
1.4. Share 'm2_[your_name]' module with nodejs community
- publish it
- search for it
- find out who is the owner (via command line)
- unpublish it
- publish it again
- install it in 'm3'
1.5. Semantics (https://semver.org/)
1.5.1. In your 'm2_[your_name]' module provide the development-only dependency called 'lodash' in version '2.0.0'
1.5.2. In the same module install 'grunt' in version '0.4.2'
  (https://semver.npmjs.com/)
  (https://graphcommons.com/graphs/a7ec343d-2a0c-47bb-9658-bb8315e8a096?auto=true&show=analysis-cluster)
1.6. Use 'npx' command to install 'react.js' application
  (https://github.com/facebook/create-react-app)
2. Share with npm community your 'pesel app' and publish it
3. Use one of your functionalities (for example from pesel app) in a new module (via require() method)


ERRORS - life without them would be so so boring.. isn't that right, Mr Sherlock? (-;
4. Error handling (https://nodejs.org/api/errors.html)
4.1. Don't use 'try-catch-throw-finally' block of instructions to handle errors with async callbacks
4.2. Console (https://nodejs.org/api/console.html)
4.3. Debugger (https://nodejs.org/api/debugger.html,  https://nodejs.org/api/util.html)
- add some steps(breakpoints) to inspect the code
- use commands to inspect (cont, next, repl, pause)
- add and remove watchers for variables (watch(), unwatch())
- set a breakpoint during debagging
4.4. Other tools: grunt, node-inspector (deprecated) and batarang
(https://github.com/node-inspector/node-inspector)
(https://www.npmjs.com/package/batarang)
(https://gruntjs.com/getting-started)


EVENTS
5. Events handling (https://nodejs.org/api/events.html)


BUFFERS
6. Buffers handling (https://nodejs.org/api/buffer.html)
6.1. Write simple gzipper with buffer (-:


STREAMS
7. Handling Streams
7.1. Write a script which makes big files
  - Name it 'streams.js'
  - It should make one text file with size around 500 MB
  - File name should be 'big.file'
7.2. Prepare simple server to play with that big guy
  - Name it 'server.js'
  - Use modules 'fs' and 'http'
  - Read the file via buffer
  - Observe ram memory consuming for node
7.3. Make similar server, but with nodejs stream
  - Name it 'server1.js'
  - Read the file via stream
  - Observe ram memory consuming for node
7.4. Use your 'streams.js' script to create bigger filo
  - Make it 2GB
  - Compare again ('server.js' vs 'server1.js')
7.5. Create a script which reads from the CLI
  - Name it 'streamWriteableImplem.js'
  - All we type in terminal should be piped back to it
7.6. Another game changer (-;
  - Name it 'streamReadableImplem.js'
  - Do 'one-time' implementation first
  --- It should take the whole alphabet and print it on the terminal
  - Later do it with 'on-demand' implementation (better practice)
7.7. Rearrange previous script (7.6.)
  - Make new filo and name it 'streamDuplex.js'
  - Readable and writable sides of a duplex stream operate completely independently from one another
  --- Make sure it can read and write in the same time
7.8. Spit the classic 'capitalize-me' one
  - Name it 'streamTransform.js'
  - 'transform' method combines both 'read' an 'write' methods
  --- Its output should be computed from its input
7.9. Not only string and buffer, but also any JS object
  - Name it 'streamObjMode.js'
  - Script should convert 'csv' into 'json'
  - Later add the oposite (json -> csv)
7.10. Improve our gzipper with streams (from 6.1.)
  - Name it 'file-compr.js'
  - Use it with your 'big.file' (the 500 MB one)
  --- 'node file-compr.js big.file'
7.11. Pipes can be combined with events
  - Name it 'streamEventPipe.js'
  - Reuse the code from (7.10.)
  - Let's allow the user to see a progress indicator while the script is working
7.12. With pipe we can organize code in a better way
  - Name it 'pipeOrganise.js'
  - Reuse the code from (7.11.)
  - Abstract the progrees info into custom function
7.13. Combining streams with pipe, encrypting
  - Name it 'encryptGzipper.js'
  - Encrypt the data (use module 'crypto')
7.14. Create script which will be able to unzip encrypted file
  - Name it 'unencryptUngzipper.js'
7.15. EXAMPLE: parrot.live (try with curl first, later look at the code in the browser)
7.16. No body, no crime (-;
  - Name it ''
  - Use London Crime Data from Kaggle (https://www.kaggle.com/jboysen/london-crime/)
  - Download the data in CSV format
  - In your script analyze the data
  --- Did the number of crimes go up or down over the years?
  --- What are the most dangerous areas of London?
  --- What is the most common crime per area?
  --- What is the least common crime?


ORIENT EXPRESS - murder or miracle? You'll have to decide on your own, my friend! (=
8. Express.js part
8.1. Folder 'node1'
8.2. Folder 'node2'
8.3. Folder 'node3'
8.4. Folder 'node4' - fix it (no 'npm', debug via logs)
8.5. Follow the link below
  (https://training-course-material.com/training/Express)
8.6. Fix me or I will go out of rails! - fullstack example, backend


MESSAGING
9. Integration and communication
9.1. Socket.io
9.1.1. Chat example - git clone https://github.com/rpaschoal/ng-chat-nodejs.git


WHERE THE DUCK IS MY DATA?!
10. Handling dbs
10.1. MongoDB
10.1.1. With Mongoose - folder 'meanCRUD'
10.1.2. Improve the starting script
10.1.3. Prepare schema for mongodb (file 'models/Book.js')
10.1.4. Configure routing (file 'routes/book.js')
10.2. MySQL
10.2.1. Server - git clone https://github.com/bezkoder/nodejs-express-sequelize-mysql.git
10.2.2. Client - git clone https://github.com/bezkoder/react-crud-web-api.git
10.2.3. Let's make some setup first:
  ----------------------- db installation ----------
  sudo apt install mysql-server -y
  sudo mysql_secure_installation  # say no to plugin for passwd, keep the test db and anonymous user
  sudo mysql
  ----------------------- db and user creation ----------
  CREATE database testdb;
  CREATE USER 'luke'@'localhost' IDENTIFIED BY 'password';
  GRANT ALL PRIVILEGES ON *.* TO 'luke'@'localhost' WITH GRANT OPTION;
  FLUSH PRIVILEGES;
  exit
  ----------------------- testing new user ----------
  mysql -u luke -p
  exit
  ----------------------- setting up the server config for db ---------
  In the server folder update this file - app/config/db.config.js
  ----------------------- running server API and the client instance ---------
  Start terminal 1 for server: node server.js
  Start terminal 2 for client: npm run start
  ----------------------- playing with the app -----------
  Add some content (-:
  -----------------------


MONITORING - yep, BigBro is watching, be carefull what'ya doing! (-;
11. With pm2 start 6 apps
11.1. List them all in cli
11.2. Show their stats in nicer tabularized view
11.3. Stop only one of them
11.4. Restart another one
11.5. Observe the logs
11.6. Restart one with watching file changes
11.7. Remove them all from pm2
11.8. Create configuration file for all the apps and manage them with it
