Apache Tomcat and Java EE Administration
Apache Tomcat and Java EE Administration
Copyright Notice
Copyright © 2004-2026 by NobleProg Limited All rights reserved.
This publication is protected by copyright, and permission must be obtained from the publisher prior to any prohibited reproduction, storage in a retrieval system, or transmission in any form or by any means, electronic, mechanical, photocopying, recording, or likewise.
JVM
JVM, JRE, JDK - what are these? ⌘
JVM - Java Virtual Machine
- Runs Bytecode
JRE - Java Runtime Environment
- JVM + libraries needed to execute an application
- Can be either Standard or Enterprise
JDK - Java Development Kit
- Compiler (.java files to bytecode)
- Tools to develop applications
Introduction to JAVA⌘
Class⌘
- Java application is a set of classes
- Class ClassName definition should be put into a file of the ClassName.java
- Classes define behavior and attributes.
- For a programmer, a class is a set of methods and variables.
- Class contains only a definition of something (e.g. Car), the Class Instance will contain a concrete car (e.g. My BMW with number plates NY1232)
Sample use of a class⌘
- Mostly you will use class libraries (especially standard libraries)
- Standard libraries contains basic functions (e.g. reading and writing files, using collections, etc...)
- Standard libraries is included in Java SE.
Example of using standard libraries:
 File file = new File("C:/mydir/file.txt");
 if (file.isFile())
 System.out.println("File found!");
 else
 System.out.println("File doesn't exist!");
JAR Files⌘
Generally speaking, the JAR files are archives (similar to zip files, rar, etc.) that contain Java programs. It is characteristic that in addition to packed files (source, compiled classes, ..) they contain information on how to run the program. This information is contained in the so-called manifest - manifest.mf file located in the directory META archive.
Creating JAR files⌘
Creating JAR files with Eclipse
- Choose a project/right click/Export...
- Choose Java-> JAR File, click Next
- Select resources to be included in JAR; choose location, (Next)
- In JAR Packaging Options, you can accept the default settings by clicking Next
- Click the checkbox "Generate the manifest file", and then click Browse (next to the field MainClass) and select the class from which it should start to run the program - the class must have a method main()!
- When you click Finish in the location you should see the new JAR file.
Running JAR files⌘
A JAR file can be run in several ways (dependent effect ustatwień the operating system):
- double-clicking on its icon
- by right-clicking and selecting the appropriate option from the context menu
- from the command line by typing: java-jar NameOfArchive.jar
Java SE, JAVA EE⌘
- Java SE or (up to version 1.5 J2SE) - Java Standard Edition (Java Platform™, Standard Edition) - set of standardized libraries in Java
- Java EE or (up to version 1.5 J2EE) - Java Enterprise Edition (Java Platform™, Enterprise Edition) - Java SE + extra libraries for more complex applications, like messaging, EJB, WebSerices, etc...
Java EE Architecture
Tiers ⌘
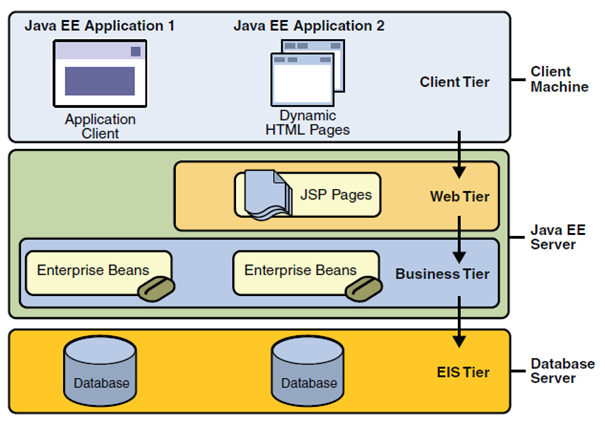
Figure 1 shows two multilayer Java EE applications divided into layers described in the following list:
- Client tier working on the client machine.
- Web tier working on a Java EE server.
- Business tier working on a Java EE server.
- Enterprise information system tier working on the database server
Multi-tier architecture ⌘
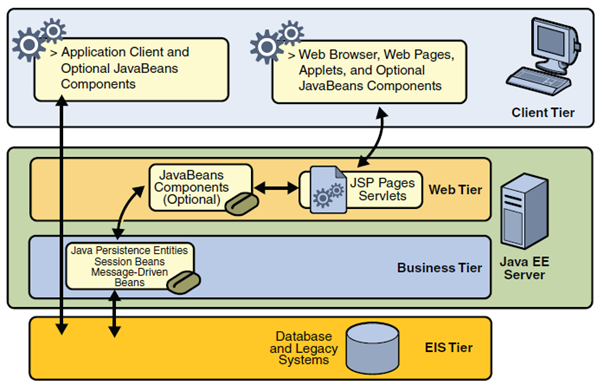
- The client tier may consist of one or more of the following measures:
- Web client. It consists of a dynamic Web page built using markup languages such as HTML or XML, and Web browser, which presents the data received from the server. Such clients are often called thin clients due to the fact that they do not perform complex tasks with business rules or database queries. Such operations are delegated by them to the components of working on Java EE servers.
- Applet. It is a small application written in Java, which is carried out on a web browser installed Java Virtual Machine.
- Client application. It is run on the client machine, and as shown in Figure 2-2 communicates directly with components of business logic without the network layer. It has a graphical user interface, which allows you to perform tasks requiring the use of options other than those offered by web browsers. Client applications written in languages other than Java also can communicate with Java EE servers.
- JavaBeans. JavaBeans are the classes that have certain characteristics, and get and set methods that allow you to get and set these properties. They can be both at the client and the server side. They support flow of information between the client application, server and database.
- The network layer consists of servlets or pages created using JSP and/or JSF. Servlets are classes that dynamically process requests sent by the browser to the server and construct responses. JSP pages are text files that allow you to insert fragments of JAVA language in the HTML code. The code before sending it to the user is processed by the server to the HTML form. This allows a more natural approach to creating a static content than in the case of servlets. JSF is built on servlets and JSP pages and combines them providing a user interface.
- Business logic tier is the place where in fact data processing and solving problems faced by the application is done, such as calculating how much a customer of the bank has yet to repay the loan. Figure 2-2 shows how the business logic tier receives the information, converts them if needed and transmits to the data tier in order to save it. This tier also takes the data from the data tier, and forwards them to present to the client.
- Data tier. Its task is to fixation the relevant information submitted to it, and to read and return when the appropriate request is sent.
Despite the fact that Java EE may include three or four layers, as shown in Figure 2-2, it is assumed that Java EE applications are three layered, due to the fact that they operate at three locations: client machine, Java EE server and database server. Three-tier applications running in this way are developing a standard two-tier architecture by adding a multithreaded application server between the client and the database server.
Components⌘
Java EE applications are created from components. Components are self-contained software units that provide certain functions and having the ability to communicate with other components. They shall include in the appropriate classes and any other necessary files. They form a kind of building blocks that make up the application. Java EE specification defines the following components:
- Client applications and applets running in the presentation layer.
- Servlets, JavaServer Faces (JSF) and JavaServer Pages (JSP) which is web-based components that running on the server.
- Components of Enterprise JavaBeans (EJB), also known as enterprise beans, which are business components working on the server.
Java EE components are written in JAVA and are compiled in the same way as all other programs written in that language. The difference between Java EE components, and standard Java classes is that they operate and are managed by the Java EE container.
JMS (Java Messaging Service)⌘
Clients (portions of the system, applications, etc.) in a distributed environment can interact by exchanging messages, as follows:
- client-producer sends a message
- client-consumer reads the message
- both clients do not need to run at the same time
- none of them have to know anything about design, code, etc. of the second
Collaboration applications through the exchange of messages has the advantage that it make each program codes independent ("loose coupling"). This method of programming is implemented on different platforms with different technologies - such as IBM MQSeries.
In Java environment we have available JMS (Java Messaging Service).
Java Messaging Service is an API (set of interfaces), which provides, among others:
- synchronous messaging (client waits for a message, expects it),
- asynchronous messaging (JMS sends a message to the client as soon as the message appears, and the client does not need to check whether the message is present, it handles it as a "callback"),
- reliability - a guarantee that the message will be "delivered" once and only once.
JMS Architecture ⌘
JMS application components
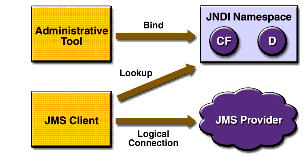
- service (JMS provider) implements the interface and provides administration tools
- clientss - create, send and receive messages
- administered objects - destinations and connection factory (they are usually created and configured by administrative tools, but also there is a programming API for this purpose)
JMS destination is a place where the sender puts a message and the recipient reads the message.
Two possible domains (types of destinations):
Queue - Point-to-Point via a message queue, the sender sends to a specific named queue (destination), receiver - receives the message from the queue.

- each message can be received by a single recipient;
- the recipient can retrieve the message, regardless of whether the sender works or already terminated;
- rule is that the recipient confirms receipt of messages, which ensures that it will not be shipped in him once again.
Topic - the principle of publications and subscriptions.
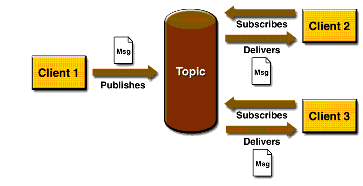
- each message can have multiple recipients (topic subscribers)
- many broadcasters may publish in a given topic
- recipient can receive only messages from the topic, which was published after his signing up for subscription
Note: Version 1.1 JMS allows you to program both types of communication using the same interfaces.
JMS Application Architecture
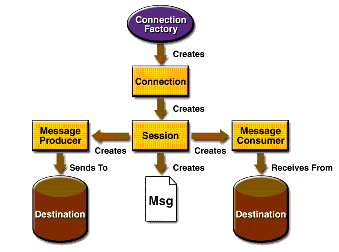
ConnectionFactory - creates a connection to the JMS service provider. Destination - Specifies the destination transmitted and received messages.
Server Installation⌘
- Download a file apache-tomcat-5.5.33.exe from http://tomcat.apache.org
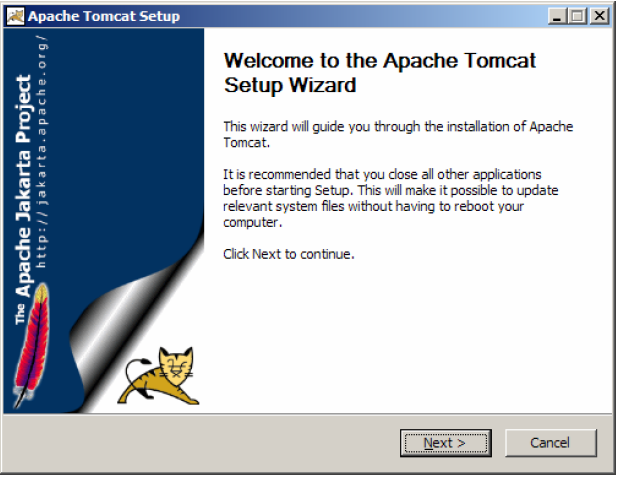
- Run the file apache-tomcat-5.5.33.exe to start installation of the application server. Click on Next >.
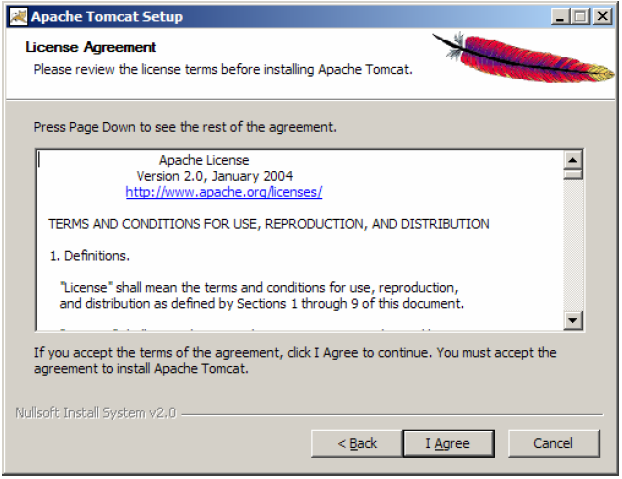
Familiarize with Apache license, on which is distributed Apache Tomcat software. Click I Agree button.
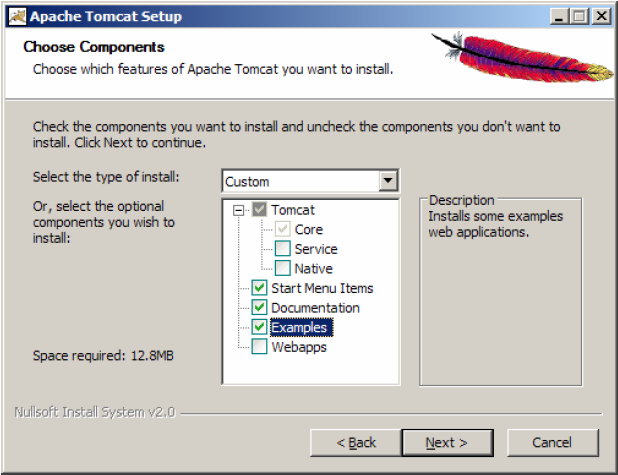
Select the type of installation to Normal. Expand Tomcat branch. We have the ability to install the Service that automatically start the application server when you start the operating system and Native option used to improve the performance of the server applications in a production environment. Select to install the examples of web applications. Click on Next >.
We point the installation directory for the application server (you can leave the default location). Click on Next >.
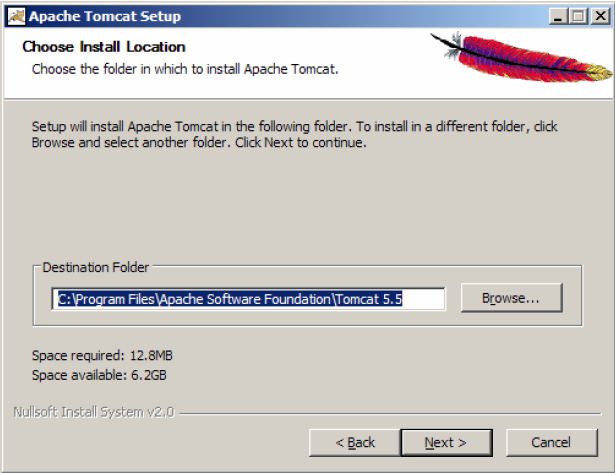
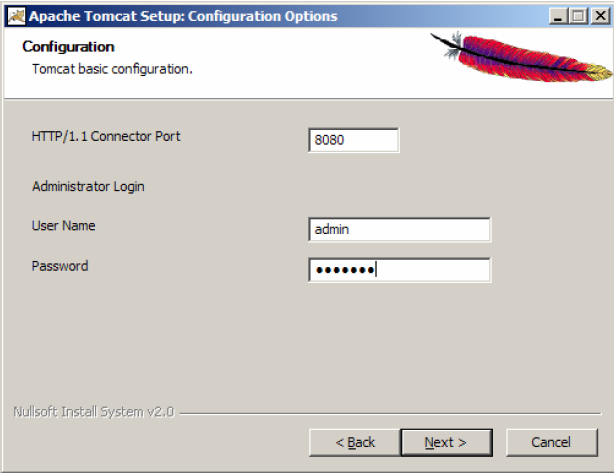
We point TCP / IP port on which to run (listen) application server and the user name and password that will have the right to administer the application server. Click on Next >.
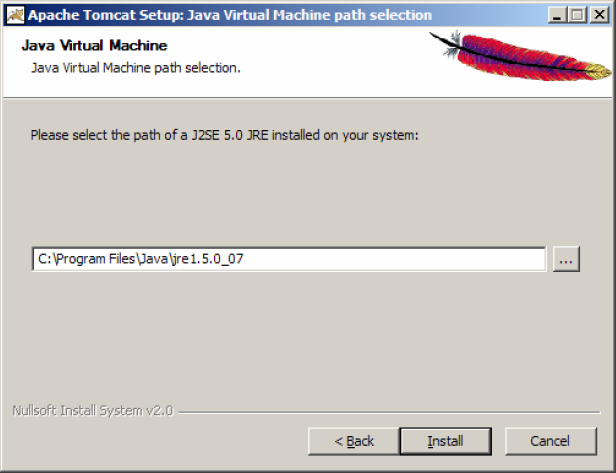
We point the location of the Java Runtime Environment (necessarily in version 5.0). Click on Install button.
Make sure the that the option Run Apache Tomcat is selected. Click Finish button.
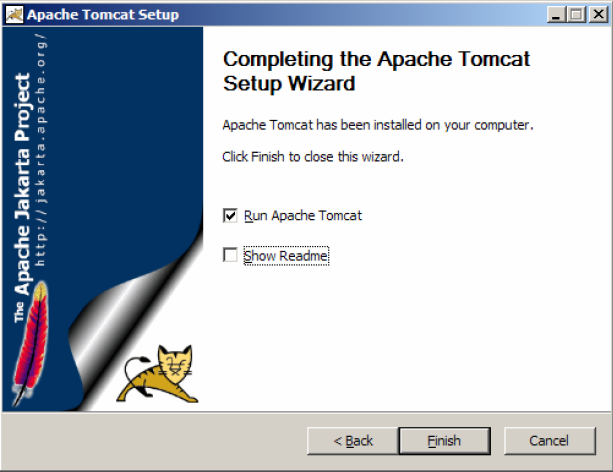
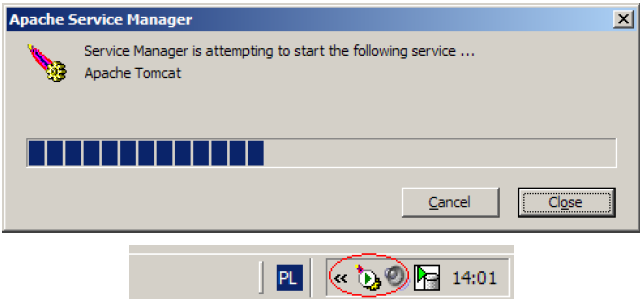
We are waiting for starting the service. Make sure that Apache Tomcat icon in the system tray is present.
Server Management⌘
Server Directories⌘
- bin - applications that start the server, the most vital binaries.
- conf - files (mainly xml) file containing configuration directives
- common - (Tomcat version 5.5 or earlier) server libraries - *. jar and server language versions
- lib - (Tomcat version 6 or later) server libraries - *. jar
- logs - server logs (administration, maintenance)
- server - (Tomcat version 5.5 or earlier) administration module, not available in the basic configuration (install it by downloading the extension: apache-tomcat-5.5.xx-admin.zip to unpack in the $ CATALINA_HOME)
- temp - temporary server files
- webapps - directory from which applications are started by default.
- work - compiled source of our applications.
Server Configuration⌘
XML configuration files The two most important configuration files that are required for Tomcat to be started are called server.xml and web.xml. By default, these files are located in the $CATALINA_HOME/conf/server.xml and $ CATALINA_HOME/conf/web.xml.
Server.xml⌘
Server.xml is the main Tomcat configuration file and is responsible for determining the initial configuration of the server at the start, and to determine the manner and order in which builds Tomcat container for running applications. Elements of the server.xml file are located in five basic categories - Top Level Elements, Connectors, Containers, Nested Components, and Global Settings. All items within these categories has a number of features that can be used to fine-tune their tasks. Most often, when you have to make major changes in the installation of Tomcat, such as port numbers specifying the application, edit the server.xml server.xml.
You can find extensive documentation for these options on Apache Tomcat documentation website, but I will present some of the important information.
Top Level Elements⌘
Server⌘
This element defines a single Tomcat server that contains the Logger and ContextManager configuration elements. In addition, the Server element supports the attributes of "port", "shutdown", and "className". Port attribute is used to specify on which Tomcat should listen shutdown commands. Shutdown attribute defines series of commands to listen on a specific port, which causes closure. ClassName attribute specifies which call of Java class should be used.
Service⌘
This element, which can be nested in the server component is used to insert one or more directives Connector, which share the same engine element. The main objective of this component is to identify the components as a single service. The service name that appears in the logs is determined by the service element with an attribute called "name".
Connectors⌘
In order of nesting several calls Connector (various ports) for services element, we let Catalina to forward requests from these ports into one of the module - engine thread for processing. Tomcat allows you to define both the HTTP and AJP connectors.
HTTP Connector⌘
This element is the HTTP 1.1 connector and provides operation of autonomous Tomcat web server functionality. This means that in addition to run servlets and JSP, Catalina is able to listen on a specific TCP ports. Each defined Connector defines a single TCP port, and should listen for HTTP requests. When you configure the HTTP connectors, pay special attention to the attributes "minSpareThreads", "maxThreads" and "acceptCount". The attribute "MaxThreads" is of particular importance, because controls the maximum number of threads that may be created to handle requests. Setting this value too low will reject incoming calls too quickly.
AJP Connector⌘
This element is the connector that is able to communicate using AJP protocol. The main objective of this component is to assist in the integration of Tomcat with Apache installation. Do not use this feature if you plan to use Apache as a static the server before Tomcat. This technique is designed to free more resources for dynamically generated pages and load balancing, so if you want to quickly improve the performance of applications, then AJP is a good idea. AJP connectors can also be used to optimize the SSL requests.
Containers⌘
These elements are used by Catalina to route requests to the appropriate applications.
Context⌘
This element represents a single web application, and contains information about the path to route requests to the appropriate application resources. When Catalina receives a request, it tries to match the longest URI to the path for a given context, until it finds the desired item to handle the request. Context element can have a maximum of one nested element: for example, such as element Loader, manager, Realm, resources and WatchedResource. Although Tomcat allows you to define the context of the "TOMCAT-HOME/conf/server.xml", yet this should be generally avoided because the global configuration settings can not be loaded without restarting Tomcat, which makes editing context attributes more intrusive than necessary.
Engine⌘
This element is used in combination with one or more Connector, and is responsible for processing all requests related to the operation of the parent element. Engine component can only be used if it is nested in the Services item. Make sure the has been defined attribute "defaulthost", which describes the Host, which is responsible for routing requests on the server - it is not configured in server.xml. This attribute must match the name of one of the Host elements nested inside the engine. Furthermore, it is important to assign a unique logical name to each of the engine components, using an attribute "name", when Server element in server.xml file contains many Services elements.
Host⌘
This element is nested inside the engine, is used to associate the names of network servers to Catalina servers. This item will work correctly if virtual host is registered in DNS service managing the domain. One of the most useful features of the host element is its ability to contain nested "Alias" elements, which are used to determine the network names to be resolved.
Cluster⌘
Cluster element is used by Tomcat to ensure replication of context attributes and replication session. It can be nested within each engine or the parent element. Elements such as Manager, Channel Valve, Deployer and ClusterListener are nested inside it. For more information on these items, and how they are used can be found on the Apache Tomcat website. Although this element is highly customizable, the default configuration is usually enough to satisfy the needs of most users.
Nested Components⌘
These elements are nested inside the container elements defining additional features.
Listeners⌘
This directive, which can be nested inside server engine, a host that performs an action when a specific event occurs. While most of the components have className attribute to select different implementations of the element, the element detector is unique, there are many unique implementation other than the default. All of these implementations that require Listener elements can be nested within Server element. So the correct setting of this attribute is important. Currently available: APR Lifecycle Listener, Listener Jasper, Listener lifecyle Server JMX Remote Lifecycle Listener and JRE Memory Leak Prevention Listener.
Global Naming Resources⌘
It is used to determine the global Java Naming and Directory Interface (JNDI) for resources on a particular server. If you want, you can declare the JNDI properties to <resource-ref> and <resource-env-ref> and connect them with <ResourceLink>. The results of this method are equivalent to <resource-ref> elements in the application "/WEB-INF/web.xml" file. If you use this technique, you must define additional parameters needed to identify and configure the factory object and its properties.
Realm⌘
This element, which can be nested inside each Container element defines the database containing user names, passwords, and roles. Nested inside the host or engine component, defined in the Realm element are inherited by all lower-level containers. It is important to properly set the "className". These settings are used to expose Catalina to other safety management systems, such as JDBC, JNDI and DataSource.
Resources⌘
This item has one simple task - Catalina redirect to static resources used by Internet applications. Resources include classes, HTML and JSP files. Using this element we allow Tomcat, to have access to files in locations other than the file system, such as the resources in WAR archives and JDBC databases. It is important to note that this technique allows a web application to access resources outside of the file system. It can be used only in case we were talking about.
Valve⌘
Valve components are nested inside the engine, host, and Context elements to send different functions in the request processing pipeline. It is a very versatile mechanism. Valves have a wide range of applications, from authentication to filter errors for WebDAV. Many of these types of valves may be nested. Paying attention to this item, you must know that the "className" attribute is required.
Web.xml⌘
This file comes from the Servlet specification and contains information used to install and configure the components of a web application. When configuring Tomcat for the first time, this is the place where you can define a servlet mapping to the central components such as JSP. The difference in the use of this file by the Tomcat server is that the user can use TOMCAT-HOME/conf/web.xml to define default values for all contexts. If this path is used, Tomcat uses TOMCAT-HOME/conf/web.xml In its basic configuration, which in turn can be overridden by application-specific entries in WEB-INF/web.xml files.
Other important configuration files⌘
As you can guess, when Tomcat is running for the first time - we set the default list of roles, usernames and passwords. Tomcat will use to authenticate UserDatabaseRealm entries that can be found in tomcat-users.xml. If you want to get access to all of the administrative tools that are packaged with Tomcat, you can edit this file to add the admin and access to the Manager. Setting default context used for all deployed applications for a particular instance of Tomcat, you can set in the context.xml file. Catalina.policy file that replaces the java.policy file supplied with the chosen JDK includes settings permissions for Tomcat elements. You can edit this file by hand or with the help of policytool, packaged together with Java 1.2 applications or later distribution.
Environment variables⌘
When configuring Tomcat for the first time several environment variables are set that should be modified according to your needs.
JAVA_OPTS⌘
By using this variable, you can specify the JVM heap size. Setting the appropriate value for this variable is essential in the implementation of new applications which may require more heap size to function properly. Finding appropriate values for these settings can help eliminate or reduce the application crashes.
CATALINA_HOME⌘
This variable specifies the location of the Tomcat installation directory. Tomcat startup scripts are trying to find the value of this variable, but it is a good idea to simply set it to the correct known by us value and avoid problems.
CATALINA_OPTS⌘
This variable is used to set various options specific to Tomcat. This variable can be used to set environment variables that override JAVA_OPTS.
Tomcat Manager⌘
Launch a web browser and connect to the address http://localhost:8080. Then click on the Tomcat Manager link in the upper left part of the window. Enter the name and password for the user you created during installation.
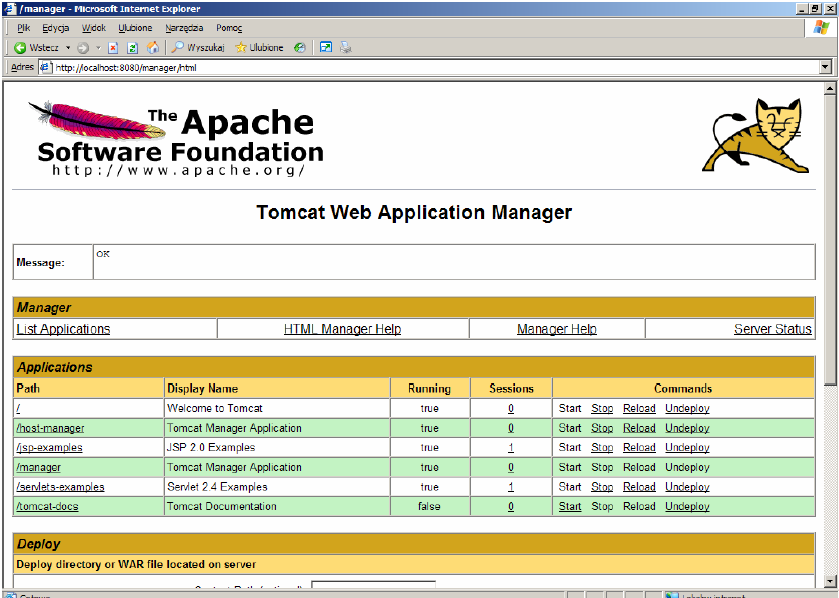
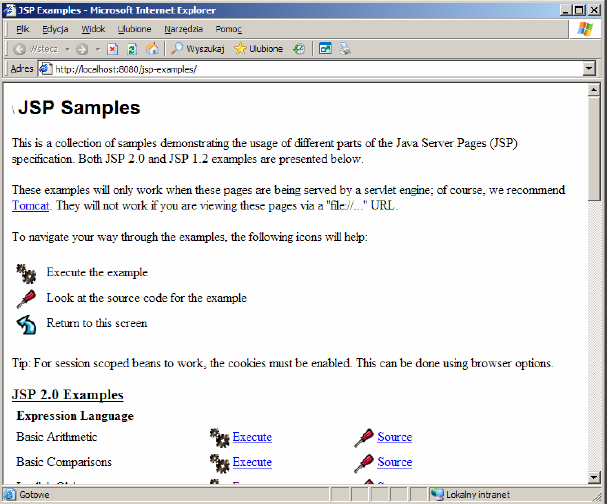
The window shows a list of all applications that are currently installed on the application server. Right click on the link /jsp-examples and select Open in New Window. We take a moment to watch the simple examples of JSP language use, tag files, JSP XML documents, and other.
Managing Server Applications⌘
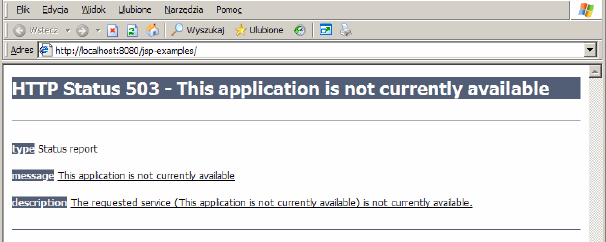
Then return to the main window panel to application management and select the Stop command relating to the /jsp-examples application. In the pop-up window press the OK button. Return to the window with examples of JSP and refresh the contents of the browser window.
Manager executed Undeploy command.
Deploying *.war files⌘
Now we will install a sample web application prepared in the form of a WAR archive (Web Archive). To do this, go into the application server administrator. Section Deploy allows you to install applications packaged as *. war placed on the server side or placed on the local computer. Find Select WAR file to upload field and click Browse ... Go then to the %CATALINA_HOME%\webapps\tomcatdocs\AppDev\sample directory (%CATALINA_HOME% variable points to Tomcat installation directory) and select sample.war file. Click Open button. Click Deploy button.
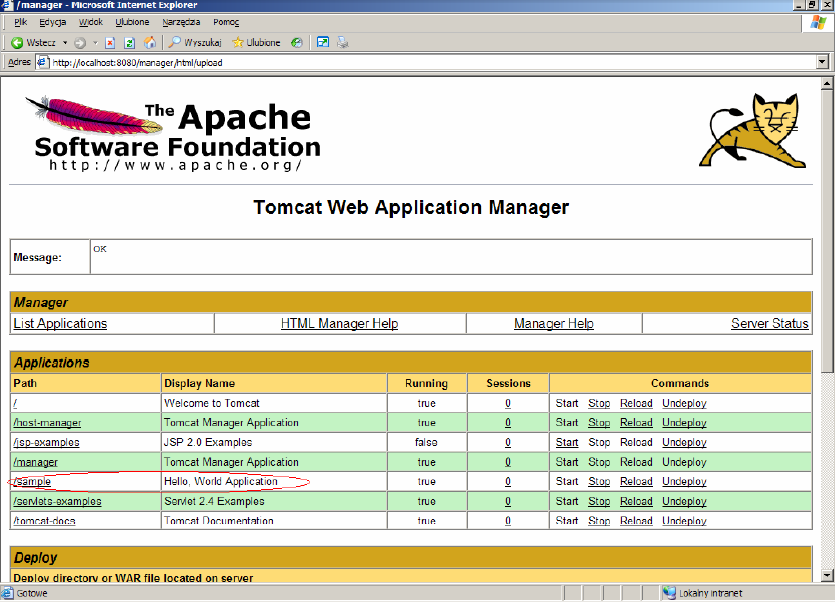
On the list of applications we will see a new entry called /sample, on which we click to view our work.
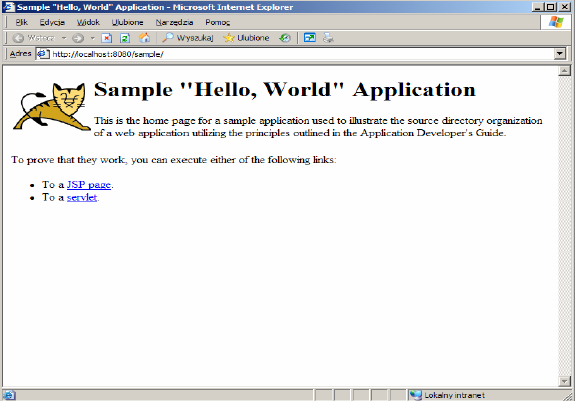
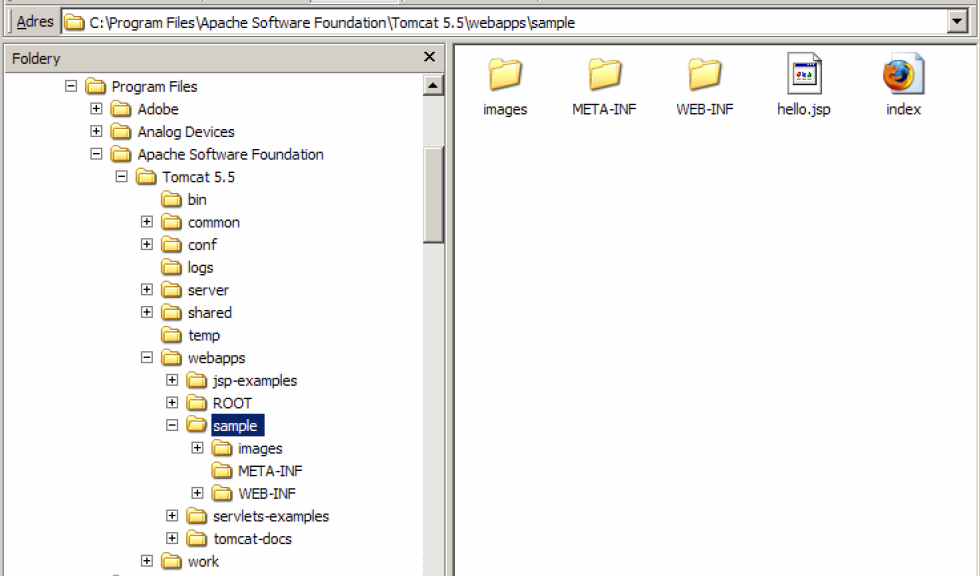
Let us now see how the application /sample is physically located on disk. Go to the %CATALINA_HOME%\webapps. This is the directory that contains all the applications installed on the application server. Archive sample.war was uploaded here. The first call to the URL http://localhost:8080/sample caused unpacking this file automatically. Go to the samples directory. Directory named images contains tomcat.gif image used on a page. META-INF directory contains an empty file MANIFEST.MF. In this directory, optionally may be found the application context descriptor (web application configuration file). WEB-INF directory contains web application deployment descriptor called web.xml. Open and read the contents of the file.
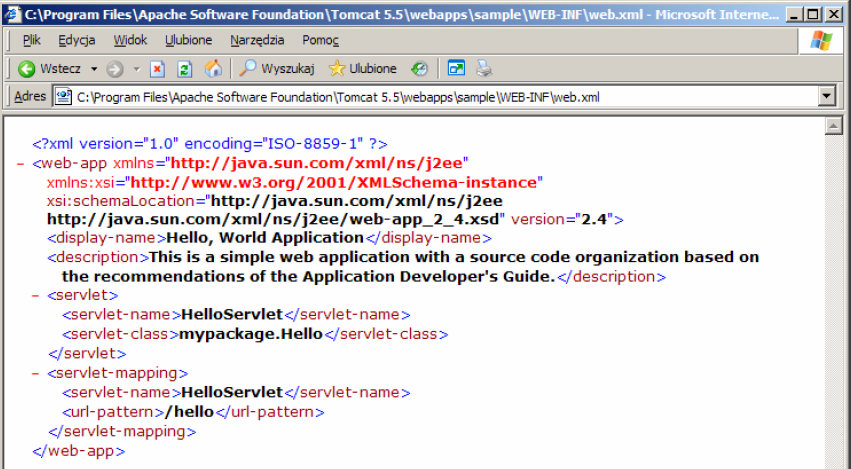
In the file is defined a servlet called HelloServlet implemented as a class mypackage.Hello and available at /hello in the context of the application /sample. Open http://localhost:8080/sample/hello address and verify that the servlet works there. The WEB-INF directory also includes the source and compiled form of the web application. The classes/mypackage subdirectory contains servlet code in Hello.class file and servlet source is located in the src/mypackage subdirectory in Hello.java file. The *.html and *.jsp files are placed directly in the root of samples directory.
Automatic unpacking and installation of the application was made possible by properly configuring the application server. The main configuration file is the file %CATALINA_HOME%\conf\server.xml. Open this file and find in it autoDeploy option. The following section defines the root directory in which applications are placed (AppBase attribute), automatic extraction of war archives (unpackWARs attribute) and automatic installation of extracted files (autoDeploy attribute).
<Host name="localhost" appBase="webapps"
unpackWARs="true" autoDeploy="true"
xmlValidation="false" xmlNamespaceAware="false">
Basic resource security system⌘
We go back to the %CATALINA_HOME%\webapps\sample\WEB-INF directory and add to the web.xml file the following code:
<security-constraint>
<display-name>Security Constraint</display-name>
<web-resource-collection>
<web-resource-name>Protected Area</web-resource-name>
<url-pattern>/hello</url-pattern>
<http-method>GET</http-method>
</web-resource-collection>
<auth-constraint>
<role-name>helloRole</role-name>
</auth-constraint>
</security-constraint>
<login-config>
<auth-method>BASIC</auth-method>
<realm-name>Basic Authentication Area</realm-name>
</login-config>
Then open the application server manager window and reload the app /sample (Reload link). Open in the browser address http://localhost:8080/sample/hello
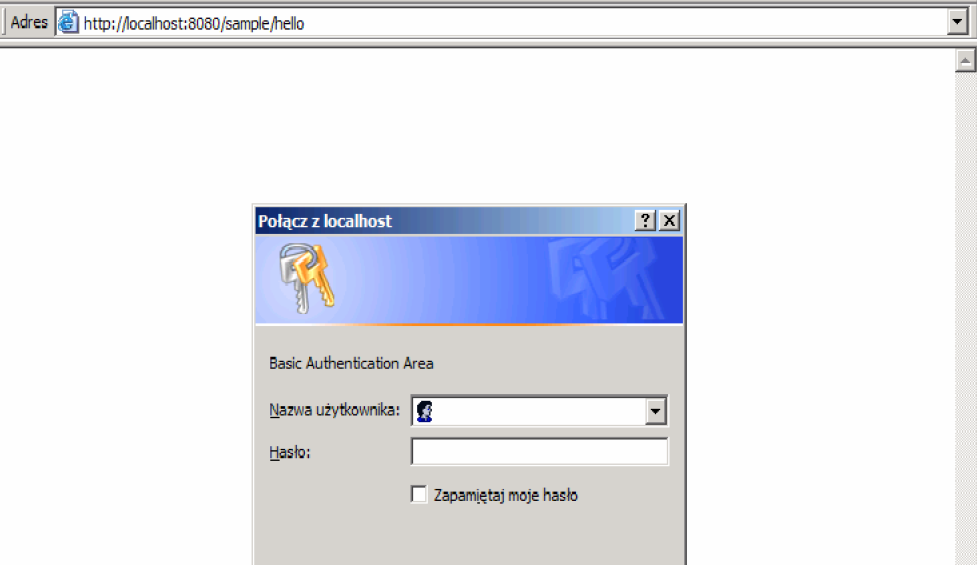
Code introduced to the web.xml deployment descriptor defines security restriction called the Security Constraint and including the URL / hello in the context of the application. Restriction applies to calls to this address using the GET method. Only users with the role helloRole get access to a protected resource. Login method is set to Basic, which means using the internal browser engine. To set the username and password for the resource, go to the %CATALINA_HOME%\conf\ directory, open it in any text editor tomcat-users.xml file and add the following lines
<role rolename="helloRole"/>
<user username="scott" password="tiger" roles="helloRole"/>
The disadvantage is that to make our changes to take effect we need to restart the Tomcat server (from the command line or windows service manager)
Logs⌘
Logging incoming HTTP connections⌘
By default, incoming HTTP connections are not tracked. This may make some consternation, luckily it can be changed easily. Appropriate modifications should be made in the server.xml file. Login is done by AccessLogValve class, launched as a valve. It is therefore necessary to find a definition of this class and just uncomment it. It looks as follows:
<Valve className="org.apache.catalina.valves.AccessLogValve"
   prefix="localhost_access_log." suffix=".log"
   pattern="common" directory="${jboss.server.log.dir}"
   resolveHosts="false" />
Such definition can be placed in any container (Context, Host, Engine) and then all connections passing through the component will be saved.
Allowable configuration parameters:
className
Name of the class that is responsible for handling logins. There are two values to choose from:
org.apache.catalina.valves.AccessLogValve – more general, to define the scope of logged information
org.apache.catalina.valves.FastCommonAccessLogValve – class designed for use on production systems, can only login information in a common format or combined
prefix
The string added to the beginning of the log file name. The default value is access_log.
suffix
The string added to the end of the log file name.
pattern
A string containing information about what should be stored in a log file. This can be a definition that uses special tags or common or combined words denoting one of the standards of logged information. The exact specification can be found in the Tomcat documentation.
directory
The path to the directory where the log files should be saved.
resolveHosts
If it is set to true, the IP addresses will be converted to domain names (this will impact negatively on the performance, because it will require additional queries to the DNS server). If this parameter will be set to false, the IP addresses will be used.
rotatable
This parameter determines whether the log file should be rotated. The default value is true. If it is set to false, the log file will never be rotated and contents of the field fileDateFormat will be ignored.
condition
Enabling of conditional logging. If the parameter is set to any value, connection information will be logged only when ServletRequest.getAttribute() will be equal to null. If the parameter will have the value log, the call will be logged only if this condition is met: ServletRequest.getAttribute("log") == null.
fileDateFormat
Allows you to specify the date format in log file name. At the same time determines how often the file will be rotated. To enable rotation every hour, you can set the parameter like this: yyyy-MM-dd.HH.
LOG4j⌘
Tomcat 5.5 has done away with localhost_log which you may be familiar with as the runtime exception/stack trace log. These types of error are usually thrown by uncaught exceptions, but are still valuable to the developer. They can now be found in the stdout log. If you need to setup cross-context detailed logging from within Tomcat's code, then you can use a simple log4j configuration. Note that this logging can be very verbose depending on the log level you chose to use. Note also that a log4j logging configuration is not going to produce stack trace type logging: those stack traces are output to stdout as discussed above.
Configuring LOG4j⌘
Follow the following steps to setup a file named tomcat.log that has internal Tomcat logging output to it:
Create a file called log4j.properties with the following content and save it into common/classes.
log4j.rootLogger=DEBUG, R
log4j.appender.R=org.apache.log4j.RollingFileAppender
log4j.appender.R.File=${catalina.home}/logs/tomcat.log
log4j.appender.R.MaxFileSize=10MB
log4j.appender.R.MaxBackupIndex=10
log4j.appender.R.layout=org.apache.log4j.PatternLayout
log4j.appender.R.layout.ConversionPattern=%p %t %c - %m%n
Download Log4J (v1.2 or later) and place the log4j jar in $CATALINA_HOME/common/lib.
Download Commons Logging and place the commons-logging-x.y.z.jar (not commons-logging-api-x.y.z.jar) in $CATALINA_HOME/common/lib with the log4j jar.
Start Tomcat
This log4j configuration sets up a file called tomcat.log in your Tomcat logs folder with a maximum file size of 10MB and up to 10 backups. DEBUG level is specified which will result in the most verbose output from Tomcat.
Tomcat 5.5 uses defines loggers by Engine and Host names. For example, for a default Catalina localhost log, add this to the end of the log4j.properties above.
- log4j.logger.org.apache.catalina.core.ContainerBase.[Catalina].[localhost]=DEBUG, R
- log4j.logger.org.apache.catalina.core=DEBUG, R
- log4j.logger.org.apache.catalina.session=DEBUG, R
Note that there are known issues with using this naming convention (with square brackets) in log4j XML based configuration files, so we recommend you use a properties file.
Be warned a level of DEBUG will produce megabytes of logging and slow startup of Tomcat. This level should be used sparingly when debugging of internal Tomcat operations is required.
Your web applications should certainly use their own log4j configuration. This is valid with the above configuration. You would place a similar log4j.properties file in your web application's WEB-INF/classes folder, and log4j1.2.8.jar into WEB-INF/lib. Then specify your package level logging. This is a basic setup of log4j which does not require Commons-Logging, and you should consult the log4j documentation for more options.
JULI⌘
The default implementation of java.util.logging provided in the JDK is too limited to be useful.
Tomcat will, in the default configuration, replace the default LogManager implementation with a container friendly implementation called JULI, which addresses these shortcomings. It supports the same configuration mechanisms as the standard JDK java.util.logging, using either a programmatic approach, or properties files. The main difference is that per-classloader properties files can be set (which enables easy redeployment friendly webapp configuration), and the properties files support slightly extended constructs which allows more freedom for defining handlers and assigning them to loggers.
JULI is enabled by default in Tomcat 5.5, and supports per classloader configuration, in addition to the regular global java.util.logging configuration. This means that logging can be configured at the following layers:
In the JDK's logging.properties file. Check your JAVA_HOME environment setting to see which JDK Tomcat is using (or maybe JRE 5.0 as Tomcat can now run on a JRE from version 5.5). The file will be in $JAVA_HOME/jre/lib. Alternately, it can also use a global configuration file located elsewhere by using the system property java.util.logging.config.file, or programmatic configuration using java.util.logging.config.class.
In each classloader using a logging.properties file. This means that it is possible to have a configuration for the Tomcat core, as well as separate configurations for each webapps which will have the same lifecycle as the webapps.
The default logging.properties specifies a ConsoleHandler for routing logging to stdout and also a FileHandler. A handler's log level threshold can be set using SEVERE, WARNING, INFO, CONFIG, FINE, FINER, FINEST or ALL. The logging.properties shipped with JDK is set to INFO. You can also target specific packages to collect logging from and specify a level. Here is how you would set debugging from Tomcat. You would need to ensure the ConsoleHandler's level is also set to collect this threshold, so FINEST or ALL should be set.
org.apache.catalina.level = FINEST
The configuration used by JULI is extremely similar, but uses a few extensions to allow better flexibility in assigning loggers. The main differences are:
A prefix may be added to handler names, so that multiple handlers of a single class may be instantiated. A prefix is a String which starts with a digit, and ends with '.'. For example, 22foobar. is a valid prefix. As in Java 5.0, loggers can define a list of handlers using the:
loggerName.useParentHandlers,
property, which accepts a boolean value. The root logger can define its set of handlers using a .handlers property. System property replacement for property values which start with
${sytstemPropertyName}.Logging.properties
Example logging.properties file to be placed in common/classes:
handlers = 1catalina.org.apache.juli.FileHandler, 2localhost.org.apache.juli.FileHandler, \
           3manager.org.apache.juli.FileHandler, 4admin.org.apache.juli.FileHandler, \
           java.util.logging.ConsoleHandler
.handlers = 1catalina.org.apache.juli.FileHandler, java.util.logging.ConsoleHandler

############################################################
# Handler specific properties.
# Describes specific configuration info for Handlers.
############################################################

1catalina.org.apache.juli.FileHandler.level = FINE
1catalina.org.apache.juli.FileHandler.directory = ${catalina.base}/logs
1catalina.org.apache.juli.FileHandler.prefix = catalina.

2localhost.org.apache.juli.FileHandler.level = FINE
2localhost.org.apache.juli.FileHandler.directory = ${catalina.base}/logs
2localhost.org.apache.juli.FileHandler.prefix = localhost.

3manager.org.apache.juli.FileHandler.level = FINE
3manager.org.apache.juli.FileHandler.directory = ${catalina.base}/logs
3manager.org.apache.juli.FileHandler.prefix = manager.

4admin.org.apache.juli.FileHandler.level = FINE
4admin.org.apache.juli.FileHandler.directory = ${catalina.base}/logs
4admin.org.apache.juli.FileHandler.prefix = admin.

java.util.logging.ConsoleHandler.level = FINE
java.util.logging.ConsoleHandler.formatter = java.util.logging.SimpleFormatter


############################################################
# Facility specific properties.
# Provides extra control for each logger.
############################################################

org.apache.catalina.core.ContainerBase.[Catalina].[localhost].level = INFO
org.apache.catalina.core.ContainerBase.[Catalina].[localhost].handlers = \
   2localhost.org.apache.juli.FileHandler

org.apache.catalina.core.ContainerBase.[Catalina].[localhost].[/manager].level = INFO
org.apache.catalina.core.ContainerBase.[Catalina].[localhost].[/manager].handlers = \
   3manager.org.apache.juli.FileHandler

org.apache.catalina.core.ContainerBase.[Catalina].[localhost].[/admin].level = INFO
org.apache.catalina.core.ContainerBase.[Catalina].[localhost].[/admin].handlers = \
   4admin.org.apache.juli.FileHandler

# For example, set the com.xyz.foo logger to only log SEVERE
# messages:
#org.apache.catalina.startup.ContextConfig.level = FINE
#org.apache.catalina.startup.HostConfig.level = FINE
#org.apache.catalina.session.ManagerBase.level = FINE
Example logging.properties for the servlet-examples web application to be placed in WEB-INF/classes inside the web application: handlers = org.apache.juli.FileHandler, java.util.logging.ConsoleHandler
############################################################
# Handler specific properties.
# Describes specific configuration info for Handlers.
############################################################

org.apache.juli.FileHandler.level = FINE
org.apache.juli.FileHandler.directory = ${catalina.base}/logs
org.apache.juli.FileHandler.prefix = servlet-examples.

java.util.logging.ConsoleHandler.level = FINE
java.util.logging.ConsoleHandler.formatter = java.util.logging.SimpleFormatter
Tomcat cluster + mod_jk + sticky session + session replication
We define a cluster consisting of two instances of Tomcat, coupled with Apache mod_jk Load Balancer and see how to start the session replication and sticky-session. The operating system is Ubuntu 11.10.
Configuration⌘
Set IP address to:
10.0.0.90
Install the required packages:
apt-get install apache2 libapache2-mod-jk2-mod-jk
Create a directory:
/tcluster/instance1
Download Tomcat and extract the contents to this directory.
Apache mod_jk configuration⌘
Create /etc/apache2/workers.properties file:
worker.list=loadbalancer,mystat
worker.worker1.type=ajp13
worker.worker1.host=10.0.0.90
worker.worker1.port=8881
worker.worker1.lbfactor=50
worker.worker1.cachesize=10
worker.worker1.cache_timeout=600
worker.worker1.socket_keepalive=1
worker.worker1.socket_timeout=300
worker.worker2.type=ajp13
worker.worker2.host=10.0.0.90
worker.worker2.port=8882
worker.worker2.lbfactor=50
worker.worker2.cachesize=10
worker.worker2.cache_timeout=600
worker.worker2.socket_keepalive=1
worker.worker2.socket_timeout=300
worker.loadbalancer.type=lb
worker.loadbalancer.sticky_session=true
worker.loadbalancer.balance_workers=worker1,worker2
worker.mystat.type=status
Iportant is the name of the worker (worker1 and worker2), IP address and port.
Add folowing line to /etc/apache2/ports.conf file:
Listen 8585
Change the contents of /etc/apache2/mods-enabled/jk.conf file to:
JKWorkersFile /etc/apache2/workers.properties
JkLogFile /var/log/apache2/mod_jk.log
JkLogLevel debug
JkLogStampFormat "[%a %b %d %H:%M:%S %Y] "
JkOptions +ForwardKeySize +ForwardURICompat -ForwardDirectories
JkRequestLogFormat "%w %V %T"
We add listening on port 8585 to mod_jk:
/etc/apache2/sites-enabled/000-default
<VirtualHost *:8585>
        JkMount /* loadbalancer
        JkMount /jkstatus mystat
</VirtualHost>
Configuring instance number 1⌘
Change the contents of /tcluster/instance1/conf/server.xml file to resemble:
<Connector port="8871" protocol="HTTP/1.1" />
.......
<Connector port="8881" protocol="AJP/1.3" redirectPort="8443" />

....
<Engine name="Catalina" defaultHost="localhost" jvmRoute="worker1">
....
<Cluster className="org.apache.catalina.ha.tcp.SimpleTcpCluster"/>
Uncomment the Connector, add jvmRoute, uncomment the cluster field.
Download http://psi-probe.googlecode.com/files/probe-2.3.3.zip war file and place it in the webapps directory. It is an application that can be useful later.
Add Tomcat users:
/tcluster/instance1/conf/tomcat-users.xml
<tomcat-users>
...
  <role rolename="manager"/>
  <user username="admin" password="jakieshaslo" roles="manager"/>
</tomcat-users>
Go to /tcluster/instance1/webapps directory, modify examples/WEB-INF/web.xml adding distributable:
<web-app ....>
  <distributable/>
</web-app>
Configuring instance number 2⌘
Copy the contents of /tcluster/instance1 file to /tcluster/instance2 file, then change /tcluster/instance2/conf/server.xml file to resemble:
<Server port="8006" shutdown="SHUTDOWN">
...
<Connector port="8872" protocol="HTTP/1.1" />
...
<Connector port="8882" protocol="AJP/1.3" redirectPort="8443" />
....
<Engine name="Catalina" defaultHost="localhost" jvmRoute="worker2">
Testing⌘
Launch all cluster elements:
/etc/init.d/apache start
/tcluster/instance1/bin/startup.sh
/tcluster/instance2/bin/startup.sh
Tests are preferably carried out with application examples. In our case it is:
http://10.0.0.90:8871/examples/servlets/servlet/SessionExample
We have three HTTP ports:
- 8871 - instance number 1
- 8872 - instance number 2
- 8585 - load balancer
When you add a session attribute and change the port from 8871 to 8872 we should have the same SessionID (Sticky-session), and the same attributes (Session replication).
Additional analysis⌘
Panel with information about mod_jk:
http://10.0.0.90:8585/jkstatus
Probe (monitoring tool) is available on a given instance:
http://10.0.0.90:8871/probe
http://10.0.0.90:8872/probe
Loadbalancing - HAProxy⌘
Description⌘
Imagine a situation where we have a site with a fairly large number of hits, all optimizations have already fail, the developers rewrote 50% from SQL queries, database administrators have moved 75% of its contents to the RAM, memcache becomes red from number of GET requests, and service still slowdowns... we seek a solution to balance the traffic across several servers.
Haproxy – as we read in the documentation, it is a TCP/HTTP reverse proxy for high-availability environments, which are able to:
- route HTTP packets based on the information in the cookie
- switch traffic to another server in case of failure
- block the HTTP requests by analyzing the headers
- generate statistics for traffic / services
- modify HTTP headers on the fly (something to add, something to remove, edit something)
- stop accepting new connections without breaking the established
- and much much more
I will describe a simple example of haproxy configuration that will be used to balance the HTTP traffic for the two servers.
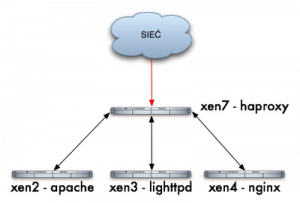
Host Configuration Chart for HAProxy
- xen2 – server with HTTP Apache – 192.168.1.241
- xen3 – server with HTTP Lighttpd – 192.168.1.242
- xen4 – server with HTTP Nginx – 192.168.1.124
- xen7 – server with haproxy – 192.168.1.220
I do not want to describe how to install haproxy because everyone chooses their way, apt-get install haproxy, emerge haproxy, wget haproxy-1.3.17.tar.gz; ./configure; make; make install, itd… having haproxy installed, we can begin the configuration:
- vi /etc/haproxy.cfg
- global – set the type of login, the maximum number of connections, uid, gid, etc…
- default – default settings for all services frontend/backed
- listen – right section which we would be interested in at the moment
Our sample configuration is as follows:
root@xen7:~# cat /etc/haproxy.cfg
global
log 127.0.0.1 local0
log 127.0.0.1 local1 notice
maxconn 4096
user haproxy
group haproxy
defaults
log global
mode http
option httplog
option dontlognull
retries 3
redispatch
maxconn 2000
contimeout 5000
clitimeout 50000
srvtimeout 50000
option httpclose
listen xen 192.168.1.220:80
balance roundrobin
server xen2 192.168.1.241:80
server xen3 192.168.1.242:80
server xen4 192.168.1.125:80
So we have a section listen (xen service name) listening on the IP address from load-balancer, for the purposes of this description, it may be so, but it is best for each service (cluster) to bind to a different IP address. Roundrobin balance means that requests will be allocated sequentially to each node xen2, xen3, xen4 and below is the very definition of nodes, server xen2, 3, 4, and IP addresses to which to redirect requests. Launch daemon (for testing in foreground and debug mode):
root@xen7:~# haproxy -dV -f /etc/haproxy.cfg
Available polling systems :
select : pref=150, test result OK
sepoll : disabled, test result OK
epoll : disabled, test result OK
poll : disabled, test result OK
Total: 4 (1 usable), will use select.
Using select() as the polling mechanism.
In practice, three requests look like this:
sampler:~ jamzed$ lwp-request -Sde xen7|grep Server
Server: lighttpd/1.4.19

sampler:~ jamzed$ lwp-request -Sde xen7|grep Server
Server: nginx/0.5.33
sampler:~ jamzed$ lwp-request -Sde xen7|grep Server
Server: Apache/2.2.8 (Ubuntu)
In console we see the debug:
00000002:xen.accept(0003)=0005 from [192.168.1.182:54865]
00000002:xen.clireq[0005:ffff]: GET / HTTP/1.1
00000002:xen.clihdr[0005:ffff]: TE: deflate,gzip;q=0.3
00000002:xen.clihdr[0005:ffff]: Connection: TE, close
00000002:xen.clihdr[0005:ffff]: Host: xen7
00000002:xen.clihdr[0005:ffff]: User-Agent: lwp-request/5.810
00000002:xen.srvrep[0005:0006]: HTTP/1.1 200 OK
00000002:xen.srvhdr[0005:0006]: Server: nginx/0.5.33
00000002:xen.srvhdr[0005:0006]: Date: Fri, 19 Jun 2009 17:32:57 GMT
00000002:xen.srvhdr[0005:0006]: Content-Type: text/html
00000002:xen.srvhdr[0005:0006]: Content-Length: 151
00000002:xen.srvhdr[0005:0006]: Last-Modified: Wed, 30 Aug 2006 10:39:17 GMT
00000002:xen.srvhdr[0005:0006]: Connection: close
00000002:xen.srvhdr[0005:0006]: Accept-Ranges: bytes
incoming request (GET/HTTP/1.1) - header from the client xen.clihdr and full server response xen.srvhdr.
In this way we were able to quickly make a simple HTTP load-balancer, it is only a fraction of what haproxy can do.
And what are your preferences for balancers? LVS or maybe some hardware?
Managing HTTP traffic based on the requested content/data type⌘
<br\><br\>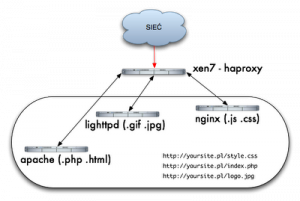 <br\><br\>
We have one service in one domain http://yoursite.com/ and have only one IP address, but you want to serve content based on the requested file from different servers. Apache will cope with documents (.php, .html), Lighttpd lightweight and fast, will cope well with pictures (.gif, .jpg) and nginx we want to use because it is fashionable, for serving other (.js, .css) files, without balancer as haproxy who works in the seventh layer and is able to analyze and perform various actions like a ninja, from movies from my childhood on HTTP headers, it would be a little more complicated. <br\>I assume that we have a running instance of haproxy and other httpd servers, if so, we can play a little bit with configuration. Let me start by explaining a few concepts:<br\>
- frontend – according to the documentation, frontend is our service that accepts connections from users and proxify them further to backend.
- backend – this is the definition of the servers that receive traffic from the balancer and return the results, in our case backends servers are Apache, Lighttpd, Nginx.
- acl – access list, with which we can match a particular request, eg based on src, dst, path_reg, path_end<br\>
Our haproxy configuration will look like this:<br\>
root@xen7:~# cat /etc/haproxy.cfg
global
log 127.0.0.1 local0
log 127.0.0.1 local1 notice
maxconn 4096
user haproxy
group haproxy>
defaults
log global
mode http
option httplog
option dontlognull
retries 3
maxconn 2000
contimeout 5000
clitimeout 50000
srvtimeout 50000
option httpclose
frontend frontend_xen
bind 192.168.1.220:80
option forwardfor
acl acl_apache path_end .jsp .html
acl acl_lighttpd path_end .gif .jpg
acl acl_nginx path_end .css .js
use_backend backend_xen2 if acl_apache
use_backend backend_xen3 if acl_lighttpd
use_backend backend_xen4 if acl_nginx
default_backend backend_xen2
backend backend_xen2
mode http
balance roundrobin
server xen2 192.168.1.241:80 check
backend backend_xen3
mode http
balance roundrobin
server xen3 192.168.1.242:80 check
backend backend_xen4
mode http
balance roundrobin
server xen4 192.168.1.125:80 check
After starting the daemon will conduct a small test:
$ lwp-request -Sde http://xen7/test.jsp | grep Server
Server: Apache/2.2.8 (Ubuntu)
$ lwp-request -Sde http://xen7/test.css | grep Server
Server: nginx/0.5.33
$ lwp-request -Sde http://xen7/test. jpg | grep Server
Server: lighttpd/1.4.19<br\><br\>
Frontend and backend definitions played a key role, but without the ACL we could not tell balancer what traffic where to direct. So we define three ACLs (acl_apache, acl_lighttpd, acl_nginx) where the condition is an extension:
acl acl_apache path_end .jsp .html
acl acl_lighttpd path_end .gif .jpg
acl acl_nginx path_end .css .js
Syntax: acl name_of_acl type_of_match condition
Another very important part of configuration is to indicate balancer where to direct traffic when there is a match to a specific acl:<br\>
use_backend backend_xen2 if acl_apache
use_backend backend_xen3 if acl_lighttpd
use_backend backend_xen4 if acl_nginx
default_backend backend_xen2
If the request matches the ACL acl_apache then direct trafic to backend_xen2, if it fits acl_lighttpd then send to backend_xen3, etc... if it does not match any acl then direct to default acl backend_xen2 backend. It is very easy to implement and gives us great opportunities to manage HTTP Stream. Operating on extensions ia a fraction of the possibilities of this load balancer.<br\><br\>
See Also
- Original version in Polish Tomcat

