Flask
Jump to navigation
Jump to search
Let's start from the basics ⌘
- WSGI
- Purpose of web frameworks
- Available web frameworks
- Place of Flask in the ecosystem
HTTP protocol ⌘
- HTTP/1.1 is defined by RFC 7230 - RFC 7235
- Browsers are the most popular clients
- There are non-browser clients
- Web servers deliver HTML, images, JS, CSS, downloadable files, other content types
HTTP Request ⌘
GET /html/rfc7240 HTTP/1.1
Host: tools.ietf.org
Connection: keep-alive
Pragma: no-cache
Cache-Control: no-cache
Upgrade-Insecure-Requests: 1
User-Agent: Mozilla/5.0 (X11; Linux x86_64) AppleWebKit/537.36 (KHTML, like Gecko) Chrome/54.0.2840.90 Safari/537.36
Accept: text/html,application/xhtml+xml,application/xml;q=0.9,image/webp,*/*;q=0.8
Accept-Encoding: gzip, deflate, sdch, br
Accept-Language: en-US,en;q=0.8,ru;q=0.6
Cookie: __cfduid=d105aee619396e6187d19c60cb032f4b71479467417
HTTP Response ⌘
HTTP/1.1 200 OK
Server: Apache/2.2.22 (Debian)
Last-Modified: Sun, 13 Nov 2016 10:39:20 GMT
ETag: "3cc378-c260-5412c55f8017f;54191604efade"
Accept-Ranges: bytes
Cache-Control: max-age=604800
Expires: Fri, 25 Nov 2016 11:15:54 GMT
Strict-Transport-Security: max-age=3600
Content-Length: 12952
Keep-Alive: timeout=5, max=100
Connection: Keep-Alive
Content-Type: text/html; charset=UTF-8
<other headers omitted for brevity>

<!DOCTYPE html ...
Python web applications ⌘
- WSGI is the interface between the web server and the web application
- Defined in PEP 3333
- The web server calls a callable for every request
- usually "application", but the name is configurable
- It should take two parameters: environ and start_response
- environ is a dict with CGI-like parameters
- also contains the "input" stream used for POST content
- start_response(status, response_headers, exc_info=None) is a callback
- should be used by the application to set the response headers and status code
- should return an iterable which supplies pieces of content
- environ is a dict with CGI-like parameters
- WSGI is not good for websockets!
Simplest Python web application ⌘
(use it with Apache's mod_wsgi, or run from command line)
#!/usr/bin/python2

from wsgiref.simple_server import make_server

def application(environ, start_response):
    status = '200 OK'
    output = 'Hello World!'

    response_headers = [('Content-type', 'text/plain'),
                        ('Content-Length', str(len(output)))]
    start_response(status, response_headers)

    return [output]

if __name__ == "__main__":
    httpd = make_server('', 8000, application)
    httpd.serve_forever()
Exercise: try the raw WSGI ⌘
- Can you print the complete WSGI environment to the browser?
- Can you handle two different URLs? ("Hello world" and environment)
Tasks of a web framework ⌘
- Routing
- Sessions
- Response formatting
- Input validation
- Database communication
- Structuring your application
Available web frameworks ⌘
- Batteries included
- Self-contained and comprehensive
- Examples: Django, TurboGears, web2py
- Best of breed
- Just a thin layer of glue between other libraries
- Examples: Flask, Pyramid, CherryPy, Bottle
Flask as compared to other web frameworks ⌘
- Minimalistic
- Commonly used for APIs and single-page applications
- Traditional web applications with forms are also possible
- Non-MVC by default - does not supply the model layer
- But you can support MVC in your application
- Modern and actively developed
- Relies on established technologies via third-party libraries
- Does not constrain the developer in terms of application architecture
Flask criticisms ⌘
- You are the only architect of your application
- There is no scaffolding
- With great power comes great responsibility
- Many extensions of varying quality and fitness for your purpose
- Sometimes it is easier to code the necessary functionality from scratch
- Sad story about user authentication
Installation ⌘
- Flask is best installed into a virtualenv
virtualenv3 flask-env
cd flask-env
. bin/activate
pip install flask
- Also included as a package in Debian and Ubuntu
- Likely outdated, but still works
- Not recommended unless you absolutely need something that never changes
- Flask supports both Python2 and Python3
Flask is a glue ⌘
- Glues together:
- Werkzeug for HTTP request and response abstractions, as well as interactive debugger
- Jinja2 for templating system
- Itsdangerous for secure cookies (used for sessions)
- Provides:
- Structuring your application into a set of blueprints
- URL routing for blueprints
- Error handling
- Configuration system
Hello World ⌘
- Save as app.py
FLASK_APP=app.py flask run
from flask import Flask

application = Flask(__name__)

@application.route('/')
def index():
    return u'Hello, World!'
Return value of a view function ⌘
- Any of the following:
- A ready-made
flask.Responseobject- Use
make_responseto create it, and then you can post-process it
- Use
- Unicode string
- Will be converted to UTF-8 and served as text/html
- Byte string
- Will be served as text/html
- A tuple of
(response, status, headers)or(response, headers) - A WSGI application, ready to be called
- A ready-made
More routing ⌘
- View functions can take arguments extracted from the URL path
- Example:
@app.route('/news/<slug>')
def news(slug):
    pass  # slug is a string that must not contain slashes
- It is also possible to convert some types like int:
@app.route('/user/<int:userid>')
def show_user(userid):
    pass  # userid is an integer
Acceptable converters ⌘
- General syntax:
<type(args):variable_name>
- string, int, float, uuid: do the obvious thing
- string is just the default converter
- UUIDs stay as strings, but now you can be sure they are valid
- path: string that can contain slashes
- any(foo,bar.baz): accepts only foo, bar or baz
- See Werkzeug documentation for all acceptable parameters
About trailing slashes ⌘
- By default, if you include a trailing slash in your route, Flask will generate a redirect if it sees the same URL without a slash
- To turn off:
app = Flask(__name__)
app.url_map.strict_slashes = False
Flask extensions ⌘
- Extensions add support for common tasks (like connecting to a database)
- Good question: why do we need an extension?
- Answer: boilerplate code that is reduced. E.g. connecting to the database at the beginning of each request.
- Here is an example how to use:
from flask import Flask
from flask_peewee.db import Database

# General pattern:
# 1. Create app
app = Flask(__name__)
# 2. Add configuration specific to the extension
app.config['DATABASE'] = {
    'name': 'example.db',
    'engine': 'peewee.SqliteDatabase',
}
# 3. Instantiate the extension, passing app as a parameter
db = Database(app)
Common extensions ⌘
- Internationalization: Flask-BabelEx
- Dealing with file uploads: Flask-Uploads
- Processing forms: Flask-WTF
- Interfacing with databases: Flask-SQLAlchemy and Flask-Peewee
- Creating REST-like APIs: Flask-RESTful (general case), Flask-Restless (for SQLAlchemy-managed database records)
- Enough for now
Do we need an extension to use something? ⌘
- Good question!
- Case study: Flask-WTF
- WTForms are framework-neutral
- Flask-WTF connects Flask-specific Request class to WTForms
- so WTForms can get the data from there automatically
- Same for file uploads
- Case study: Flask-Peewee
- Written by the same author as the Peewee ORM itself
- The Peewee page documents the recommended way to use Peewee from Flask
- Without the extension!
- All you need is to connect to the database at the beginning of the request and disconnect at the end
- The extension includes some extra functionality, but this extra functionality is deprecated
Templates ⌘
- Templates are incomplete HTML pages, which require post-processing
- values have to be inserted
- pieces such as table rows have to be repeated
- some parts may be displayed conditionally
- there is a hierarchy of inheritance
- Templates live in the
templates directory
Rendering templates ⌘
- At the top of the file:
from flask import render_template
- In the view function:
flask.render_template(template_name_or_list, **context)
context provides extra variables for the template to userequest, g, session and app.config (as config) are always available
Template syntax ⌘
- Jinja2 is the underlying engine
- Write whatever HTML code that is needed - it will be delivered to the browser
- To display a variable, write
{{ variable }}
- attribute access and array element access also works
- some functions (e.g.
url_for) are also available
- Conditional printing:
{% if foo %} ... {% else %} ... {% endif %}
- Looping:
{% for a in b %} ... {{ a }} ... {% endfor %}
- There are macros
- Equivalent of functions in other languages
Macros ⌘
- Best explained via example from Flask-Security
- In _macros.html:
{% macro render_field_with_errors(field) %}
  <p>
    {{ field.label }} {{ field(**kwargs)|safe }}
    {% if field.errors %}
      <ul>
      {% for error in field.errors %}
        <li>{{ error }}</li>
      {% endfor %}
      </ul>
    {% endif %}
  </p>
{% endmacro %}
- In other templates:
{% from "security/_macros.html" import render_field_with_errors %}
{{ render_field_with_errors(login_user_form.email) }}
{{ render_field_with_errors(login_user_form.password) }}
{{ render_field_with_errors(login_user_form.remember) }}
XSS attacks ⌘
- XSS = Cross-Site Scripting
- Interpretation of malicious data as HTML (or, worse, JavaScript) by the browser
- Reflected XSS: data from the query string are interpreted as HTML
- Stored XSS: data from the database are interpreted as HTML
- Typical exploitation scenario: write a "blog post" that also sends
document.cookie to attacker when viewed by admin
- Admin's session is now hijacked!
- Solution: convert data from text to HTML
- Also known as "escaping"
CSRF attacks ⌘
- CSRF = Cross-Site Request Forgery
- A hacker makes a form on his website
- The button says "View my photos"
- The form actually submits to your bank (in hope that you are logged in) and asks it to transfer $100 to the hacker
- WTForms protect you against CSRF
- They include a hidden field in all forms and check it against a cookie
- The hacker can't see or modify the cookie, so can't guess what should be in the hidden field
- Don't forget to render the CSRF protection field:
{{ form.hidden_tag() }}
How variables are escaped ⌘
- Autoescape is on for all templates with .html, .htm, .xml and .xhtml extensions
- With autoescape:
- If it is an object with an
__html__ attribute, then this attribute is called as a function, and the result is used as-is
- Otherwise, the object is converted to unicode and then the result is escaped
- The logic is in the
markupsafe.escape function
- If you already have a piece of HTML in a string, make a
Markup object from it and print it
- Use
unicode for text (that needs escaping) and Markup for HTML fragments (that don't need escaping)
- Alternatively, use this inside the template:
{{ something|safe }}
- Without autoescape, all variables are simply converted to unicode
How to format objects for JavaScript ⌘
var myobj = {{ mydict }}; won't work
- Reason: you want to transform to JSON, not to string with HTML escaping
- This pattern works:
<script><!--
var myobj = {{ mydict|tojson }};
--></script>
- With Flask before 0.10, you also needed to add
|safe at the end
How to provide some variables to all templates ⌘
- Common use cases: user name, cart item count, ...
- They are usually displayed in the navigation bar and thus should be always available
- Solution: write a context processor
@app.context_processor
def inject_user():
    return dict(user=current_user)
Template inheritance ⌘
- You definitely don't want to write the whole HTML for every dynamic page
- There are too many common parts, e.g. the general theme
- Solution: create a base template and extend it
- In the base template, mark the replaceable parts with
{% block foo %}...{% endblock foo %}
- The block tag both denotes a "pluggable hole" and the default content there
- Child templates can override the content
- Sometimes it is a good idea to create blocks both inside and outside certain HTML tags
- So that you can either fill in the tag with the relevant content, or remove it completely
- At the top of the child template, put
{% extends "base.html" %}
- Then, write the overrides for some blocks:
{% block foo %}...{% endblock foo %}
{{ super() }} inside the overridden block gets back the default content
Static files ⌘
- Images, javascript and css files, fonts, ...
- Not processed by Python
- Put them into the
static folder
- Flask will serve them from the /static URL
- But you should really configure your web server to do that instead
- And please don't hard-code
/static in URLs
- Please use
url_for('static', filename='...') instead
Good starting points ⌘
- Minimal:
- Almost nothing: HTML5 Boilerplate
- With a bit of responsive theming: Initializr
- Popular:
- Does not need any introduction: Bootstrap
- There is a Flask-Bootstrap extension that contains some handy functions
- The most advanced responsive CSS framework: Foundation
- This thing evolves very fast, beware!
What about static content like help pages? ⌘
- Help pages cannot be static files
- Navigation bar still contains dynamic content
- Still, a simple solution for them all is wanted
- What you probably want is the Flask-FlatPages extension
- Serves flat pages from Markdown-based static files
- The extension itself only returns a rendered piece of HTML for static content, it's your task to put it into a proper template
- It's a good idea to use a catch-all route, to be added last
@app.route('/<path:path>/')
def page(path):
    page = pages.get_or_404(path)
    template = page.meta.get('template', 'flatpage.html')
    return render_template(template, page=page)
- In a template, you can also access things like
page.title, to be fetched from the YAML block at the top of the file
Returning JSON ⌘
- Use the
jsonify helper
from flask import jsonify

# in a view:
    return jsonify(some_object)
- The helper in this case sets the correct MIME type (
application/json)
Returning redirects ⌘
from flask import redirect

# in a view:
    return redirect(some_url)
Returning custom headers and error pages ⌘
- You can return a Response object from your view
- Make it with
make_response()
- Set
response.headers['...'], mimetype and/or status_code
- Altervatively, return a tuple of
response_string, status, headers from a view function
- Or even
response_string, status_or_headers and Flask will guess what you mean
- To return a pre-designed HTTP error page (e.g. a 404):
abort(404)
- To customize the 404 page:
from flask import render_template

@app.errorhandler(404)
def page_not_found(e):
    return render_template('404.html'), 404
Application context ⌘
- WSGI interface is composable, so there may be more than one app
- This is an advanced use case, we will not do that
- Anyway, in a particular thread at a given moment, at most one is active
- It is sometimes too cumbersome to pass the application everywhere
- Solution: use the
current_app context-local variable
- It does not work if no application is active
with app.app_context(): current_app.do_something()- Pushes the application context down the stack, does something, then removes from the stack
- This is only a problem that manifests itself in code outside view functions
Request context ⌘
- Same story: due to internal redirects, there may be more than one request
- This is also an advanced use case
- Anyway, in a particular thread at a given moment, at most one request is active
- Flask keeps the current request in the
request context-local variable
- It is sometimes useful to create a test request and push it down the stack
What's in the request object ⌘
method: the HTTP method, e.g. "GET" or "POST"args: stuff after the question mark in the URL, parsed into something like a dictionaryform: same for POST variables (multipart/form-data)
- These two are also combined into
values
files: files uploaded via the formcookies: incoming cookiesheaders: HTTP headersget_json(): here is how to convert the incoming application/json data into Python objects
On duplicate parameters: MultiDict ⌘
- This is valid
request.args['foo'] takes the first value, i.e. bar- To get them all as a list, use
request.args.getlist('foo')
- No foo? Get an empty list
request.args['does_not_exist'] still raises a KeyError
- A nice feature is that you can do type conversions like this:
request.args.get('i', type=int)
- A default value can also be passed
Validating requests ⌘
- Of course it is possible to validate
request.form or request.args by hand
- A better alternative is to use a form validation library
- Common choice: WTForms, via the Flask-WTF extension
- Tasks simplified by WTForms:
- Conversion between strings and native data types, both ways
- E.g. sometimes you need to display something in a form for editing
- Display of common HTML5 input-like tags
- Arbitrary per-field or whole-form validation
- Displaying useful error messages near the invalid field
Flask-WTF boilerplate ⌘
from flask_wtf import FlaskForm
from wtforms.fields import *
from wtforms.validators import *

# Some people prefer this:
# from flask_wtf import FlaskForm as BaseForm

# Then use FlaskForm (or BaseForm) as a base class for your forms, e.g.:

class MessageForm(FlaskForm):
    recipients = StringField('Recipients',
                             validators=[InputRequired(message='No recipients provided')])
    message = TextAreaField('Your message',
                             validators=[InputRequired(message='Message cannot be empty')])
    submit = SubmitField('Submit')
WTForms field types ⌘
- Obvious: StringField, IntegerField, FloatField (rarely used), DecimalField
- These render as
<input type="text">
- On form submission, they coerce the string into the correct type
- Special rendering but nothing else: HiddenField, PasswordField, TextAreaField
- Choice-related: SelectField, RadioField, SelectMultipleField
- They accept the
choice=... keyword argument, and render as the corresponding HTML5 tags
- There are also FileField, DateField, DateTimeField, SubmitField, and others
- You can create custom fields, too
- Out of scope for this training
Typical structure of a view with a form ⌘
- Typical usage pattern with Flask-WTF:
@app.route('/submit', methods=('GET', 'POST'))
def submit():
    form = MyForm()
    if form.validate_on_submit():
        do_something()
        return redirect('/success')
    return render_template('submit.html', form=form)
- The
validate_on_submit method comes from Flask-WTF, not wtforms!
- If you need to pass form data from sources other than
request.form
- Pass the dictionary as an argument to
form.validate
- Maybe disable CSRF validation via keyword argument:
meta={'csrf': False}
- If you want to edit some ORM object, pass it as
obj keyword parameter to the form constructor
- It will be checked for matching attributes if there is nothing POSTed
How WTForms validates the form ⌘
- It calls all field validators until one raises StopValidation
- This includes validators passed during field construction, and the
validate_fieldname() method on the form
- If you need form-level validation, override the
validate method
- The real question without a good answer is where to put the resulting errors
How to get the data and errors from the form ⌘
- Many ways to access validated data:
form.my_field.data - None if there were errorsform.data - expensive, generated each time you access itform.populate_obj(some_object) - may be useful with ORMs
- And get errors:
form.my_field.errors - this is a list of messagesform.errors - this is a dictionary which contains only fields with errors (name => list of messages)
WTForms built-in validators ⌘
- All validators take a message as their first argument
- Optional: put it first if an empty field should not be checked by other validators
- InputRequired: fails if the user entered nothing
- DataRequired: fails if the user did not enter anything that can be coerced into a truthy value of the target type
- Almost never useful - bans 0, 0.0 and similar values for integer and decimal fields
- Length, NumberRange
- Regexp, Email, URL
- AnyOf, NoneOf
- There are others
- You can create custom validators
- Look at the source, create classes in the same way, raise ValidationError when needed
How to display form fields ⌘
- Just mention them like this:
{{ form.myfield }}
- Or, call them to set additional HTML attributes:
{{ form.myfield(class_="fancy") }}
- There is also a pre-made label for each field:
{{ form.myfield.label }}
- This is for the use case when the label is near the field's input tag
- The other possibility offered by the HTML standard is to make the input a subelement of the label
- WTForms doesn't do this, but you can hand-code it
- You should be able to display errors based on
form.myfield.errors
- The form itself does not have an
__html__ method
- But you can iterate over it to get the fields
- Don't forget
{{ form.hidden_tag() }} (comes from Flask-WTF, for CSRF protection)
Dealing with file uploads ⌘
- Werkzeug has
request.files which is a MultiDict of FileStorage objects
- You can use it directly
- Useful properties:
filename, content_type, content_length
- You can call a
save method to save it to a file
- Or you can access it via the
stream property (either in-memory representation or a temporary file
- WTForms don't handle file uploads
- Flask-WTF has FileField
form.my_file_field.data reefers to Werkzeug's FileStorage
File upload security ⌘
- Hackers can provide any filename
- Including
../../../../../tmp/hacked.txt!
- Or
evil.jpg.php
- Be careful
- Whitelist allowed mime types and extensions
- Check filenames
werkzeug.utils.secure_filename strips out the bad stuff but can return an empty or non-unique filename
- Always rename the uploaded file to something safe and unique
- Limit the maximum file size
- The Flask-Upload extension can help you with these tasks
- It also supports serving uploaded files
Configuration system ⌘
app.config looks like a dictionary- You can also update it from various sources
app.config.from_object
- Imports the module provided as an argument, takes everything that has all-upsrcase names
app.config.from_envvar
- Loads the file with the name provided by the argument
- it should contain lines like
DEBUG = False
Mandatory configuration ⌘
- SECRET_KEY = 'some long string that nobody can guess'
- Used for secure cookies in sessions
Handling non-GET requests ⌘
- By default,
@app.route(...) registers only the handler for GET requests
- Add the
methods=("GET", "POST") keyword argument to override the default
- GET implies HEAD
- OPTIONS is always implied and, if necessary, routed to the internal handler
Session ⌘
- A way to store some data between requests made by the same client
- Just use
flask.session as a dict that can only hold serializable values
- Flask session is, by default, based on signed cookies
- Cookies are signed using the secret key, so keep it non-guessable
- Limitations:
- You cannot store secrets there (a client can do URL-safe base64 decoding and gzip decompression to get the data)
- You cannot store too much data
Flashing messages ⌘
- Flashing a message means storing it at the end of the request so that it can be displayed at the next request
- Here is how to flash a message:
from flask import flash

...
# in a view function
flash('A message', 'error')
- To get flashed messages, use the
get_flashed_messages() function in a template. Something like this:
{% with messages = get_flashed_messages(with_categories=True) %}
  {% if messages %}
    <ul class=flashes>
    {% for category, message in messages %}
      <li class="{{ category }}">{{ message }}</li>
    {% endfor %}
    </ul>
  {% endif %}
{% endwith %}
- The names of message severities do not match those used by Bootstrap
- Flask-Bootstrap contains an utility to display them, too:
{% import "bootstrap/utils.html" as utils %}
{% with messages = get_flashed_messages(with_categories=True) %}
  {% if messages %}
    <div class="row">
      <div class="col-md-12">
        {{ utils.flashed_messages(messages) }}
      </div>
    </div>
  {% endif %}
{% endwith %}
How to structure a Flask application ⌘
- Ugly and fragile circular imports are a common issue
- The official documentation dismisses them as something acceptable, but in fact they are avoidable
- In app.py, create the application and populate its config
- Do nothing else
- In models.py, initialize the ORM-related extension and describe models
- You will need to import app, or use init_app() later
- If you want to use Flask-Admin for the administrative interface, do everything related in admin.py
- You will need to import app and all models
- In forms.py, describe the forms
- A common way to do so is to use wtforms via Flask-WTF
- As with any Flask extension, you need to import the app or use init_app() later
- Some forms will be based on models, so you need to import them
- In other files, do other things needed by your application
- Collect everything in main.py, initialize all extensions
- And then point "flask run" to it
Signals ⌘
- Signals are a way to decouple policy from mechanism
- Policy: what should be done when a user registers?
- Mechanism: what does it mean that the user registered?
- Signals are available when the blinker library is installed
import blinker
signals = blinker.Namespace()
user_registered = signals.signal("user-registered")
- How to emit:
    user_registered.send(app._get_current_object(),
                         user=user, confirm_token=token)
- How to subscribe:
def my_callback(sender, user, confirm_token, **extra):
    pass

user_registered.connect(my_callback)
- Flask has some built-in signals like template_rendered, request_started
- They are useful for profiling and tracing
Decorator-based hooks ⌘
- Flask has an ability to register functions that run at certain stages of request processing
- Unlike signals, they can modify the request or response, or even prevent the normal view function from running
- See after_request(), before_first_request(), before_request(), errorhandler(), teardown_appcontext(), teardown_request()
Blueprints ⌘
- Logical parts of the app
- Can contain view functions, templates, static files
- If you think "let's convert my views.py file into a package", better think about blueprints
from flask import Blueprint

bp = Blueprint('captcha', __name__)  # and possibly other keyword arguments

# Then use it like an app. E.g.:
@bp.route('/captcha.jpg')
def captcha():
    pass

# Any setup code goes here
def bp_setup(state):
    app = state.app
    blueprint = state.blueprint
    # ...

bp.record_once(bp_setup)
- You have to register your blueprints on an app
from captcha import bp as captcha_bp

app.register_blueprint(captcha_bp)
MVC ⌘
- Model, View, Controller
- A common pattern for application design
- Or maybe just a buzzword that only indicates that Models, Views and Controllers exist, with some separation of concerns
- Flask is not an MVC framework, but your application can still be based on this pattern
- Wikipedia's articles on MVC, MVP (Model, View, Presenter) and similar software architectures are written with classical GUI-based software in mind
- The English Wikipedia MVC interaction diagram (below) doesn't apply to web frameworks
- Non-English editions of Wikipedia even have different interaction diagrams!
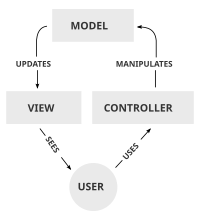


MVC in web frameworks: Model ⌘
- Model:
- Has business-domain knowledge (both logic and data)
- Provides API that can be used by the controller to read state and submit updates
- Does not contain presentation logic
- Note: in many other ORMs and web frameworks, a model is only an abstraction over data storage (such as database) and validation mechanism. I.e. there is no accent on the API that makes sense in the business problem domain.
- Good article on the issue, by Julien Pauli
- Even the data you get from web services can be expressed as a Model!
- With Flask, the model layer is to be supplied by you, the developer
- You can base it on SQLAlchemy for data persistence
MVC in web frameworks: View ⌘
- View:
- Presents data to the user
- Usually as HTML
- Data can come from the model and from the controller
- Templates!
MVC in web frameworks: Controller ⌘
- Controller:
- Reacts to user actions (in the form of HTTP requests)
- Decides what to do
- Updates model state, or queries state from the model
- Asks the appropriate view to render itself, supplies the necessary data
- Frequently advocated approach: fat models, skinny controllers
- View functions!
Database topics ⌘
- Making SQL queries from Python
- Ways to avoid SQL injection
- SQLAlchemy vs Peewee
- Defining tables
- Selecting data
- Joins
- Inserting, updating and deleting data
- Transactions
Making SQL queries from Python ⌘
- DB API 2.0 specification
- A standard which database-interfacing modules follow
- You can connect to the database, issue queries, get results
- There is a mechanism for using prepared queries and substitution of parameters
import sqlite3
db = sqlite3.connect('test.sqlite')
cur = db.cursor()
cur.execute('SELECT id, dname FROM dept WHERE loc = ?', ('Berlin',))
rows = list(cur)
db.commit()
SQL injection ⌘
- A serious vulnerability
- Appears when an application constructs SQL query dynamically by concatenating fixed strings with attacker-provided data
- By using special characters (like ') inside their data, attacker can trick SQL database to interpret their data as additional SQL queries
- Can bypass access restrictions, exfiltrate data, make unauthorized changes
How to avoid SQL injection ⌘
- Answer from 1990s: forbid bad characters in user input
- Bad: how would you register Catherine Anne O'Hara as a user?
- Answer from 2000s: "escape" user data before concatenation so that special characters are properly interpreted as data, not as SQL syntax
- Bad: too hard to keep track what's escaped and what's not
- Too easy to forget to escape data
- Answer from 2010s: don't build queries by concatenating fixed strings with user-provided data
- "Prepared Statement" APIs exist that clearly separate SQL from external data in queries
- Usually (but not always), they stay separate on the wire. If the database doesn't provide this option, the client library will escape and concatenate strings as necessary.
How to avoid SQL injection, once again ⌘
Don't:
cur.execute("SELECT id, dname FROM dept WHERE loc = '%s'" % (city,))
Do:
cur.execute('SELECT id, dname FROM dept WHERE loc = ?', (city,))
Or just let your favorite ORM generate queries for you.
Why we need ORMs ⌘
- SQLite on dev, PostgreSQL in production
- Slight differences in SQL syntax
- E.g. here is how to create a suitable
id field in SQL:
- SQLite:
id INTEGER PRIMARY KEY (autoincrement is optional, and the AUTOINCREMENT keyword, if present, must be placed last)
- MySQL:
id INTEGER AUTO_INCREMENT PRIMARY KEY
- PostgreSQL:
id SERIAL PRIMARY KEY
- Construct queries programmatically
- Important if a user should be able to e.g. filter or sort records on ultiple criteria
- "IN" queries are just cumbersome with raw DB API
- Access result rows in object-oriented way
- There is an impedance mismatch between object-oriented and relational world
- Conversion is trivial for integers and strings, but not for relations
Relations ⌘
- 1:1: don't do this, just put both sides into the same table
- If you must (because of physical storage considerations), just use the same primary key and write helpers or joins to retrieve the other side
- 1:many: add a non-NULL reference field to the "many" side that references the "1" side
- ORM will convert this into a maybe-lazily-loaded collection on "1:" side and to the link to the other object on the ":many" side
- 1:0-1: add a non-NULL unique reference field to the "0-1" side that references the "1" side
- many:many: use an intermediate table that has two non-NULL fields that reference both sides
- ORM will represent the other side as a collection
Normalization ⌘
- Goal: make sure that the very structure of the database makes it impossible to have inconsistent data
- If you don't update your data, denormalization may be OK
- Traditional theory of relational databases doesn't really accept IDs
- Always think "if there is no ID, what else could serve as a key?"
- Useful rule of thumb, approximately equivalent to BCNF (also known as 3.5NF):
- Each attribute must provide a fact about the key (1NF), the whole key (2NF), and nothing but the key (BCNF).
- Both 2NF and 3NF are concerned equally with all candidate keys of a table and not just any one key.
- So help me Codd!
Common ORMS ⌘
- SQLAlchemy: the most powerful one
- Adopts the Unit of Work pattern
- The application sometimes becomes a bit too verbose
- Peewee: the lightweight one
- Adopts the Active Record pattern
- Much easier to learn, but has limitations
- There are others but they are not commonly used with Flask
How to learn an ORM ⌘
- Describing tables
- Migration tools
- Selecting by primary key
- Selecting by other attributes
- Joining tables
- Inserting, updating and deleting records
- Mass updates and deletes
- Data validation
- Transactions
Flask-SQLAlchemy: boilerplate ⌘
from flask import Flask
from flask_sqlalchemy import SQLAlchemy

app = Flask(__name__)
app.config['SQLALCHEMY_DATABASE_URI'] = 'sqlite:////tmp/test.db'
db = SQLAlchemy(app)

# Now use db.Model as a base class for your models
# also db.* contains everything from sqlalchemy and sqlalchemy.orm
How to describe database tables with SQLAlchemy ⌘
class User(db.Model):
    id = db.Column(db.Integer, primary_key=True)
    # ...

class Article(db.Model):
    id = db.Column(db.Integer, primary_key=True)
    text = db.Column(db.Text)
    date = db.Column(db.DateTime)
    author_id = db.Column(db.Integer, db.ForeignKey('user.id'))
    author = db.relationship('User', backref='articles')
SQLAlchemy session ⌘
- With SQLAlchemy, you need to construct relationships between objects by setting the attributes that were declared as db.relationship, not by manipulating IDs
- The objects stay in the session (
db.session)
- Newly constructed objects have to be added there first
- When you flush the session, the objects are saved to the database and get the IDs
- Other database clients will see your records when you commit the transaction
- flush != commit. Session flushing and transactions are different concepts
>>> db.create_all()
>>> u = User()
>>> u.id
>>> a = Article()
>>> a.text = 'Something new'
>>> a.author = u
>>> db.session.add(u)
>>> db.session.add(a)
>>> db.session.flush()
>>> u.id
1
>>> a.id
1
>>> a.author_id
1
>>> db.session.commit()
Querying the database ⌘
>>> # get by id
>>> a = Article.query.get(1)
>>> a.text
'Something new'
>>> # get by something else - note the first() to get only one item instead of a collection
>>> b = Article.query.filter(Article.date == None).first()
>>> b.id
1
Performing joins ⌘
- Here is how:
Article.query.join(User).filter(...)
- The result is still a collection of Articles
- The benefit is that you can filter on User-related conditions
- SQLAlchemy will figure out the join condition automatically in most cases
Aggregation ⌘
- Counting records:
Article.query.filter(...).count()
- Getting min, max, sum, ...:
from sqlalchemy.sql import func
db.session.query(func.max(Article.date)).filter(...).scalar()
- There are special constructions for grouping, too
- It is hard to come up with a query that cannot be expressed using SQLAlchemy
- But this is not a course on SQLAlchemy, so please learn these advanced topics yourself when needed
Updating and deleting records ⌘
- If you have the record:
db.session.delete(record) (or update fields as needed) and then db.session.flush()
- If you want mass-update or mass-delete:
Article.query.filter(...).delete() or .update(...)- This bypasses the session, use with care
Peewee ORM: boilerplate with Flask-Peewee ⌘
from flask import Flask
from flask_peewee.db import Database

app = Flask(__name__)

app.config['DATABASE'] = {
    'name': '/tmp/test.db',
    'engine': 'peewee.SqliteDatabase',
}

db = Database(app)

# Now use db.Model as a base class for your models
Peewee ORM: raw boilerplate ⌘
from flask import Flask
from peewee import *

app = Flask(__name__)
database = SqliteDatabase('/tmp/test.db')

# This hook ensures that a connection is opened to handle any queries
# generated by the request.
@app.before_request
def _db_connect():
    database.connect()

# This hook ensures that the connection is closed when we've finished
# processing the request.
@app.teardown_request
def _db_close(exc):
    if not database.is_closed():
        database.close()

# A common pattern is to create a base model class
# so that all models know that they belong to this database
class BaseModel(Model):
    class Meta:
        database = database
How to describe database tables with Peewee ⌘
class User(db.Model):
    # With Peewee, id is implicit
    ...
    pass

class Article(db.Model):
    text = TextField()
    date = DateTimeField(default=datetime.datetime.now)
    # Note: you don't have to describe the column and the relationship separately
    author = ForeignKeyField(User, related_name='articles')
Active Record pattern ⌘
- Peewee does not use Unit of Work and does not have a Session
- Instead, each model object knows (via Meta) which database it belongs to
- To persist it, call
.save() on it
- Unlike SQLAlchemy, you have to track dependencies manually
- By default, an
INSERT will be generated if the id is not set, and an UPDATE if id is known
- To delete it, call
.delete_instance() on it
- Don't confuse with
.delete which constructs a query which deletes all records matching a condition from the table!
- By default, autocommit is True
Querying the database ⌘
>>> # get by id
>>> a = Article.get(id=1)
>>> a.text
'Something new'
>>> # get by something else - note the first() to get only one item instead of a collection
>>> b = Article.select().where(Article.date == None).first()
>>> b.id
1
Joins ⌘
- With Peewee, joins are as easy as with SQLAlchemy
- And they work exactly the same
Article.select().join(User).where(...)
Aggregation ⌘
- Counting records:
User.select().count()
- Finding minimum or maximum:
Article.select(fn.max(Article.date)).where(...).scalar()
Database evolution ⌘
- It's a fact that fields and tables are added, removed, or otherwise modified
- One can talk about schema migrations and data migrations
- You can do it by hand, or by a script (i.e. create a migration)
- SQLAlchemy: no built-in support for migrations
- Frequently used with Alembic, maybe via Flask-Migrate
- Schema migrations are auto-generated, but can be edited
- Data migrations are possible but only documented in external blogs
- Alternative: SQLAlchemy-migrate
- Used e.g. in OpenStack
- No Flask extension
- Peewee: some built-in schema migrations but no built-in tracking of what has been applied
- No clear winner among tracker tools
- peewee-db-evolve is an interesting idea: fully automated schema migrations that introspect the current schema and diff it against the models
- No Flask extension, and extension is not needed
- Migration tools don't really work with SQLite due to incomplete support for ALTER TABLE
Model-based forms ⌘
- Sometimes it is a good idea to base a form on a set of fields from a model, plus or minus some exceptions
- The most secure practice is to whitelist fields
- For SQLAlchemy models, use WTForms-Alchemy
from wtforms_alchemy import ModelForm
from myproject.myapp.models import User

class UserForm(ModelForm):
    class Meta:
        model = User
        only = ['first_name', 'last_name', 'email']
- Peewee support is provided via the wtfpeewee package
from wtfpeewee.orm import model_form
from myproject.myapp.models import User
UserForm = model_form(User, only=('first_name', 'last_name', 'email'))
Admin interface ⌘
- Smart idea: create a model_form from each model, and expose via dynamically-generated views
- That's what Flask-Admin does
- It also has a component for managing files on disk
- It's your responsibility to properly restrict access to the admin interface
- Boilerplate (without any security):
from flask import Flask
from flask_admin import Admin

from flask_admin.contrib.sqla import ModelView
# or: from flask_admin.contrib.peewee import ModelView

app = Flask(__name__)

admin = Admin(app)

admin.add_view(ModelView(User, db.session))
admin.add_view(ModelView(Article, db.session))
# Peewee: there is no session
- For authentication, subclass
ModelView and define the is_accessible method which should return a boolean
- Flask-Login
- The most basic one
- Tracks the currently logged-in user, stores it in the session
- Allows to protect some views with the
@login_required decorator
- You have to implement the login procedure (e.g. the password check against your models) yourself
- It's not that difficult, and the result is likely to match your business requirements
- Flask-Security
- Implements login, registration, password change, password recovery via email
- In a way that may or may not be suitable for you - but allows some customization
- Follows best practice regarding password storage
- Supports both SQLAlchemy and Peewee
- Flask-User
- Was written because the author had found Flask-Security too difficult to customize
- Supports only SQLAlchemy out of the box
- There are also packages for the use case where the authentication data is not stored in models
- Flask-SimpleLDAP, Flask-LDAP-Login, Flask-CAS, Flask-Social, ...
What's wrong with Flask-Security ⌘
- User enumeration vulnerability open since 2015
- Insists too much on users having emails
- Possible, but non-trivial, to overcome
- Implements a policy of sending emails on events like password change
- This is configurable via
app.config, with the default being on
- It would have been better if Flask-Security just provided a signal that it triggers on such events
- Possibly implements something else that doesn't match your requirements
- Test it thoroughly
How to protect the entire application with login ⌘
- Look how the
login_required decorator in Flask-login works to understand the code below
@app.before_request
def check_valid_login():
    login_valid = current_user.is_authenticated
    page_is_public = request.endpoint and request.endpoint in ('static', 'security.login')
    if not (login_valid or page_is_public):
        return current_app.login_manager.unauthorized()
Optimizing static assets ⌘
- Client-side caching is an important loading-time optimization
- Client is told to cache all JS and CS files by setting the Expires: header to point far into the future
- Problem: what if the file changes?
- Solution: don't reuse the URL
- Include some version number in it
- See how Flask-Bootstrap does it
- Concatenate and minify your JS and CSS files
- This avoids issuing multiple requests
- Flask-Assets can do it for you
Sending email ⌘
- Of course you can use
email and smtplib modules manually
- Common tasks arise then
- Central configuration of SMTP server credentials
- Suppressing emails centrally during unit tests or on developers' machines
- Solution: Flask-Mail
Further reading ⌘